Demo
Click on the red dot, then move it along the circle:


Adding the Tiny Circleslider to the Blog
In order to make it work, first task is to add the javascript jQuery library in our template:
Step 1. From your Blogger's dashboard, select your blog
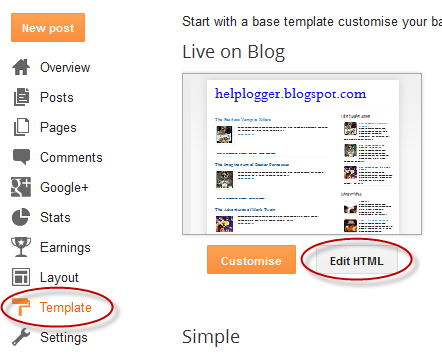
Step 2. Go to Template and click the Edit HTML button:
Step 3. Click anywhere on the code area and search by using the CTRL + F keys for this tag:
</head>Step 4. Just above the </head> tag, add the following scripts:
<script src='http://ajax.googleapis.com/ajax/libs/jquery/1.10.2/jquery.min.js' type='text/javascript'/>Step 5. We need to add the CSS styles above the </head> tag, as well:
<script src="http://helplogger.googlecode.com/svn/trunk/jquery.tinycircleslider.min.js"/>
<style>
#rotatescroll { /* is the rectangle container */
height: 300px;
position: relative;
width: 300px;
}
#rotatescroll .viewport { /* is the rectangle containing the images */
height: 300px;
position: relative;
margin: 0 auto;
overflow: hidden;
width: 300px
}
#rotatescroll .overview { /* is the list with the images */
left: 0;
list-style: none;
margin: 0;
padding: 0;
position: absolute;
top: 0;
}
#rotatescroll .overview li { /* each item of the list */
float: left;
height: 300px;
position: relative;
width: 300px;
}
#rotatescroll .overlay { /* the image with the circle overlapping the list */
background: transparent url(https://blogger.googleusercontent.com/img/b/R29vZ2xl/AVvXsEh5E0mFH2LioW-Z93eUaoxayOcAk5p5MtTeaRXKm57oR6rxSabqgmw28OQENJtrzYSPXGKvmG4L1GLBPdUfBs_NQsNFaZM210cVdVjvl5bg25FkCycb2nnmBKUroO-mB_9wcWgPS02CkiNJ/s1600/bg-rotatescroll.png) no-repeat 0 0;
height: 300px;
left: 0;
position: absolute;
top: 0;
width:300px;
}
#rotatescroll .thumb { /* the red circle that allows us to navigate */
background:transparent url(https://blogger.googleusercontent.com/img/b/R29vZ2xl/AVvXsEjn9C_lSZRMQ3WhE0aX8Af84nSjo_dywq0rVMld4KPbFjp8xZed3UzDkvaqaDYJc5qzeNqwCjd6S5L016YiSQeRwH92UfbN-WbWhS194OExI-m1qjf5oT9IFVdDfOZtjOqeARTWrDE8bZn3/s1600/bg-thumb.png) no-repeat 0 0;
cursor: pointer;
height: 26px;
left: 137px;
position: absolute;
top: -3px;
width: 26px;
z-index: 200;
}
#rotatescroll .dot { /* the points indicating the position of each image */
background: transparent url(https://blogger.googleusercontent.com/img/b/R29vZ2xl/AVvXsEiM38uWDeKATaKwJsqqkFP4laQzbjqk7GMHzEZYqw1mS2v31QR_CRxfvuQptPeykUdZigODdy-nzM34doyGWarFn8Xb8JGEQr1Pqaepdc8iu0Qa-CNgg1nblkVKWdZtYqcahX958Hg2DoKw/s1600/bg-dot.png) no-repeat 0 0;
display: none;
height: 12px;
left: 155px;
position: absolute;
top: 3px;
width: 12px;
z-index: 100;
}
#rotatescroll .dot span { /* are hidden by default */
display: none;
}
</style>
 |
| Screenshot |
Now here's the HTML that has to be added to where we want to display the carousel.
To add it inside a post the click the New post on the left side of your dashboard and paste the code below by going to the HTML tab:
<div id="rotatescroll">
<div class="viewport">
<ul class="overview">
<li><img src="imageURL" /></li>
<li><img src="imageURL" /></li>
<li><img src="imageURL" /></li>
<li><img src="imageURL" /></li>
<li><img src="imageURL" /></li>
</ul>
</div>
<div class="dot"></div>
<div class="overlay"></div>
<div class="thumb"></div>
</div>
<script type="text/javascript">
$(document).ready(function(){ $('#rotatescroll').tinycircleslider(); });
$('#rotatescroll').tinycircleslider({ interval: true, snaptodots: true });
</script>
 |
| Screenshot |
Note: replace the imageURL text with the URL of your images
and here are other options that could be added, separated by commas:
snaptodots - false if you want no dots to be shown when dragging them
hidedots - false if you want to display the internal points (by default is true)
intervaltime - is the time between slides (by default 3500)
radius - defines the size of the circle (by default is 140)
If you want to add it to your sidebar, simply go to Layout, click the Add a Gadget link > from the popup window, choose HTML/Javascript and paste the code inside the empty box.
0 comments:
Post a Comment