Showing posts with label Comments. Show all posts

Add a Cool Style to Blogger Threaded/Nested Comments

Posted On // 1 comment
If you need a fresh style to the threaded comments of a standard Blogger template, here's a simple CSS that will help you to apply a different background, make your avatars rounded, add a border with rounded corners and a triangle which is actually an HTML entity to get that speech bubble look on your comments.

You can see a demo here.

To have this style in your comments, all you need to do is to paste the below code inside the CSS part of the template, which is between <b:skin> and </b:skin>

Styling Simple Nested Comments with CSS


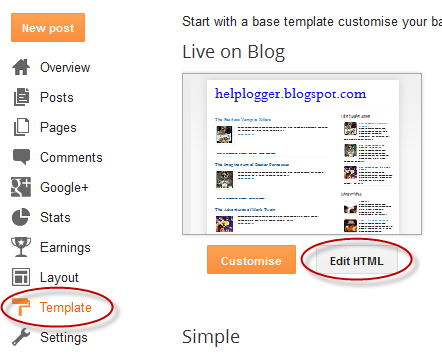
Step 1. From the Blogger Dashboard, go to Template and press the Edit HTML button

Step 2. Click anywhere inside the code area and press the CTRL + F keys to open the search box:


Step 3. Paste or type the </b:skin> tag inside the search box and hit Enter. After you found the highlighted code, click on the arrow next to it to expand the code, then search it again by hitting Enter.

Step 4. Just above </b:skin> add this CSS:
.comments .comment-block {
background: #F9F9F9;
color: #555;
box-shadow: 0 4px 10px #EEEEEE;
position: relative;
margin-top: 10px;
margin-left: 60px;
padding: 10px;
border: 4px solid #EEEEEE !important;
border-radius:10px;
font: 1.190em/1.2 Cambria,Georgia,sans-serif;
}
.comment-thread li .comment-block:before {
position: absolute;
display: block;
left: -26px;
color: #EEEEEE;
content: "\25C4";
font-size: 30px;
}
.comments .avatar-image-container {
width: 60px;
height: 60px;
max-height: 60px;
margin:0px 0px 0 -28px;
padding: 0px;
border: 7px solid #EEEEEE;
border-radius:60px;
}
.comments .avatar-image-container img {
overflow:hidden;
width: 60px;
height: 60px;
max-width: 60px;
border:0 !important;
border-radius:60px;
}
.comments .comment-thread.inline-thread {
background: none;
}
.comments .continue {
border-top: 0px solid transparent;
}
.comments .comments-content .datetime {
float: right;
font-size: 11px;
}
.comments .comments-content .user a{
font-size: 15px;
color: #498EC9;
}
.comments .comments-content .datetime a:hover{
color: #777;
text-decoration: none;
}
.comments .comments-content .comment:first-child {
padding-top: 0px;
}
.comments .comments-content .comment {
margin-bottom: 0px;
padding-bottom: 0px;
}
.comments .continue a {
padding: 0px;
}
.comments .comments-content .icon.blog-author {
background-image: none;
}

How to Change Blogger Threaded Comments Background, Border and Colors


- replace the #F9F9F9 value to change the background color of the comments;
- #555 to change the text comments color;
- #EEEEEE to change the color of the shadow around comments;
- 4px solid #EEEEEE to change the border width (4px), style (solid) and color (#EEEEEE) around comments;
- 1.190em to change the comments font size;
- to change the arrow color, replace the #EEEEEE value from color: #EEEEEE;
- to change the border width (7px), style (solid) and color (#EEEEEE) around avatars, modify this part: 7px solid #EEEEEE;
- to change the avatars' size and roundedness, change the 60px value;

Here is a tool from that may help to pick your favorite color:
Color Code Generator (after you choose a color, copy the hex value)
Step 5. Finally, click on the Save template button... and you're done!
[Read more]

Top Commentators Widget with Avatars for Blogger

Posted On // Leave a Comment
The commentators are a fundamental part of any blog, since they are the ones that give life to the blog, opening and replying to discussions which leads to more activity in the posts.
how to add top commenters widget to blogger

It is therefore very important to know which are the most active users of your blog, the users who leave more comments, and for this reason, today I present a great method to display a list with the top commentators.

The gadget will look something like this:

add top commentators widget to blogger

This Top Commentators gadget comes with user's avatar and is done with JavaScript.

How to Add the Top Commenters Gadget to Blogger


1. To add this gadget, you have to go to Layout, click on Add a Gadget link.

2. Select the HTML/JavaScript gadget and copy/paste within the empty box the following code:
<style type="text/css">
.top-commentators {
margin: 3px 0;
border-bottom: 1px dotted #ccc;
}
.avatar-top-commentators {
vertical-align:middle;
border-radius: 30px;
}
.top-commentators .commenter-link-name {
padding-left:0;
}
</style>
<script type="text/javascript">
var maxTopCommenters = 8; 
var minComments = 1;     
var numDays = 0;         
var excludeMe = true;    
var excludeUsers = ["Anonymous", "someotherusertoexclude"]; 
var maxUserNameLength = 42;
//
var txtTopLine = '<b>[#].</b> [image] [user] ([count])';
var txtNoTopCommenters = 'No top commentators at this time.';
var txtAnonymous = '';
//
var sizeAvatar = 33;
var cropAvatar = true;
//
var urlNoAvatar = "https://blogger.googleusercontent.com/img/b/R29vZ2xl/AVvXsEh6bA1EBwI3Emc6m1ygHRAcQEhA7vwgU9jNpbbZudLfwK_H22ESCRoUQZyYamxuqDvPOeq8H-BNd2EoF_59y5WRcSeJJJwqE9vcjNN4gebMCXB_iHJquifsAVXyoYK6UY7dWtHBpqaN12YU/s1600/avatar_blue_m_96.png" + sizeAvatar;
var urlAnoAvatar = 'https://blogger.googleusercontent.com/img/b/R29vZ2xl/AVvXsEjjlj251bTRE7BA5RHTFzFFtD1bvTFI2Hg97sB3rByanh59Kno3sux2PZQHAA_RXJGkArxOqgGU3czJXuLpCnr037J5z3TcNIISEHurMed7Akmdy0vcDEhdAI1vfRQaV2zdoxlW4ug33jkb/s1600/avatar1.png' + sizeAvatar;
var urlMyProfile = '';
var urlMyAvatar = '';
if(!Array.indexOf) {
 Array.prototype.indexOf=function(obj) {
  for(var i=0;i<this.length;i++) if(this[i]==obj) return i;
  return -1;
}}
function replaceTopCmtVars(text, item, position)
{
  if(!item || !item.author) return text;
  var author = item.author;
  var authorUri = "";
  if(author.uri && author.uri.$t != "")
    authorUri = author.uri.$t;
  var avaimg = urlAnoAvatar;
  var bloggerprofile = "http://www.blogger.com/profile/";
  if(author.gd$image && author.gd$image.src && authorUri.substr(0,bloggerprofile.length) == bloggerprofile)
    avaimg = author.gd$image.src;
  else {
    var parseurl = document.createElement('a');
    if(authorUri != "") {
      parseurl.href = authorUri;
      avaimg = 'http://www.google.com/s2/favicons?domain=' + parseurl.hostname;
    }
  }
  if(urlMyProfile != "" && authorUri == urlMyProfile && urlMyAvatar != "")
    avaimg = urlMyAvatar;
  if(avaimg == "http://img2.blogblog.com/img/b16-rounded.gif" && urlNoAvatar != "")
    avaimg = urlNoAvatar;
  var newsize="s"+sizeAvatar;
  avaimg = avaimg.replace(/\/s\d\d+-c\//, "/"+newsize+"-c/");
  if(cropAvatar) newsize+="-c";
  avaimg = avaimg.replace(/\/s\d\d+(-c){0,1}\//, "/"+newsize+"/");
  var authorName = author.name.$t;
  if(authorName == 'Anonymous' && txtAnonymous != '' && avaimg == urlAnoAvatar)
    authorName = txtAnonymous;
  var imgcode = '<img class="avatar-top-commentators" height="'+sizeAvatar+'" width="'+sizeAvatar+'" title="'+authorName+'" src="'+avaimg+'" />';
  if(authorUri!="") imgcode = '<a href="'+authorUri+'">'+imgcode+'</a>';
  if(maxUserNameLength > 3 && authorName.length > maxUserNameLength)
    authorName = authorName.substr(0, maxUserNameLength-3) + "...";
  var authorcode = authorName;
  if(authorUri!="") authorcode = '<a class="commenter-link-name" href="'+authorUri+'">'+authorcode+'</a>';
  text = text.replace('[user]', authorcode);
  text = text.replace('[image]', imgcode);
  text = text.replace('[#]', position);
  text = text.replace('[count]', item.count);
  return text;
}
var topcommenters = {};
var ndxbase = 1;
function showTopCommenters(json) {
  var one_day=1000*60*60*24;
  var today = new Date();
  if(urlMyProfile == "") {
    var elements = document.getElementsByTagName("*");
    var expr = /(^| )profile-link( |$)/;
    for(var i=0 ; i<elements.length ; i++)
      if(expr.test(elements[i].className)) {
        urlMyProfile = elements[i].href;
        break;
      }
  }
  if(json && json.feed && json.feed.entry && json.feed.entry.length) for(var i = 0 ; i < json.feed.entry.length ; i++ ) {
    var entry = json.feed.entry[i];
    if(numDays > 0) {
      var datePart = entry.published.$t.match(/\d+/g);
      var cmtDate = new Date(datePart[0],datePart[1]-1,datePart[2],datePart[3],datePart[4],datePart[5]);
   
      var days = Math.ceil((today.getTime()-cmtDate.getTime())/(one_day));
      if(days > numDays) break;
    }
    var authorUri = "";
    if(entry.author[0].uri && entry.author[0].uri.$t != "")
      authorUri = entry.author[0].uri.$t;
    if(excludeMe && authorUri != "" && authorUri == urlMyProfile)
      continue;
    var authorName = entry.author[0].name.$t;
    if(excludeUsers.indexOf(authorName) != -1)
      continue;
    var hash=entry.author[0].name.$t + "-" + authorUri;
    if(topcommenters[hash])
      topcommenters[hash].count++;
    else {
      var commenter = new Object();
      commenter.author = entry.author[0];
      commenter.count = 1;
      topcommenters[hash] = commenter;
    }
  }
  if(json && json.feed && json.feed.entry && json.feed.entry.length && json.feed.entry.length == 200) {
    ndxbase += 200;
    document.write('<script type="text/javascript" src="http://'+window.location.hostname+'/feeds/comments/default?redirect=false&max-results=200&start-index='+ndxbase+'&alt=json-in-script&callback=showTopCommenters"></'+'script>');
    return;
  }
  // convert object to array of tuples
  var tuplear = [];
  for(var key in topcommenters) tuplear.push([key, topcommenters[key]]);
  tuplear.sort(function(a, b) {
    if(b[1].count-a[1].count)
        return b[1].count-a[1].count;
    return (a[1].author.name.$t.toLowerCase() < b[1].author.name.$t.toLowerCase()) ? -1 : 1;
  });
  var realcount = 0;
  for(var i = 0; i < maxTopCommenters && i < tuplear.length ; i++) {
    var item = tuplear[i][1];
    if(item.count < minComments)
        break;
    document.write('<di'+'v class="top-commentators">');
    document.write(replaceTopCmtVars(txtTopLine, item, realcount+1));
    document.write('</d'+'iv>');
    realcount++;
  }
  if(!realcount)
    document.write(txtNoTopCommenters);
}
document.write('<script type="text/javascript" src="http://'+window.location.hostname+'/feeds/comments/default?redirect=false&max-results=200&alt=json-in-script&callback=showTopCommenters"></'+'script>');
</script>
3. Now you just have to save changes and you're done!

Configuration

- To modify the number of users displayed in the gadget, look for var maxTopCommenters = 8; and change 8 with any number you want.
- To change the avatar size of the commenters, look for var sizeAvatar = 33; and change number 33 with the number of pixels you want. - To hide your name or some other username, replace the someotherusertoexclude text between the quotes (to add more, add another comma after the text in red, then type the username you want to exclude between the quotes)
[Read more]

Expandable Recent Comments Widget for Blogger/Blogspot

Posted On // Leave a Comment
This Expandable Recent Comments is a very accessible widget that can be collapsed or expanded through user interaction, so that now, we don't have to click on the commenter or post title link in order to see the content of a comment.
recent comments widget, blogger gadgets, blogspot tricks

The expanding content can be shown or hidden by clicking on the plus/minus icon or by pressing the "Show all" or "Hide all" button at run time.
How To Add The Expandable Recent Comments Widget to Blogger

Step 1. Log in to your Blogger dashboard and go to Layout > Click on "Add a Gadget" link


Step 2. From the pop-up window, scroll down and click on the HTML/JavaScript widget


Step 3. Copy and paste this code inside the empty box:
<style type="text/css" media="screen">
.row-aa {        background: #f2f2f3; }
.row-bb {        background: #F8F5F1; }
.row-div { 
  margin:0px;
  padding:5px;
}
.comment-header {
  font-size:0.9em;
//  border:1px solid #E0E0E0;
//  background-color:#F3F3F3;
  padding:4px;
  margin-top:10px;
  margin-bottom:5px;
}
.comment-box {
  margin:0px;
  padding:0px;
  font-size:0.9em;
  height:500px;
  overflow:auto;
}
.comments1  { 
//  background: #F3F3F3;
  padding:3px;
  border-left:1px dashed #A6A6A6;
  color: #888888;
  font-style: italic;
  padding-top:4px;
  margin-bottom:5px;
}
.comment-footer {
  text-align:center;
  font-size:0.9em;
  padding:4px;
  margin-top:5px; 
}
</style>

<div style="text-align: center" class="comment-header"><input class="comment-button" id="commshowall" type="button" onclick="if (this.value == &#39;Show all&#39;) { unfold_all(this); this.value=&#39;Hide all&#39;; } else { fold_all(this); this.value=&#39;Show all&#39;; }" style="width:8em;font-size:1em;font-family:Verdana,sans" value="Show all" /></div>

<div class="comment-box">
<script type="text/javascript" src="http://helplogger.googlecode.com/svn/trunk/expandable-recent-comments.js"></script>
<script type="text/javascript"  src="http://helplogger.blogspot.com/feeds/posts/default?start-index=1&max-results=999999&alt=json-in-script&callback=showrecentposts">
</script>
<script type="text/javascript"  src="http://helplogger.blogspot.com/feeds/comments/default?start-index=1&max-results=999999&alt=json-in-script&callback=showrecentcomments">
</script>

</div>

Note: Replace http://helplogger.blogspot.com with your blog/site address.

Step 4. Save your widget and you're done!

Enjoy :)
[Read more]

Recent Comments Widget with Hide Author Comments function For Blogger

Posted On // Leave a Comment
A few days ago, Mrpolie asked if there's a way to hide the author comments in the Recent Comments widget so that we would be able to see only readers' comments and our replies to be hidden. So, in this post I'll be sharing with you the Recent Comments widget that comes with this function. If you want to show just blog readers' comments rather than yours, you have just to change "Blogger User" text with the surname under which you are posting.

recent comments widget, recent comments, blogger

The main features of this recent comments widget:
  • You'll be able to hide your comments
  • Change the avatar size
  • Set the number of comments to display
  • Set the length of comment for the widget to display

Now let's start adding it...

Step 1. From your Blogger Dashboard, go to Layout and click on Add a Gadget link


Step 2. In the pop-up window, choose the HTML/JavaScript widget


Step 3. Copy-paste the following code:

Recent Comments Widget with Round Avatars: 

Click to see the code

Recent Comments Widget With Post Titles (no avatars): 

Click to see the code

Some changes before saving it.

- to set the number of comments to be shown, change the "5" value from the orange line
- for the number of characters, change the "67" (for the 2nd widget, it is 95) value from the green line
- to hide your comments, replace the Blogger User text TWICE with your name
- to change the size of avatar, change "50" from the blue line.
- if you don't want rounded avatars, delete this line:

-webkit-border-radius: 100px;-moz-border-radius: 100px;border-radius: 100px;
Step 4. Save your widget and you're done!
[Read more]

Add a Different Background For Author Comments in Blogger's Threaded Comments

Posted On // Leave a Comment
In this tutorial we will learn how to highlight the author comments so that they will have a different background color, border, or anything that makes them stand out from the others. To achieve this, we need to add a code in the Blogger's template and to modify the style according to our preferences.
blogger tricks, blogger comments
  

How to highlight author comments in Blogger:

Step 1. Go to Template, click on Edit HTML

blogger threaded comments, customize blogger comments

Step 2. Click anywhere inside the code area and try to find - using CTRL + F keys - this tag:
</body>
Screenshot:
blogger comments, blogger tricks

Step 3. Just above it, paste the following code:
<script src='http://code.jquery.com/jquery-latest.js'/>
<script>
$(function() {
function highlight(){
$('.user.blog-author').closest('.comment-block')
.css('border', '1px solid #FFA500')
.css('background','#F1F1F2 url("http://www.blogblog.com/1kt/transparent/white80.png")')
.css('color', '#444444')
.css('font-size', '12px')
.css('padding', '10px');
}
$(document).bind('ready scroll click', highlight);
});
</script>

Customizing the Author Comments:


Border:
The line marked in orange represents the border's style.
What it can be done:
  • 1px - you can increase the value to change the border's thickness
  • solid - change the border's style to dotted, dashed, inset, outset etc.
  • #FFA500 - this is the border's color value, change it with your own color
Background:
The line marked in blue represents the background's style. You can use a plain color or an image. By default there's a combination of both (a white transparent image with a gray plain color).
To change/add:
  • a different color: replace the #F1F1F2 value with your own (use this tool to find the hex code of your desired color)
  • an image: replace the defaul url http://www.blogblog.com/1kt/transparent/white80.png with that of your image

Font Color:
To change the font's color, replace the #444444 color value in green with your own. (you can use this tool to find the hex code of your desired color)

Font Size:
Modify the value in red by increasing/decreasing the "12" value in order to change the size of text.

Step 4. Now Save your Template.

To customize the entire style of threaded comments, please check my previous tutorial on How to Customize Comment's Background, Font Color and Border in Blogger.
[Read more]

How to Customize Blogger Comments By Adding a Background Color and Border

Posted On // Leave a Comment
The comments are an essential part of any blog as in them readers express their opinions about a post or a blog, thus it is important to spend a little of our time to make this part looking more stylish, accessible and neat.

To put our comments in order, we should make each comment easy to identify, so that we'll know from where it begins and to where it ends, otherwise it becomes a jumble of letters and our visitors could run away. Here are some methods to make some order by separating each comment.

- Add a Separator To Blogger Comments
- Add a Divider Below Comments in Blogger
- Fully Customize Your Blogger Comments By Changing The Background Color and Border

The first method is the easiest: we'll separate our comments by adding a border below each of them.

How to Add a Separator/Border To Blogger Comments


customize comments, blogger

Step 1. To add a simple separator go to Template > Edit HTML and click on the small arrow on the left of <b:skin>...</b:skin>
Step 2. Click anywhere inside the code area and search using CTRL + F keys, for the following piece of code:
]]></b:skin>

Step 3. Paste the following style just above it:

- If we are using threaded comments (with the reply option):

.comment-block {
border-bottom: 1px solid #000000;
}
.comments .continue {
  border-top: 0px solid #000;
}

- If we are using previous commenting system (with no reply option)
#comments-block .comment-footer {
border-bottom:1px solid #000000;
}

Note: To change the border's color, replace the bolded color value and to change its thickness, increase/decrease the 1 value.

Step 4. Save the Template.

Instead of a simple border, we can also add a divider/image between our comments.

How to Add a Divider (Image) Between Each Comment in Blogger


blogger comments, blogger tricks, blogger tutorials

Step 1. Go to Template > Edit HTML and search (CTRL + F) for the following piece of code:
]]></b:skin>
Screenshot:


Step 2. Paste the following just above it:

- If we are using threaded comments (with the reply option):
.comment-block {
background-image:url(https://blogger.googleusercontent.com/img/b/R29vZ2xl/AVvXsEjO2Bi8GSneOuHf4UNgp3mDdpHwziDPvDTWEyaXOhcYdR2979vbhgRKQE67drg_yBzUkrli4DxYOvt9YWrjnL4uaelXXjpZTzWTLgJQkDMuNiNt3mMdgEbhYchOXiZ7lWn014bOBaEIxxYo/s1600/74.gif);
background-repeat:no-repeat;
background-position:center bottom;
padding-bottom:30px;
margin-top: -10px;
}
.comments .continue {
border-top: 0px solid #000;
}

- If we are using previous commenting system (with no reply function)
#comments-block .comment-footer {
background-image:url(https://blogger.googleusercontent.com/img/b/R29vZ2xl/AVvXsEjO2Bi8GSneOuHf4UNgp3mDdpHwziDPvDTWEyaXOhcYdR2979vbhgRKQE67drg_yBzUkrli4DxYOvt9YWrjnL4uaelXXjpZTzWTLgJQkDMuNiNt3mMdgEbhYchOXiZ7lWn014bOBaEIxxYo/s1600/74.gif);
background-repeat:no-repeat;
background-position:center bottom;
height: 50px;
}

Note: The URL that is in blue represents the image that you can change as you like, just remember that at the height must set the height of an image with 30px more, for instance, if the image's height is 50px then the value will be 80px. This is for making sure that the image won't overlap the date of comments. (for threaded comments, increase/decrease the padding 30 value)

Step 3. Save the Template.

But you can still have more styles for each comment, for example adding a background color and a border.

How to Add A Border and A Background Color To Blogger Comments


blogger tips, blogger tricks, gadgets
Step 1. Go to Template > Edit HTML and search for the following piece of code:
]]></b:skin>

Step 2. Paste the following just above it:

- If we are using threaded comments (with the reply option):
.comment-block {
background:#F9F9F9; /* Background Color */
border: 1px solid #f1f1f1; /* Border style */
margin-bottom:20px;
-webkit-box-shadow: 0 1px 2px rgba(0, 0, 0, .4);
-moz-box-shadow: 0 1px 2px rgba(0, 0, 0, .4);
box-shadow: 0 1px 2px rgba(0, 0, 0, .4);
-moz-border-radius: 10px;
-webkit-border-radius: 10px;
border-radius: 10px;
}
.comments .comment-thread.inline-thread {
background-color: #FAFAFA; /* Background color behind the replies */
border-left: 4px dotted #E6E6E6; /* Border on the left side of replies */
}
.comment-content {
padding:2px 10px 10px 10px;
color:#444444; /* Font Color in Comments */
}
.datetime a {
font-style:italic;
font-size:9px;
margin-left: 2px;
}
.comments .comments-content .user a{
color:#1982D1; /* Author's name color */
font-size: 12px; /* Author's name size */
padding-left: 10px;
font-weight:bold;
text-decoration:none;
}
.comments .comment .comment-actions a,.comments .comment .continue a{
display:inline-block;
margin:0 0 10px 10px;
padding:0 15px;
color:#B4B4B7;
text-align:center;
text-decoration:none;
background:#F8F8FB;
border:1px solid #C2C2C5;
border-radius:4px;
height:20px;
line-height:20px;
font-weight:normal;
cursor:pointer;
}
.comments .continue {
border-top: 0px solid #000;
}
.comments .comments-content .icon.blog-author {
background-image: none;
margin-left: -10px;
}
.comments .avatar-image-container{
margin: 0px 0px 0px 0px;
padding: 0px 0px 0px 0px;
width: 40px;
max-height: 40px;
border: 1px solid #F2F2F2;
padding: 1px;
}
.comments .avatar-image-container img{
margin: 0px 0px 0px 0px;
padding: 0px 0px 0px 0px;
max-width: 40px;
height: 40px;
}
Step 3. Save the Template.

- If we are using previous commenting system (with no reply function):

Step 1. Search for this line in your template:
<b:loop values='data:post.comments' var='comment'>
Step 2. Then, add the following code just below of it:
<div class='comments-new'>
Step 3. Look a little further down and you'll see the </b:loop> code and just above it, add this:
</div>
Step 4. Now find this:
]]></b:skin>
Step 5. And just above of it, add this CSS code:
.comments-new{
background:#F9F9F9; /* Background Color */
border: 1px solid #f1f1f1; /* Bprder Style */
margin-bottom:20px;
-webkit-box-shadow: 0 1px 2px rgba(0, 0, 0, .4);
-moz-box-shadow: 0 1px 2px rgba(0, 0, 0, .4);
box-shadow: 0 1px 2px rgba(0, 0, 0, .4);
-moz-border-radius: 10px;
-webkit-border-radius: 10px;
border-radius: 10px;
}
.comment-body {
color:#444444; /* Font Color in Comments */
padding:10px;
}
.comments-new a {
padding-left: 5px; /* Link color */
color: #4A9BD8;
}
.comment-timestamp a {
font-style:italic;
font-size:9px;
padding-right:10px;
padding-left:10px;
}
.comments .avatar-image-container {
overflow: visible;
}
(The rounded edges will not work in Internet Explorer with CSS)

In either case, you can change the background color, border, etc.. in parts with annotations in green.

Step 6. Save the Template.

If you need more help, leave a comment below.
[Read more]

How to Create Drop Caps (Big First Letters) in Blogger/Blogspot

Posted On // Leave a Comment
Here's another way to customize your Blog. In this case, your Posts and Comment's first letter. The effect is a large first letter stretching down three or four lines with the text wrapped around. The drop cap letter can also use a different font and have a different color from the rest of the text. This style can be often seen in newspapers, literature, magazines. So, in this tutorial I will show you how to apply automatically a Magazine text style on Blogger Posts and Comments. Let's start adding it...

-> Add Drop Caps For Blogger Posts

drop caps, blogger blogspot, tutorials

-> Add Drop Caps For Blogger Comments

drop caps, first letter, blogger

Big First Letter for your Blogger / Blogspot Posts


Step 1. From your Blogger Dashboard, go to Template and click on the Edit HTML button:


Step 2. Click anywhere inside the code area and press the CTRL + F keys to open the Blogger' search box. Type this piece of code inside the search box then hit Enter to find it:
]]></b:skin>
Note: you might need to click on the arrow next to it to expand the code within and then you need to search ]]></b:skin> one more time.

Step 3. Just above ]]></b:skin>, add the following CSS code:
.capital:first-letter {
float: left;
display: block;
font-family: Times, serif, Georgia;
font-size: 40px;
color: #000000;
margin:0px 5px 0 0;
padding:0 0 0 10px;
}
Color - change the value in blue with the hex of your color
Size - to change the letter size, increase/decrease the value highlighted in pink.

Step 4. Now search for this code:
<data:post.body/>
Step 5. Then immediately before and after add the red fragments you see in the example below:
 <div class='capital'><data:post.body/></div>
Step 6. Save the changes by clicking on the Save template button.

Important! If the above code is not working, add one of following codes from this example:
<p class="capital"><data:post.body/></p>
Or try this instead:
<span class="capital"><data:post.body/></span>

Big First Letter For Blogger/Blogspot Comments

Step 1. Log in to your Blogger account > go to Template > Edit HTML > click anywhere inside the code area and press CTRL + F keys to open the search box

Step 2. Type the following piece of code inside the search box and hit Enter to find it (if you have already added this code, skip step 2 & 3):
]]></b:skin>
Step 3. Add the following code just above ]]></b:skin>:
.capital:first-letter {
float: left;
display: block;
font-family: Times, serif, Georgia;
font-size: 40px;
color: #000000;
margin:0px 5px 0 0;
padding:0 0 0 10px;
}
Color - to change the letter color, replace the value in blue with the value of your color. Here's a tool that might help you to find the hex of the color that you need: Color Code Generator
Size - to change the letter size, change the value in pink.

Step 4. Then Search for this piece of code:
<data:comment.body/>
Step 5. Add the red codes before and after <data:comment.body/> as you can see in my example below:
<p class="capital"><data:comment.body/></p>
Step 6. Save your Template.

That's it! Now you have a cool drop cap first letter on your blog. If you have any question, leave a comment below!
[Read more]

Numbered comments on threaded comments for Blogger/Blogspot

Posted On // Leave a Comment
In a previous tutorial you've seen how you can add numbered comments to your blogger blog, unfortunately, this trick worked only for those who don't have the reply option and are still using the old blogger commenting system. But we won't have any problem this time because this tutorial will show you how to add numbered comments with comment bubbles on the threaded comments, as well ;)

What the following CSS trick will do for you:
  1. When the general block of comments is initiating (.comments-content) a counter called countcomments activates and starts with an initial value of 1. 
  2. Then, each time the code flow goes through a review of any level, either the original comment or a reply (.comment-thread li), it will bring us in front (:before) of the comment's body the number that is the counter.
  3. Finally, this is incremented in the counter (counter-increment).
See the screenshot:
count comments, comment bubble, forum, blogger

Isn't that great? I'm pretty sure many of you have been waiting for this cool trick. So, let's begin applying it for our threaded commenting system.

Steps to add bubble comments count

Step 1: From your Blogger Dashboard, go to Template and click on the Edit HTML button:

    ... click anywhere inside the code area and press CTRL + F to open the Blogger' search box.

    Step 2: Type the following tag inside the search box and hit Enter to find it:
    ]]></b:skin>
    Note. you have to click on the arrow next to it, then search the ]]></b:skin> one more time 

    Step 3: Add the following code just above ]]></b:skin>:
    .comment-thread ol {
    counter-reset: countcomments;
    }
    .comment-thread li:before {
    content: counter(countcomments,decimal);
    counter-increment: countcomments;
    float: right;
    z-index: 2;
    position:relative;
    font-size: 22px;
    color: #555555;
    padding-left:10px; 
    padding-top:3px; 
    background: url(
    https://blogger.googleusercontent.com/img/b/R29vZ2xl/AVvXsEh74Vorf8P8NbmosysdQ6hR7Tqql03bhosxE1-SGSvCdY5lDPHCWjBXohMJKj7x_C08areB4xxcIEVZY4QuCX2vO55RgZd6rSVzQVzcTdix6sweMq3q9jcOLsUl01Nj9n9sx5IgThJe6qo8/s1600/comment+bubble2.png) no-repeat;
    margin-top:7px; 
    margin-left:10px; 
    width: 50px; /*image-width size*/
    height: 48px; /*image-height size*/ 

    }
    .comment-thread ol ol {
    counter-reset: contrebasse;
    }
    .comment-thread li li:before {
    content: counter(countcomments,decimal) "." counter(contrebasse,lower-latin);
    counter-increment: contrebasse;
    float: right;
    font-size: 18px;
    color: #666666;
    }
    Note:
    • if you want to have no bubble icon, remove the code in red (including the address in blue)
    • to change the comment bubble, replace the code in blue with the URL address of your own icon. If you're not sure what icon you should use, you can find some cool icons in my previous posts (see these tutorials here and here)
    • to change the position of comments count, increase/decrease the values (3 & 10) from padding-top and padding-left
    • to change the position of comments bubble/icon, change the values (10 & 7) from margin-left and margin-top
    Step 4: Now Save the Template and you're done!

    If you enjoy reading this blog, please share and subscribe. For any questions you may have, leave a comment below.
    [Read more]

    Add Facemoods Emoticons To Your Blogger Comments

    Posted On // Leave a Comment
    Here are some amazingly funny emoticons compatible with your Blogger comments - also with threaded commenting system! If you want to know how to add them, just follow the next steps:

    emoticons, smileys, blogger, tricks

    Step 1. From your Blogger Dashboard, go to Template and click the Edit HTML button


    ...click anywhere inside the code area and press CTRL + F to open the search box:

    Step 2. Type or paste one of the below lines inside the search box, then hit Enter in order to find it:

    • For previous commenting system: 
    <h4 id='comment-post-message'><data:postCommentMsg/></h4>
    • For threaded comments:
    <div class='post-footer-line post-footer-line-3'>

    Step 3. Add the below code just above it

    (for threaded comments, add the code after):
    <b:if cond='data:blog.pageType == "item"'>
    <div style=' width: 450px; text-align: left; border: 1px dashed #0084ce; background: transparent; padding: 10px; color:#000000; font-weight:bold; '>
    <img border='0' src='https://blogger.googleusercontent.com/img/b/R29vZ2xl/AVvXsEjttQrAexnPf2pMRHI3oo5wRiXQ1wlHsoieHF-HyTQlDpxSIM2cC7F-F0rs82UhT3QYZLF-cYpspxMMzEIVyrMeZpir4eLeQSY9SU3L_PXLQjI6Hw2HUtXf9tbPLSgwNNBAM7LpH6HTbxA8/s1600/helplogger.blogspot.com(1).gif'/> :a
    &#160;
    <img border='0' src='https://blogger.googleusercontent.com/img/b/R29vZ2xl/AVvXsEiS_RWexEtbYxCAtMM6Afzeqa9_6AUt5qaVtQmViiwydA9ZQ3cyDPJh4E25TL9Gg5o2rMiqd8BDkjgHlmsyqrg9-8ozTj9b2uceZ12S7vGBh8kW1Y8mNC6nu2hlq41gRrfApghYNsEmFm-R/s1600/helplogger.blogspot.com+(2).gif'/> :b
    &#160;
    <img border='0' src='https://blogger.googleusercontent.com/img/b/R29vZ2xl/AVvXsEgZdc6JJlAXN9xDXkOyIr8zw5DM7Cl8I15juK3dn2bDNQOGYb3a4KcGMJwy056idxoO5tRzYeWJAeh6ZU6XHdIT0eR2XlacYchw_K8Ebh3tpbjleDjnGKePs_4T7-VamwgQtSiRxbVbdT1j/s1600/helplogger.blogspot.com(3).gif'/> :c
    &#160;
    <img border='0' src='https://blogger.googleusercontent.com/img/b/R29vZ2xl/AVvXsEiaO4N8eHRPhwdVP9tK8tA4K82FC8zcAbHmFE8RkuswmdeY31UIM9-1ROYRxW1A5UMl5T-aQdQ9vwH7ams0Vjy4VogWsDEqOuhM3cdFZ7Meu1T6uswcrZ6o6UuW0D3z9WAG-I-f0qLFJ3iP/s1600/helplogger.blogspot.com(4).gif'/> :d
    &#160;
    <img border='0' src='https://blogger.googleusercontent.com/img/b/R29vZ2xl/AVvXsEg_0Bmn_aW8Pb6dUAFpPwELe6u-Df7OofjODWnGd0oU60bSwVbVwC-ohsfegI2YyArwXPRt7D1wXmI2jrs7WkaImUY4sFJt8UAaoQLlGSLZlAhWw9p3Mg3a4X9eTJNrsRUeJoTWd8ApOaYL/s1600/helplogger.blogspot.com(5).gif'/> :e
    &#160;
    <img border='0' src='https://blogger.googleusercontent.com/img/b/R29vZ2xl/AVvXsEgsOrqNKgsgfXa7bNcxHv68KSIALbsBvXK0Z73np1GQ_HtFYr-nt_mm_88QrU5mJy8ieaAhKKgcLYYmv3Qk2P2nNaeFAOxMWGVA9q8AlvG4xpsMo4NI1htpTpM7WQmEkjamtAqxaOLZevN-/s1600/helplogger.blogspot.com(6).gif'/> :f
    &#160;
    <img border='0' src='https://blogger.googleusercontent.com/img/b/R29vZ2xl/AVvXsEjf6Hbx2BVg0eGaR2IgxwZaEiG5ojO8-07ygWqsWiO8mOmXF2jo2zHszEs9LiFRJVfpjNJv2WG4K0CVLpqCPnUekZVSQczFOVhE8oivkdXLHN5UMkFUWq0Ncjxr6UQzQsCl_tM2ZmPiVhUM/s1600/helplogger.blogspot.com(7).gif'/> :g
    &#160;
    <img border='0' src='https://blogger.googleusercontent.com/img/b/R29vZ2xl/AVvXsEjCXrqOMGLOvej4LuuhzUsVetvw3t3Dem-ZmvE8I9qHVIhYig9PHpjq9ZKS_VZ_tbYHh6DCCB_4XxNjtW_hIMAup7hjmTIH8i4Ydg6wQQJfFxSe_fXNMuG3DaW0etAWwTSyNht3RbyngQ_W/s1600/helplogger.blogspot.com(8).gif'/> :h
    &#160;
    <img border='0' src='https://blogger.googleusercontent.com/img/b/R29vZ2xl/AVvXsEh8cAy2XubXfUpn7a8_c2XAOKbMzV7QWCi_B8aBoToqYDJNOY8LoCgxoUBE5lvN2o4N7m7mjPcPMdNxoXC1NJus6AeplrjK71zERJTiFORMX94UWZeTNhoeTASNwG73DAVKX6fvS63y9Mz3/s1600/helplogger.blogspot.com(9).gif'/> :i
    &#160;
    <img border='0' src='https://blogger.googleusercontent.com/img/b/R29vZ2xl/AVvXsEjVOkRroEbFtnb_tJ8blsV3YFVhs6NMPCtQ2mTEsN1PycSF1-NN5Z0NxOtRnGwcHCqGMhBLLZWL3GYa6AVbxGKGMSXPa6-iUTz83Vg-Eo5AR7y9TGoZGlDaZbbTRzGxqX09WwvbOsWAELDA/s1600/helplogger.blogspot.com(10).gif'/> :j
    &#160;
    <img border='0' src='https://blogger.googleusercontent.com/img/b/R29vZ2xl/AVvXsEiZSGz1368ML6NxEehE8TpaRNUWqXAszvTrnWGhLx16-shLeIUosfUxkJAklNpaUaSCRxbjZ_Dj0mGfprZLf2ZDnbCpNgWPj80jln3CAVl7z62n2iqQpauACvBuYFEnCzglm8AlCyZ0avWl/s1600/helplogger.blogspot.com(11).gif'/> :k
    &#160;
    <img border='0' src='https://blogger.googleusercontent.com/img/b/R29vZ2xl/AVvXsEivYWPOkMFE-70CcwPkaVZzTxq0jGzaGUYJ661-aCMQXTxeIrs8M1GbjKYRI9mfefVuGpylZ-FVGbJxNmoMfKQDa9KltofCuqGIhgxX7bsTUdYd4FdMKcfXIERwoE1vcwx56z5uYwFwFhcG/s1600/helplogger.blogspot.com(12).gif'/> :l
    &#160;
    <img border='0' src='https://blogger.googleusercontent.com/img/b/R29vZ2xl/AVvXsEjMygIYzT7LLUnAKuUkzi5324iwmZLHfObxJZO4Up5CBsaBeDGJZPnH6jlEJwsM87JcsbK77LahV7RexzLKNmVXH2fmQOODipuIJOirB-5SPxwHVwmuF6cvh33oasps-gj4vqyAHUybKyGM/s1600/helplogger.blogspot.com(13).gif'/> :m
    &#160;
    <img border='0' src='https://blogger.googleusercontent.com/img/b/R29vZ2xl/AVvXsEiAEDcIdZM3UtLoDsGqEqRfsYpvQ3kyGnxP3pqA6mnZYP8pPg5LCLrFVg6X7N62cLvPZfx6zOYOix7R0r0s7OudQrpaQ-SvpGul3csZD1bocaamMsMWy5Opa0LlaLo6jHnugJCCgEJN1QLh/s1600/helplogger.blogspot.com(15).gif'/> :n
    &#160;
    <img border='0' src='https://blogger.googleusercontent.com/img/b/R29vZ2xl/AVvXsEgJM8eWZW9VPHoYFpjvA-CLwhfPItRlRh5vrIyaBzcTCAzzCEmlyhNXdU0j41OpUN5FsOSfQATPCwOhU4t7O-26zSkMbwS3HpSgkPAoFUns6aF6qR11ZiHpFbdyE-ova-A4mEm3ZKrHYkui/s1600/helplogger.blogspot.com(16).gif'/> :o
    &#160;
    <img border='0' src='https://blogger.googleusercontent.com/img/b/R29vZ2xl/AVvXsEgWwA0H1Vs2ex4af-LxgtFk3-DnHGuo5HmNB-QTorPFO2K5n1yHY69STYWaxPyhN1sLRxYU_67lfW2OdwK5bwGjqcvccBt-rhWWhY228ermcIzc6VsNmPgYNTdSsYCZOZevp-0cJOUSX5xK/s1600/helplogger.blogspot.com(14).gif'/> :p
    &#160;
    <img border='0' src='https://blogger.googleusercontent.com/img/b/R29vZ2xl/AVvXsEjc8LyaLOE6OjefhjXot3qEZZvF8jj9ZIcB8V3TTRwbiAdhEi_W2XuhrErUslvD9a8aKmTE4JOnOZEhgsPixbQctikas-OGqwNB998h0W97F75b8yo3xzdMBlZGXpB0ABEjRpn01ObOB4KG/s1600/helplogger.blogspot.com(17).gif'/> :q
    &#160;
    <img border='0' src='https://blogger.googleusercontent.com/img/b/R29vZ2xl/AVvXsEgYd2NlIRTL6tInqUDttxudNsCSjFyYCjXY7ezE44JBzyNh96GDrc8kqG6iWBEkVt4jzdhc1M4xomk28SmNhTVD-9RRlkDM75u_i9qN0TDXZhr028FlGlyofJEWQsPOWMu_21KXNP4is7gq/s1600/helplogger.blogspot.com(18).gif'/> :r
    &#160;
    <img border='0' src='https://blogger.googleusercontent.com/img/b/R29vZ2xl/AVvXsEi6eJHfsVcheMIGmq9k2ZOJa3zSYWgUMKKHGGafPbFJJUJvvNu3nt0V2-98TBMwq3nr8ThU_YfpKTPtbXNk6BCkDYBSqvdtwivgUvBUf6ZbtRcn0HuXF-lzeKSz1vze9MMDLxycSqDVQTn0/s1600/helplogger.blogspot.com(19).gif'/> :s
    &#160;
    <img border='0' src='https://blogger.googleusercontent.com/img/b/R29vZ2xl/AVvXsEh5QKfiueuE06R7YxTrmP7FZBuvJ1494Qhkxzr6k9mCvKI0a3IHUd1oGu2NCzZEzx9vn3cqCrXHCOkPFNBvmgUsbyFKBY73cJ0mh_WimUuDj6g2LBkZ0G3XFtRB_mhlzgBC7uEMHy3gQa3O/s1600/helplogger.blogspot.com(20).gif'/> :t   <a href='http://helplogger.blogspot.com/2012/05/add-facemoods-emoticons-to-your-blogger.html' style='color: rgb(30, 122, 183); font-size: x-small;'>Add smileys to Blogger + </a>
    </div></b:if>
    Step 4. Now search for this piece of code:
    </body>
    Step 5. And add the following code immediately above it:

    • For previous commenting system:
    <script type='text/javascript' src="http://helplogger.googlecode.com/svn/trunk/facemood emoticons.js"/>
    • For threaded comments: 
    <script type='text/javascript' src="http://helplogger.googlecode.com/svn/trunk/facemood emoticons threaded.js"/>
    Step 6. Save the Template and hopefully, now you can enjoy commenting by adding these cool emoticons.

    [Read more]

    How to Change Default Anonymous Avatar in Blogger Comments

    Posted On // Leave a Comment
    Earlier, you've seen how you can change the size of the avatars in blogger comments and now I will show you how to change or customize the default avatar of anonymous commenters or Blogger users with no picture on their profiles. While Blogger announced the new threaded commenting system, we can still customize it by adding a jQuery plugin to our template and then replace the default anonymous avatar that can be found on this address: http://img1.blogblog.com/img/anon36.png and the one for blogger users: http://img2.blogblog.com/img/b36-rounded.png ...with our own.

    anonymous, default avatar, blogger blogspot

    Replace the Default Anonymous Avatar on Blogger Comments


    Step 1. Go to Dashboard - Template - click on the Edit HTML button


    ...click anywhere inside the code area and open the template search box by pressing the CTRL + F keys

    Step 2. Type or paste this code in the search box, then hit Enter to find it:
    </body>
    Step 3. Just above the </body> tag, add the following code:
    <script src='http://code.jquery.com/jquery-latest.js'/>
    <script>
    $(&quot;img[src=&#39;http://img1.blogblog.com/img/anon36.png&#39;]&quot;)
    .attr(&#39;src&#39;, &#39;https://blogger.googleusercontent.com/img/b/R29vZ2xl/AVvXsEjnUI9p7RRt7WlE3GgBsXDc9x5tqAmg5hBiiGsTOZZKhoI9ZXPEQMKTX87yPRNFyTT33T3iZZ_jShaoB3pZVAHbuc5aFReEuWm9vo1M3qrlaa-odaz5nP4K5JVmnFKoWZZHRq0cJLXYvhY/s1600/default_avatar.gif&#39;)
    .ssyby(&#39;blank&#39;)
    </script>
    <script src='http://code.jquery.com/jquery-latest.js'/>
    <script>
    $(&quot;img[src=&#39;http://img2.blogblog.com/img/b36-rounded.png&#39;]&quot;)
    .attr(&#39;src&#39;, &#39;https://blogger.googleusercontent.com/img/b/R29vZ2xl/AVvXsEhXLJw4cS1qpIDZ5pgdjt35Jv77g77kOl9WsfkAInvy_iohCWDVCeE6x47ulT1Fd58JDY6tg52NpvpqRNAeAHNAISiSoW3-mgsfvoAFGXhDVXgLdow1OQuwY9eFsSbcfFgvnMTgytSOrG8/s1600/blogger-user.png&#39;)
    .ssyby(&#39;blank&#39;)
    </script>
    Step 4. Save the changes by clicking on the Save Template button

    Changing the default avatar

    For Anonymous users: Replace the code in red with your image address
    For Blogger users: Replace the URL in blue with your own.

    You can choose an avatar from here and then copy the url of it:


    https://blogger.googleusercontent.com/img/b/R29vZ2xl/AVvXsEjnUI9p7RRt7WlE3GgBsXDc9x5tqAmg5hBiiGsTOZZKhoI9ZXPEQMKTX87yPRNFyTT33T3iZZ_jShaoB3pZVAHbuc5aFReEuWm9vo1M3qrlaa-odaz5nP4K5JVmnFKoWZZHRq0cJLXYvhY/s200/default_avatar.gif


    https://blogger.googleusercontent.com/img/b/R29vZ2xl/AVvXsEjjX_37VprWXOwWXnVsumJzj-qpQCRqxuDf6OjeL8I9bOh2YL0pl-1czpq5niIrK0XqV0Iu1Ilc8VUeC1FyQbrQNyMSkO8GvL5afckus-5oiGwQShCq2m_1M6kDmskGzdyLJtiIKtOupgQ/s1600/facebook.gif


    https://blogger.googleusercontent.com/img/b/R29vZ2xl/AVvXsEjtYH-rvHbGo1EaWEV48-fFN0R19YvT-GvK4bUxHDBMJjjNYe6o_K9ZaplXxtCDxjIwnh9vO5vOLU2k4H64HFb3laPneKdhVRPWDqaqFmvbmfNFQKidliBFpPwHP3ZscPMF64qqggSnMEM/s1600/anonymous3.png


    https://blogger.googleusercontent.com/img/b/R29vZ2xl/AVvXsEgwphAVWn2SElU1GrEIFjVmIBWZDNe3mJv3C9vLdPcxs331vGDUYCh_m_D8GVdtbu8gPp6eQAmiJNNlYJ-5XkqTwOqd36Lg9oZUKwhYiGCQbPnezRavra5bVGvqpO1eXTxRbBFmybJOWukH/s1600/blogger-user.png

    That's it! If you found this trick useful, please consider sharing it.
    [Read more]
    Click to go to top
