Showing posts with label social media plugins. Show all posts

How To Add Social Media Icons to Blogger Header

Posted On // Leave a Comment
social media icons, facebook icons, social media icons for bloggerThis tutorial will help you to add social media icons in the top right corner of the page which could increases the likelihood that readers can follow through the various social networks. There are several ways to do this, like adding a new widget section to the blog header but now, we'll do it using an unordered list that uses icons of Facebook, Twitter, Google+ and blog feed, and as a bonus, the icons will rotate when you hover over them.

You can see a demo in this test blog.


Adding Social Media Icons to Blogger Header

Step 1. From your Blogger dashboard, go to Template and click on the Edit HTML button:
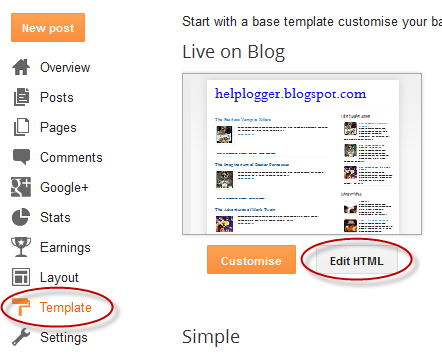
blogger blogspot, blogger template, blogger gadgets

Step 2. To expand the style, click on the small arrow on the left of <b:skin>...</b:skin> (screenshot 1), then click anywhere inside the code area to search (using CTRL + F) for the ]]></b:skin> tag (screenshot 2) and add this code just above it:

 /* Social icons for Blogger
----------------------------------------------- */

#social-icons {
margin-bottom:-30px;
height:50px;
width:100%;
clear:both;
z-index: 2;
position: relative;
}
.social-media-icons {
display:table
}
.social-media-icons ul {
text-align:right;
padding:5px 5px 0 0
list-style-image:none;
list-style-position:outside;
list-style-type:none;
}
.social-media-icons ul {
margin-bottom:0;
padding:0;
float:right;
}
.social-media-icons li.media_icon {
margin-left:6px;
padding-left:0 !important;
background:none !important;
display:inline;
float:left;
}
.social-media-icons li:hover {
-moz-transform: rotate(360deg);
-webkit-transform: rotate(360deg);
-o-transform: rotate(360deg);
transform: rotate(-360deg);
-moz-transition: all 0.5s ease-in-out;
-webkit-transition: all 0.5s ease-in-out;
-o-transition: all 0.5s ease-in-out;
-ms-transition: all 0.5s ease-in-out;
transition: all 0.5s ease-in-out;
}

Screenshot 1:


Screenshot 2:


Step 3. Now search for this line

<b:section class='header' id='header' maxwidgets='1' showaddelement='no'>

Step 4. And just above it, add this code:

<div class='social-media-icons' id='social-icons'>
<ul>

<li class='media_icon'><a href='http://facebook.com/username'><img border='0' src='https://blogger.googleusercontent.com/img/b/R29vZ2xl/AVvXsEhjKfMwHznIMrVI_AMG62dnNlYcgkPL5k8cDVd4alYbRWkpqNcgCBytJJWP4yuFdkGZuwf_jKEDE_bXeZzF1TTpqie9hqAuSAQblm1hsZyIkAGz8gEjz7r2Xh7Xgm2NWTsV-FgvJAUTwAg/s1600/Facebook.png'/></a></li>

<li class='media_icon'><a href='http://twitter.com/#!/username'><img border='0' src='https://blogger.googleusercontent.com/img/b/R29vZ2xl/AVvXsEgvHgZ8pAFvttgd3ZOfXeChDhZfjwlCCcepd9eewL8RDgZqfaYA13wGruxOr7YK5_3YLiY-urHfhBSFuottpKldTmrza2qCiqUo7fIcejjMbo3R3ENhxyIf2Ofl77JiYiBhxy4AirR2X3A/s1600/Twitter.png'/></a></li>

<li class='media_icon'><a href='https://plus.google.com/XXXXXXXXXXXXXXXXXX/about'><img border='0' src='https://blogger.googleusercontent.com/img/b/R29vZ2xl/AVvXsEhOQ7TfQPUGt_tHyswIjCNE6GXfySbYSGaxC8aDCWcXc0LNw2mvY18FNwheB8bkCE4hdlmqOSjwTZ5Xt6kE6WTp0fIzlciWuWlMyJ7sSEWCHJxHT3HxXHXT1_SH2NnFdQ_6e2ku_Ywuouk/s1600/googleplus.png'/></a></li>

<li class='media_icon'><a href='http://name-of-your-blog.com/feeds/posts/default'><img border='0' src='https://blogger.googleusercontent.com/img/b/R29vZ2xl/AVvXsEgWnmpMgD5L9VQMmqDAB0UziDaTEXF76xmpdlG5PfTHY3SQWL56qymMGL2ZJVfPRkDI58CNgiERIqj3veXfsiKXIbeixDV9eY_1isiIWHCJjpCCjsT9oyM2-8s72Q5XXBQ0sLxHg5KJOpw/s1600/RSS.png'/></a></li>

</ul></div>

Customization

- Change what's in red with your usernames and id: the first is your Facebook username, the second is that of Twitter, in the third you should change the X by the ID of your Google+ profile and in the fourth you will put the name of your blog.
- To change the icons, just replace the urls in blue with the ones of your images.
- You can add more icons if you want, you just have to add before </ul></div> a line like this for each extra icon you want:

<li class='media_icon'><a href='Link URL'><img border='0' src='Image URL'/></a></li>

Step 5. Finally, Save the Template to apply the changes.
The effect is done with CSS3, so this effect will not work in older browsers.
[Read more]

Add Floating Social Media Sharing Buttons To Blogger

Posted On // Leave a Comment
The Floating Social Media Sharing is a very popular widget on all the top blogs and this is one of the ways to increase the number of times your posts get shared on Twitter, Facebook and other social networks.

This floating social bar has the following options: Facebook Like, StumbleUpon, Twitter Share, Digg This, Google+ and each of them comes with a live counter. You can add more sharing buttons or social bookmarking icons later if you want.

Blogger, WordPress, Facebook, Share

How to add the scrolling social bookmarking bar


Step 1. Log in to your Blogger Dashboard, select your blog and go to Layout 

Step 2. Click on Add A Gadget link


Step 3. From the pop-up window, scroll down and select HTML/Javascript 

Step 4. Copy the code below and paste it inside the empty box.

Step 5. Save the gadget.

The code to copy-paste (updated!):
<style type="text/css">
#social-buttons {
position:fixed;
bottom:15%
margin-left:-721px;
float:left;
border-radius:5px;
-moz-border-radius:5px;
-webkit-border-radius:5px;
background-color:#fff;
padding:0 0 2px 0;
z-index:10;
}
#social-buttons .button-share {
float:left;
clear:both;
margin:5px 5px 0 2px;
}
</style>
<div id='social-buttons' title="Get this from helplogger.blogspot.com">
<div class='button-share' id='like' style='margin-left:7px;'>
<div id="fb-root"></div>
<script>(function(d, s, id) {
  var js, fjs = d.getElementsByTagName(s)[0];
  if (d.getElementById(id)) return;
  js = d.createElement(s); js.id = id;
  js.src = "//connect.facebook.net/en_US/all.js#xfbml=1";
  fjs.parentNode.insertBefore(js, fjs);
}(document, 'script', 'facebook-jssdk'));</script>
<div class="fb-like" data-send="false" data-layout="box_count" data-width="40" data-show-faces="false"></div>
</div>
<br /><div class='sbutton' style="margin-left: 2px;" ><a class='twitter-share-button' data-count='vertical' data-via='Helplogger' expr:data-counturl='data:blog.url' href='http://twitter.com/share' rel='nofollow'>Tweet</a><script src='http://platform.twitter.com/widgets.js'; type='text/javascript'></script>
<br />
<div class='button-share' style="margin-left: 3px;" id='su'>
<script src="http://www.stumbleupon.com/hostedbadge.php?s=5"></script>
</div>
<div class='button-share' id='digg' style='margin-left:3px;width:48px'>
<script src='http://widgets.digg.com/buttons.js' type='text/javascript'></script>
<a class="DiggThisButton DiggMedium"></a>
</div>
<div class='button-share' style='margin-left:3px;' id='gplusone'>
<script type="text/javascript" src="https://apis.google.com/js/plusone.js"></script>
<g:plusone size="tall"></g:plusone>
</div>
<div style="clear: both;font-size: 9px;text-align:center;">Get <a style="color: #3399BB;" href="http://helplogger.blogspot.com/">widget</a></div></div></div>
Customization:
  • Vertical alignment - Change the 15% value of bottom. The code positions the social bar relative to the bottom of your browser window. To fix the distance even when window is resized, specify the value in px (pixels) instead of %.
  • Horizontal alignment - Change the -721px value from margin-left. Negative value pushes the button to the left of the main blog column, positive value pushes it to the right. Increase or decrease the value based on your needs.
  • Twitter setting - Replace Helplogger with your Twitter username
  • Replacing and removing buttons - You can replace existing buttons with your own. Each button is represented by this code:
<div class='sbutton'> BUTTON CODE HERE </div>
    Enjoy!!! :)
    [Read more]

    Add Facebook Like Button Below Post Titles

    Posted On // Leave a Comment
    facebook like button, blogger tricks

    This Facebook Like button will allow visitors to Like your post and share it to their Facebook friends. In this post we will see how we can add a Like button for each individual Blogger post, and not a Facebook fan box for the entire blog (which is also a good idea to have in your sidebar). Having a Facebook Like button below your post titles makes easier for Facebook users to like specific posts on your blog, which in turn displays the liked content on their profile (and potentially on their friend's feeds).
    If you want to add the Facebook Like Button below your blogger post title, then follow these steps:

    Adding Facebook Like Button Below Post Titles


    Step 1. Go To Blogger Dashboard > Template > Edit HTML 

    Screenshot 
    facebook for blogger, facebook button

    Step 2. Click anywhere inside the code area and search - using CTRL + F keys - for this piece of code:
    <data:post.body/>
    Note: you might find it more than 3 times, stop to the second one (or third one in case it won't show up after applying the code from step 3)

    Step 3.  Just above it, paste this code:
    <p><iframe allowTransparency='true' expr:src='&quot;http://www.facebook.com/plugins/like.php?href=&quot; + data:post.url + &quot;&amp;layout=button_count&amp;show_faces=false&amp;width=100&amp; action=like&amp;font=arial&amp;colorscheme=light&quot;' frameborder='0' scrolling='no' style='border:none; overflow:hidden; width:100px; height:20px;'/></p>
    Screenshot

    facebook button

    Step 4. Save your template and you are done with this simple implementation of the Facebook Like button on your Blogger blog.
    [Read more]

    Awesome Slide Open Heart Bookmarking Gadget For Blogger

    Posted On // Leave a Comment
    This widget released by Sharethis team was made as a Valentine gift from them. The heart bookmarking gadget has a cool slide out effect that makes the heart icon split each time you mouse hover it, displaying several bookmarking buttons like Facebook, Twitter, Pinterest, LinkedIn, Stumble Upon, Email and many more bookmarking choices. This gadget/widget comes with a fixed position and stays in the corner of the page, so it will grab your readers attention and make them share your posts easily.
    I'm sure you will love it after seeing the demo of this gadget:


    Adding The Open Heart Bookmarking Gadget to Blogger

    Step 1. Go to your Blogger Dashboard, select Template and click the Edit Html button:


     ....select the "Expand Widget Templates" box (it is recommended to make a backup first)


    Step 2. Find the following tag (Ctrl + F):

    </head>


    Step 3. Paste above/before the </head> tag, the following code:

    <!-- Start Open Heart Bookmarking Gadget From http://www.helplogger.blogspot.com/ -->
    <script src='http://w.sharethis.com/gallery/shareegg/shareegg.js' type='text/javascript'/>
    <script src='http://w.sharethis.com/button/buttons.js' type='text/javascript'/>
    <script type='text/javascript'>stLight.options({publisher: &quot;ur-98d377f-bdd3-9ad1-fbe5-2a678f0a60ee&quot;, onhover:false}); </script>
    <link href='http://w.sharethis.com/gallery/shareegg/shareegg.css' media='screen' rel='stylesheet' type='text/css'/>
    <!-- End Open Heart Bookmarking Gadget From http://www.helplogger.blogspot.com/ -->

    Step 4: Now find (CTRL + F) this tag:

    </body>

    Step 5: Paste above/before </body> tag... the following code:

    <!-- Start Open Heart Bookmarking Gadget From http://www.helplogger.blogspot.com/ -->
    <div style='position: fixed; bottom: 2%; left: 2%;'>
    <div class='shareEgg' id='shareThisShareHeart'/>
    </div>
    <script type='text/javascript'>stlib.shareEgg.createEgg(&#39;shareThisShareHeart&#39;, [&#39;facebook&#39;,&#39;twitter&#39;,&#39;pinterest&#39;,&#39;linkedin&#39;,&#39;stumbleupon&#39;,&#39;email&#39;,&#39;sharethis&#39;], {title:&#39; <data:blog.pageTitle/>&#39;,url:&#39;<data:blog.url/>&#39;,theme:&#39;shareheart&#39;});</script><a href="http://www.helplogger.blogspot.com/">Blogger Gadgets</a>
    <!-- End Open Heart Bookmarking Gadget From http://www.helplogger.blogspot.com/ -->

    How To Move The Position Of The Gadget

    To move the position of this widget from the bottom right corner of your blog to any location you want, change the percentages of the red code from Step 5.

    Step 6. Now preview and Save Template.

    Done!
    [Read more]

    Add Social Bookmarking Buttons near Adsense Ads

    Posted On // Leave a Comment
    The main advantages of this widget is that you can increase your AdSense impressions along with CTR - and of course, fill up the empty space besides Adsense units, making your blog look more attractive.

    Adding the social bookmarking buttons at the top of your blogger post, will make things easier when your readers will want to share your posts via the networking sites. The widget includes buttons for Del.icio.us, Twitter, Facebook, StumbleUpon, Technorati and Digg.


    How to add this widget:

    1. Firstly, login to your Blogger Dashboard and go to Template and then click on the Edit HTML button
     (don't forget to make a backup of your template)

    2. Search (CTRL + F) for the following tag:

    ]]></b:skin>

    3. Paste the following CSS code just above it:

    .ads{margin-bottom:10px; border-top:solid 1px #DEDEDE; padding-top:10px; font-size:13px;}
    .ads-right-min{border-left:solid 1px #DEDEDE; height:250px; padding-left:10px;}
    .ads-right-min a:link,
    .ads-right-min a:visited,
    .bottom-share-links a:link,
    .bottom-share-links a:visited{
    font-size:12px;
    color:#222;
    display:block;
    height:22px;
    line-height:22px;
    margin-bottom:16px;
    padding-left:32px;
    }
    .ads-right-min a:hover,
    .bottom-share-links a:hover{color:#666;}
    .mini-tech{background:url(https://blogger.googleusercontent.com/img/b/R29vZ2xl/AVvXsEiE49JYNV4U2t3QmmPVpg9zXpyZyo87kE6iGoQ0fSxWxOUkCYX6ts7UJoHFpIeMi07A9i2-ecLQQbsWKv50DReVNyJDU5ySiEiH767Ha1HR7z7esrkPoJJTKGQVJ2GLHCtuLhC3zkCt82BU/s1600/technorati.gif) no-repeat;}
    .mini-facebook{background:url(https://blogger.googleusercontent.com/img/b/R29vZ2xl/AVvXsEiOBNu_0KUEZr-TPM5uapRepI1p_i6QpdcpQATmpzrjhg3-jrfI2yii9tDUkXN79EXjYnTzW7beNJlqNMoE0ZYX6ddHD1gSPPcMcXBUdL4hvyzOxQ0vFmsBQfdPoLRBsvqpmV_zgDXeH34Q/s1600/facebook.gif) no-repeat;}
    .mini-tweet{background:url(https://blogger.googleusercontent.com/img/b/R29vZ2xl/AVvXsEikbUTu4ckmMVKUS2pplFkJ3evvM0uYkEZ-MP6XmnNPtnJG05Et4TRCabKz8qeukVerH7wOi_mbBEn9av4ayBD4EmHp1W1_6lUSHeL5DHvJ9ta1MdYcYaMZILSleZ-X4nisb4-hxmjz_iCy/s1600/tweet.gif) no-repeat;}
    .mini-del{background:url(https://blogger.googleusercontent.com/img/b/R29vZ2xl/AVvXsEj8zf8S50qqrAISh1F-szGTrwtykjKUfVmaM3AqWqEmf3zCSkxh-pkqEQzKnkSLzG55ph9u7CMqUFe8wS-in8Z7VB-zyAI_BigDewT1P6n1_-7xKFY2Ph-Qn5_mgwSwdjdzLbyaJp2fOJbk/s1600/delicious.jpg) no-repeat;}
    .mini-stumble{background:url(https://blogger.googleusercontent.com/img/b/R29vZ2xl/AVvXsEjjH9D0-hbiWsGpBg0eZGNmJ9yBJDtJYuwLS8JFs5a4ERAsDFz3nllQn18ay8MRJxKP9VybM_e7kfVX2jAIORa1ssSuKyv9HKoed_G-h4N-NnfWKvZCa8vlhsZxeqMlIqF39kBuwLn6F_dM/s1600/stumbleupon.png) no-repeat;}
    .mini-digg{background:url(https://blogger.googleusercontent.com/img/b/R29vZ2xl/AVvXsEhveM09C6PAv7qP_SRF7RLseoNYoGo8xIGgS9Gt42XSxIkbl116V4OHEpMKNzcQx51zhDg34Np2HR8dkS1zeDOp_a02ii_ruohrT7EPnpVONmsKpy3yX92ERO69QDUUiLMLc5wco1JGSk1j/s1600/Digg.png) no-repeat;}

    4) Now search - using "CTRL+F" - for the following line:

    <div class='post-body entry-content'>

     If you can't find it, search for this one:

    <div class='post-body entry-content' expr:id='&quot;post-body-&quot; + data:post.id'>

    5) Add the following code directly below it:

    <b:if cond='data:blog.pageType == &quot;item&quot;'>
    <div class='ads'>
    <table border='0' cellpadding='0' cellspacing='0' width='100%'>
    <tr>
    <td width='354'>
    &lt;script type=&#39;text/javascript&#39;&gt;&lt;!--
    google_ad_client=&quot;pub-YOUR PUBLISHER ID&quot;;
    google_ad_host=&quot;pub-1556223355139109&quot;;
    google_ad_width=300;
    google_ad_height=250;
    google_ad_format=&quot;300x250_as&quot;;
    google_ad_type=&quot;text_image&quot;;
    google_ad_host_channel=&quot;0001&quot;;
    google_color_border=&quot;FFFFFF&quot;;
    google_color_bg=&quot;FFFFFF&quot;;
    google_color_link=&quot;0000FF&quot;;
    google_color_url=&quot;008000&quot;;
    google_color_text=&quot;000000&quot;;
    //--&gt;&lt;/script&gt;
    &lt;script src=&#39;http://pagead2.googlesyndication.com/pagead/show_ads.js&#39; type=&#39;text/javascript&#39;&gt;
    &lt;/script&gt;
    </td>
    <td><div class='ads-right-min'>
    <a class='mini-del' expr:href='&quot;http://del.icio.us/post?url=&quot; + data:post.url + &quot;&amp;title=&quot; + data:post.title' target='_blank' title='Add To Del.icio.us'>Add This To Del.icio.us</a>
    <a class='mini-tweet' expr:href='&quot;http://twitter.com/home?status=Reading &quot; + data:post.title + &quot; &quot; + data:post.url' target='_blank' title='Post this article on Twitter'>Tweet/ReTweet This</a>
    <a class='mini-facebook' expr:href='&quot;http://www.facebook.com/sharer.php?u=&quot; + data:post.url + &quot;&amp;title=&quot; + data:post.title' target='_blank' title='Share On Facebook'>Share on Facebook</a>
    <a class='mini-stumble' expr:href='&quot;http://www.stumbleupon.com/refer.php?url=&quot; + data:post.url + &quot;&amp;title=&quot; + data:post.title' target='_blank' title='Stumble This'>StumbleUpon This</a>
    <a class='mini-tech' expr:href='&quot;http://www.technorati.com/faves?add=&quot; + data:post.url' target='_blank' title='Add To Technorati'>Add to Technorati</a>
    <a class='mini-digg' expr:href='&quot;http://digg.com/submit?phase=2&amp;url=&quot; + data:post.url + &quot;&amp;title=&quot; + data:post.title' target='_blank' title='Digg This'>Digg This</a>
    </div>
    </td>
    </tr>
    </table>
    </div>
    </b:if>

    Replace YOUR PUBLISHER ID with your AdSense account ID. You'll find it with the Home tab, on your "Account settings" page. It should look something like this:

    pub-5623269265862168 (copy only the numbers and then paste them)

    6) Save template... and just go to one of your post to see the changes.
    [Read more]
    Click to go to top