Showing posts with label Tutorials. Show all posts

How to Stop Blogger Country Specific Redirection

Posted On // Leave a Comment


Blogger is a vast blogging platform with millions of blogs hosted on it. So some time before Blogger introduced Country Specific Redirection. For example a visitor from India who visits your blog by entering the URL abc.blogspot.com will be redirected to abc.blogspot.in. Blogger introduced Country Specific URL to provide better support to local blogs. Today I am going to show you how you can stop this redirection.

Before that you must be wondering that why should you stop redirection. The answer is simple. After redirection is on, you lost your Alexa ranks and the Pagerank juice too. This is not healthy for your blogger blog. So to remove the Redirection follow the steps given below.


Adding the JS


We will need to add JavaScript which will stop redirection. So to add this script firstly go to Blog Title → Template → Edit HTML. Press Ctrl + F and search for <head> and paste the below given code just below it.

<script type='text/javascript'>
var blog = document.location.hostname;
var slug = document.location.pathname;
var ctld = blog.substr(blog.lastIndexOf("."));
if (ctld != ".com") {
var ncr = "http://" + blog.substr(0, blog.indexOf("."));
ncr += ".blogspot.com/ncr" + slug;
window.location.replace(ncr);
}
</script>

After adding the code save the template.

You are done now. Now whenever a person tries to visit your blog, inspite of being redirected he will be at the original blog URL.
[Read more]

How to Change Blogspot Domain Name

Posted On // Leave a Comment


Ever wondered if you can change the blogspot domain in your blog ? The answer is Yes you can. Suppose you have a domain name myblog.blogspot.com and you wish to change its domain to techguide.blogspot.com then what would you do ? Download template and posts and upload in a newly created blog updates the widgets and hell lot of things. The answer is NO. You can simply change the URL of your blog.

Below is the step by step guide to show you how you can change the blogspot domain name in your blogger blog.


Step by Step Guide

  1. Go to Blogger.com
  2. Click the arrow button which is beside your Blogs name and select Settings
  3. In the Basic Tab (Open by Default) you would see three categories Basic, Publishing and Permissions.
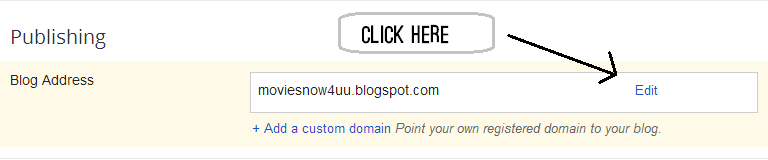
  4. Under the Publishing settings click the Edit text which will be be beside your blog URL.

    Blogger Domain Tutorial
  5. Enter your new desired domain and click save. You will see a confirmation popup showing that your desired settings has been saved.
  6. Now you can see your blog on a fully new URL.
This setting can be useful for those who want to change their blogger domain name. Blogs with personal names decrease it value in such cases this can be the best solution.
[Read more]

How to block Adblocker users in your Blogger blog

Posted On // Leave a Comment


Ad-blocker is an extension available on major browsers which blocks the advertisements which appear on Facebook / Google / Youtube and all small and big website/blogs. Ad-blocker currently has millions and millions of users. Bloggers work hard to provide services to their visitors and in return they too should get something and this extension is actually the road block in the path.

Due to Ad-blocker the ads don't reach some of the visitors and thus there would be no money no matter how much large user base you have. So in order to block Ad-blocker users, you just have to add a small piece of code. When any Ad-blocker user visits to your blog he will be redirected to a page which will instruct him/her to disable the extension and visit the page again.

There are many pros and cons of this plugins.

Pros - 

1. You will have more income as ads are visible to all.
2. After adding Ad-blocker the UI of the website changes to an extent. After adding this plugin all can see the actual page.

Cons- 

1. Bounce rate is going to be much higher
2. You may loose visitors.

A bloggers main job is helping others and not making money so I would personally recommend not to use this plugin. But if you think that you are not getting anything for the things you have been providing to your visitors you may add this plugins.


Adding the Ad-blocker Blocker


First go to Blog Title → Template → Edit HTML. Press Ctrl + F and search for </body> and paste the given code just above </body>.

<div id="abt-adblock-container">
<script type='text/javascript'>
//<![CDATA[
document.write('<\/SCR'+'IPT>');
//]]>
</script>
</div>
<script type='text/javascript'>
//<![CDATA[
if (document.getElementById("abt-adblock-container").clientHeight < 11 || document.getElementById("abt-adblock-container").style.position == "absolue") {window.location = "http://www.techigeek.com/abt-adblocker-blocker.html";}
//]]>
</script>

After adding the code save the template.

You are done now. Now whenever any Ad-blocker users come to your block he would be forced to disable the extension to see the contents of your blog.
[Read more]

Cool Badge with CSS Effect for Blogger

Posted On // Leave a Comment


So today I am going to show how you can add a Cool Badge which is in shape of a circle. When hovered over it, a CSS transition takes place and we can see a beautiful effect. These effects are seen in JavaScript and rarely in CSS.

The CSS is beautifully coded and the transition works because of the pseudo elements i.e. :after :before. Other than that browser hacks are used in it. This badge is extremely attractive and will force users to hover on it. You can add this widget in between the posts or in the sidebar. A quick live and working demo of this widget can be seen just below.


To add this badge to your sidebar/posts or anywhere where  HTML is supported just add the below code.

<style>
.circle{background:#fff;border-radius:100%;cursor:pointer;position:relative;width:15em;height:15em;overflow:hidden;transform:translateZ(0);margin:0 auto}
.circle h1{color:rgba(189,185,199,0);font-family:Lato, sans-serif;font-weight:900;font-size:1.6em;line-height:8.2em;text-align:center;text-transform:uppercase;-webkit-font-smoothing:antialiased;user-select:none;transition:color .8s ease-in-out}
.circle h1 a{color:rgba(189,185,199,0);text-decoration:none}
.circle:before,.circle:after{border-radius:100%;content:"";position:absolute;top:0;left:0;width:inherit;height:inherit;box-shadow:inset 10.6em 0 0 rgba(30,140,209,0.2), inset 0 10.6em 0 rgba(30,140,209,0.2), inset -10.6em 0 0 rgba(30,140,209,0.2), inset 0 -10.6em 0 rgba(30,140,209,0.2);transition:box-shadow .75s}
.circle:after{transform:rotate(45deg)}
.circle:hover:before,.circle:hover:after{box-shadow:inset .86em 0 0 rgba(255,0,0,0.5), inset 0 .86em 0 rgba(252,150,0,0.5), inset -.86em 0 0 rgba(0,255,0,0.5), inset 0 -.86em 0 rgba(0,150,255,0.5)}
.circle:hover > h1 a,.circle:hover > h1{color:rgba(185,185,185,1)}
</style>
<div class="circle">
  <<h1><a href="http://www.allbloggertricks.com">Your Blog</a></h1>
</div>


After Adding the Code change the text/URL which is in Bold and add your desired text/URL.

You are done now. Now you and your blog visitors can see this Cool Badge with CSS Effect in your blogger blog.
[Read more]

How to make your blogger blog more SEO Friendly

Posted On // Leave a Comment


SEO Blogger
SEO (Search Engine Optimization) is the base of every blog, without it one can't call his blog a commercial/professional one. The ranking of your blog in Google largely depends on SEO and we all know better the ranking in Google, more the traffic we get. So one should make every possible effort to make his blog more SEO Friendly. But how do I do it ? SEO is a vast topic. There are thousands of ways for improving your blog's SEO. Such as adding Meta Tags, Keeping the right number of characters in the post title, adding alt tags to all images and many other things.

Today I will show you how you can -

1. Make all the external links open in new tab 
This will reduce your bounce rate, increase the no. of pageviews on your blog and your blog traffic will not be transferred just because of one single link.

2. Make all the external links nofollow
By default all links are dofollow that means Google can crawl them and hence much of the PageRank juice of the page goes away. So in order to prevent them one should add nofollow tag to all external links.

3. Adding alt tags to all images
Alt tag in an image describes it and through it search engines like Google Images show you blogs image on related query. This helps to get more visitors to your blog and improve SEO greatly.

So the question comes how to do all these things ? Manually doing this will take hell lot of time and it would nearly impossible for blogs with huge number of posts for manually doing this task. So in order to save your effort a JavaScript code is already coded.


How to add SEO Friendly code to Blogger


Go to Blog Title → Template → Edit HTML and add the below code just above the tag </head>

<script src='http://ajax.googleapis.com/ajax/libs/jquery/1.3.2/jquery.min.js' type='text/javascript'/>

<script type='text/javascript'>//<![CDATA[
jQuery('a').each(function(){// Let's make external links open in a new tab. var href=jQuery(this).attr('href');if (typeof href !='undefined' && href !="" && (href.indexOf('http://') !=-1 || href.indexOf('https://') !=-1) && href.indexOf(window.location.hostname)==-1){jQuery(this).attr("target", "_blank");}});//]]></script>

<script type='text/javascript'>//<![CDATA[
jQuery('a').each(function(){// Let's make external links nofollow. var href=jQuery(this).attr('href');if (typeof href !='undefined' && href !="" && (href.indexOf('http://') !=-1 || href.indexOf('https://') !=-1) && href.indexOf(window.location.hostname)==-1){jQuery(this).attr("rel", "nofollow");}});//]]></script>

<script type='text/javascript'>//<![CDATA[
$(document).ready(function(){$('img').each(function(){var $img=$(this);var filename=$img.attr('src') $img.attr('alt', filename.substring((filename.lastIndexOf('/'))+1, filename.lastIndexOf('.')));});});//]]></script>

If your blog already has the JQuery plugin you may remove the code in red and if not add the whole code in order to make the script work.
Once you have added the code save your template.You are done now. Now you can see alt tags in your images, Nofollow tag in External links and Opening of external links in new tab. I would recommend every blogger to add this code because one small effort of yours can make improve your blog's SEO significantly.
[Read more]

Official Contact Form Widget released for Blogger

Posted On // Leave a Comment


Official Blogger Contact Form
As +Prayag Verma of Stylifyyourblog.com wrote on his post on 02 April 2013 that blogger is working on Contact Form. He found out CSS codes for Contact form from the bundle css file which is by default in every blog. That Contact form is released now. Just prior to Google I/O 2013 all Google products are really working hard to improve their services and the same goes for blogger.

You don't have much options to edit this form. If you know basics of CSS you may use inline CSS in your blog to edit it. Whenever someone sends you a message through this from it will directly go in your email which is linked with Blogger.


How to add this widget to Blogger


Adding this widget is quite easy. Just follow the below steps to add it.

1. Go to Blogger.com → Blog Title → Layout → Add Widget
2.  From the tabs menu click on More Gadgets.
3. Now click on Contact Form and finally Give your desired heading to it
4. Save the widget and lastly save the Template


How to add Contact Form


Thats it. Now whenever a visitor wants to contact you he can do the same by just press a single button moreover you can see the messages in your email box. Now there would be no need of 123forms and Foxyforms. This contact form is in its initial stage and we may see further development on it.
[Read more]

How to add Custom Text Ads Box like Adsense

Posted On // Leave a Comment


text ads box
Many of you may have seen Google Adsense text ads in other or your blog. Today I will show you how you can add Text Ads Box widget to your blogger blog. In this widget you can edit everything i.e. the colors, Title text, Description, Ads provider etc. etc. If you sell text links on your blog this widget may be quite helpful for you.

The live demo of this widget can be seen by clicking the below button and looking at the right sidebar of the opened page.

Now if you have seen the demo we can proceed with the steps on how you can add this widget to your blog.


Adding the Widget


Go to Blog Title → Layout → Add Widget → HTML/JavaScript. Paste the below code in the box

<style>
#ads_ppc {text-align: left; width:280px; height:300px; padding:5px; margin:0px;border:1px solid #1a4d86}
</style>
<div id='ads_ppc'>
<a style="text-decoration: underline; padding: 15; font-size: 12px; color:blue;" href="http://www.yourlinkhere.com/" target="_blank" title="YourTitle"><strong>Big Link Name</strong></a><br />
<span style="font:11px verdana;">YOUR DESCRIPTION HERE</span><br />
<a style="font-size: 9px;color:#b0130d;" href="http://www.rockingtemplates.com/" target="_blank" title="Link Title">Small Link Name</a><br/><br/>

<a style="text-decoration: underline; padding: 15; font-size: 12px; color:blue;" href="http://www.yourlinkhere.com/" target="_blank" title="YourTitle"><strong>Big Link Name</strong></a><br />
<span style="font:11px verdana;">YOUR DESCRIPTION HERE</span><br />
<a style="font-size: 9px;color:#b0130d;" href="http://www.rockingtemplates.com/" target="_blank" title="Link Title">Small Link Name</a><br/><br/>

<a style="text-decoration: underline; padding: 15; font-size: 12px; color:blue;" href="http://www.yourlinkhere.com/" target="_blank" title="YourTitle"><strong>Big Link Name</strong></a><br />
<span style="font:11px verdana;">YOUR DESCRIPTION HERE</span><br />
<a style="font-size: 9px;color:#b0130d;" href="http://www.rockingtemplates.com/" target="_blank" title="Link Title">Small Link Name</a><br/><br/>

<a style="text-decoration: none; padding: 15; font-size: 12px; float: right;color:#b0130d;" href="http://www.allbloggertricks.com/" target="_blank" title="Creators Link"><small>Ads by ABT</small></a><br />
</div>

Change the numbers in red to meet your requirements. Change other things like Link, Title, Link Name etc. with your desired text. 
Save the Widget and Save the Template.

Your are done now. Now you and your visitors can see this custom text ads widget in your blog.
[Read more]

Best SEO Practices for Blogger Blogs

Posted On // Leave a Comment


Search Engine Optimization
We all know about WordPress. It is just another alternative for blogger but it has one thing which blogger blogs lack. They are Plugins. WordPress has a wide range on plugin which you can use in your blog. There are different types of SEO Plugins available for WordPress such as - Yoast SEO, All in One SEO etc. Blogger does not supports these plugins and you have to do all the SEO work manually. You may hire someone but this could be costly. So below are few tips on how you can make your Blogger blog more visible to search engines.

Adding Meta Tag in Header


Go to Blog Title → Template → Edit HTML and add the below code just after the tag <head>

<meta content='Your site description' name='description'/>
<meta content='Your site Keywords' name='keywords'/>
<meta content='Your Name' name='author'/>
<meta content='youemail@ymail.com' name='Email'/>
<meta content='global' name='distribution'/>
<meta content='document' name='resource-type'/>
<meta content='all' name='audience'/>
<meta content='general' name='rating'/>
<meta content='all' name='robots'/>
<meta content='en' name='language'/>
<meta content='EN' name='country'/>
<meta content='blogger' name='generator'/>
<meta content='Your Name' name='owner'/>
<meta content='(c) 2013 Blog name' name='copyright'/>

After adding the above code edit it with your desired settings.


Adding Alt and Title tag to all images


Optimizing blog images are really important for SEO and for that one should add Alt and Title tag to every image of its blog. The following can be done by Clicking the image in post editor, click on properties and adding the needed text.

Blogger Image Properties

Customizing Permalink of your post


You can also customize the permalink that is URL of your blog post. For customizing the permalink of the post you have to click on Permalink tab under Post Settings and do the desired changes.
Tip : Remove slugs like in, on, to, for etc. You must be inquisitive to know why don't I do these changes well you will get the answer in the last line of this post.

Blogger Permalink

Adding blog to different Search Engines


So that search engines can crawl your blog, it is very important to add your blog on different search engines. Below is a list of some popular search engines where you can submit your blogs URL.

AlltheWebwww.alltheweb.com Submit at www.alltheweb.com/help/webmaster/submit-site.
AltaVistawww.altavista.com Submit at www.altavista.com/addurl/.
AOL Searchsearch.aol.com Submit via Google (www.google.com/addurl/).
Ask.comwww.ask.com Does not accept site submissions.
Best of the Webwww.botw.org Paid submittal at www.botw.org/helpcenter/submitcommercial.aspx.
Bingwww.bing.comSubmit at www.bing.com/webmaster/SubmitSitePage.aspx
Gigablastwww.gigablast.com Submit at www.gigablast.com/indexphp?subPage=addUrl&page=about&.
JoeAntwww.joeant.com Submit at www.joeant.com/suggest.html.
Open Directorywww.dmoz.org Go to appropriate category page and click Suggest URL.
Starting Pointwww.stpt.com Paid submittal at www.stpt.com/directory/addsite.htm.
Wikia Searchsearch.wikia.comClick the Add button on any relevant search results page.


 Other Factors


There are many other factors on which your blog's SEO depends they are - Blog Speed, Originality of the content, Keyword research, Backlinks, SEO optimized template etc.

SEO is a very important factor for your blogs productivity so one should surely pay attention to it. Last but not the least I just want to say that never over-optimize your blog.
Write for your readers, not for the search engines.
[Read more]

How to make a Full backup of your Blogger blog

Posted On // Leave a Comment


Making a backup of your blog is what every blogger should practice. Since Google Reader has been shut down, rumors have been spread that Blogger MAY shut down too. So being sorry in the near future would not help you but the backup you make now would surely do.

No one knows when his blog would be hacked by hackers or a malware breaks down all the coding of the template. Sometimes while editing a template we may delete/add some codes which may make the blog's template not as you desire. This makes making a backup for your blog really important. A Blogger should make a backup of his template once and keep it at a safe place where you can find it easily. We recommend to make posts backup once in every week. It may look tedious to you but your small effort can save your blog one day. Here are the steps to make Template and Posts backup.

Making backup of the template


Go to Blog Title → Template. Click at Backup/Restore button at Top right. A Popup box will appear click on Download full template button. Your template will start downloading.


Save it in a place where you can find it easily. You should always make a template backup before editing the template.


Making backup of all the posts


Head up to  Blog Title → Settings → Other → Blog Tools. Click on Export Blog option. A popup box will appear again. Click on Download blog option. Your posts will be downloaded. you can upload it to other CMS Platoforms like WordPress too.

Save the file. You are done. Make sure you make Posts backup once in a week.

Now you have both Posts as well as template backup. You can import them whenever you want. Make you blog's backup before its too late.
[Read more]

How to use a Subdomain for your Blogger blog

Posted On // Leave a Comment


Google already provides you a tutorial on how you can add a domain to your blogger blog. But it does not specifically show the steps for setting up two domains - 1. Main Domain 2. Subdomain for your two blogger blogs i.e. you will have two blogs one on main domain and the other on subdomain for example http://www.allbloggertricks.com and http://demo.allbloggertricks.com.

Below are 3 easy steps with images on how you can add a subdomain to your blogs existing domain without any difficulty.


Step 1 : Add a A Name Record


Go to your domains registrar website and click on Change DNS/DNS Manager option. There you would find different CNAME and A records you have made previously for your main blog. Add another A name record with the the desired subdomain as your host. For example if you want subdomain http://demo.allbloggertricks.com/ for your blog then enter demo in the host name. In the IP/Point to section add this IP - 216.239.32.21 After adding save the record.

Subdomain Blogger

Step 2 : Setup the domain in Blogger


Now go to Blog Title → Settings → Basic → Blog Address → Add a Custom Domain → Switch to Advance Settings and add your full subdomain in our case it would be demo.allbloggertricks.com. Make sure the box saying "Redirect allbloggertricks.com to demo.allbloggertricks.com" is unchecked else when someone goes to allbloggertricks.com (with no www ) they will be redirected to http://demo.allbloggertricks.com/

Subdomain Blogger Blog


Step 3 : Settings in the main Blog (Required in some cases)


Even after unchecking the box above, if the domain http://allbloggertricks.com (without www) redirects you to http://demo.allbloggertricks.com Go to Main Blog Title → Settings → Basic → Blog Address → Edit and check the box which states "Redirect allbloggertricks.com to www.allbloggertricks.com" Thats it, the whole setup is done. Sometimes if takes 1-2 hours for making the changes by the domain registrar but most of the time change is withing 5 minutes. Your custom subdomain is ready.
[Read more]

How to add PPT Presentation to Blogger

Posted On // Leave a Comment


Blogger post editor has options to add Images and Videos but Presentation can be added too if you know just the basic concept of using Blogger Templates editor.
Ever wanted to add a PowerPoint/PPT Presentation to your Blogger post. Confused how can you embed a PowerPoint Presentation? Here are some simple steps to do the same. Follow these steps to add PPT Presentation to your Blogger blog.


1. Go to Slideshare.net


Go to Slideshare.net and login to your account. If you don't have have an account create a new one.

2. Upload your Presentation


Once you have logged in Click on Upload button from the top menu. After that click on Single upload from the sub-menu. Upload you presentation and add details like Title, Description etc.


3. Copying the Embedding code


Now click on the option My Slideshow from the top menu bar and open your uploaded presentation. After the Presentation opens click on the embed option present on the menu just above the presentation. Click on customize if you want to change the size of presentation. After doing to the desired changes click on Copy.


4. Posting the Presentation


Now open Blogger post editor. Click on the HTML option which is beside Compose at Top Right. Paste the code copied from Slideshare. Publish your post and enjoy the Presentation.

Thats it. Its not too tough. You just have to follow these 4 simple steps to add the presentation to your Blogger blog. If you face any problem do not hesitate to ask for help using the below Comment Form.
[Read more]
Click to go to top