Showing posts with label how to. Show all posts

How to Add an Admin Control Panel in Blogger

Posted On // Leave a Comment
A while ago I've posted some tutorials on how you can remove the Blogger Navbar or add a Peek A Boo Effect so that it would show only when we mouse over on top of our page.

However, customizing or removing the Blogger Navbar also has its downside because the admin links for "New post", "Customize" and "Log Out" will be no longer visible and navigating through the blog functions could be really frustrating sometimes. When the navbar is visible, blog administrators can easily create a new post or customize their template with just one click; however, when the navbar is hidden, many more clicks are required to access the Blogger dashboard panel again.

So in this tutorial, we'll see how to add an "Admin Control Panel" menu with many cool additions such as:

- access to the Blogger's Homepage
- create a New Page or Post
- view all your posts
- read your comments
- access the Blog's layout to add or rearrange gadgets
- edit the HTML of your Template
- refresh current page or post
- open a new tab with your blog's homepage
- access the blog' settings
- view your stats
- ...and finally, log out

We will put all these options on the top of your page as a menu and we will make it visible only to the administrator of the blog, so our blog visitors will not be able to see it.

The result will be something like this:

admin control panel for blogger

Getting the Blog ID 

The first thing we need to do is get the ID of our blog by clicking on any option from our Blog Dashboard, for example Settings. Once we have clicked there, take a look at the address bar in your browser:

blogger id number

Within the URL you will notice a string like this:
blogID=XXXXXXXXX
Where XXXXXXXXX is the unique identifier (ID) for your blog.

Copy the ID for the blog you wish to work with so we can add this in the links for your admin control panel.

Adding the admin control panel to Blogger template


The Admin Control Panel will only be visible when the blog author is logged in. It is invisible to blog readers, similar to the Edit post/widget pencil icons which are only visible to you while you are logged in.

To add the control panel to your Blogger template, follow the steps below:

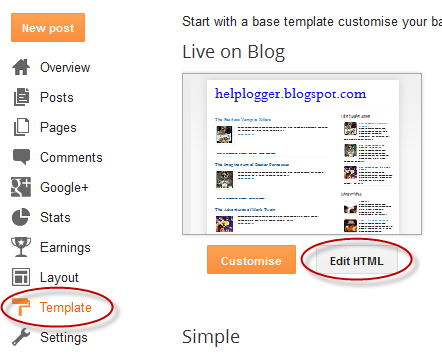
Step 1. Go to Template and click on the Edit HTML button:

Step 2. Click anywhere inside the code area and press the CTRL + F keys to open the Blogger' search box

Step 3. Paste this line inside the search box then hit Enter to find it:
<body expr:class='&quot;loading&quot; + data:blog.mobileClass'>
Note: if you can't find this line, try to find the <body> tag.

Step 4. Just below this line, add the following code:
<span class='item-control blog-admin'>
<style>
.control-panel ul{z-index: 20; position: absolute; margin: 0px auto; background-color: #F6F6F6; width: 100%; }
.control-panel ul li{display: inline-block; float: left; padding: 7px 0px;}
.control-panel ul li a {color:#686868;padding: 7px 15px;border-right: 1px solid #E3E3E3;font-weight: bold;font-size: 13px;}
.control-panel a:hover {text-decoration:none; color:#FC8F44;}
</style>
<div class='control-panel'>
<ul>
<li><a href='http://www.blogger.com/home'>My Blogs</a></li>
<li><a href='http://www.blogger.com/blogger.g?blogID=XXXXXXXXXXXXX#editor/src=sidebar'>New Post</a></li>
<li><a href='http://www.blogger.com/blogger.g?blogID=XXXXXXXXXXXXX#editor/target=page'>New Page</a></li>
<li><a href='http://www.blogger.com/blogger.g?blogID=XXXXXXXXXXXXX#posts'>All Posts</a></li>
<li><a href='http://www.blogger.com/blogger.g?blogID=XXXXXXXXXXXXX#comments'>Comments</a></li>
<li><a href='http://www.blogger.com/blogger.g?blogID=XXXXXXXXXXXXX#pageelements'>Layout</a></li>
<li><a href='http://www.blogger.com/blogger.g?blogID=XXXXXXXXXXXXX#templatehtml'>Edit HTML</a></li>
<li><a href='#' onclick='location.reload(true); return false;'>Refresh</a></li>
<li><a href='/' target='_blank'>New Tab</a></li>
<li><a href='http://www.blogger.com/blogger.g?blogID=XXXXXXXXXXXXX#basicsettings'>Settings</a></li>
<li><a href='http://www.blogger.com/blogger.g?blogID=XXXXXXXXXXXXX#overviewstats'>Stats</a></li>
<li><a href='http://www.blogger.com/logout.g'>Logout</a></li>
</ul>
</div>
</span>
Change XXXXXXXXXXXXX with your unique Blog ID previously copied, and be careful not to delete anything, like quote or any other character.

Step 4. Click on the Save template button to save the changes.

Now take a look at your blog. While you are logged in to Blogger, you should notice your control panel appear on top of your blog. Enjoy!

With this admin control panel for Blogger you can easily access the functions of the blog and you will not have to always open your blog page and the Blogger homepage at the same time.
[Read more]

How to create click events using CSS

Posted On // Leave a Comment
An event is something that happens when we do something. In CSS, the most common is the hover selector which helps us to select elements when we mouse over them and then an event is executed automatically. There is one way to avoid this since in modern browsers there is a property called pointer-events which allows us to disable them. For instance, if we have a link and we set the pointer-events property value to none, it would simply not work:
<a href="page-url" style="pointer-events: none;">Click here</a>
Many use :target to make it work, however, this is not always the best choice if we consider its jumping behavior - click on the link below to see what happens:

Link with target
Lorem ipsum dolor sit amet, consectetur adipiscing elit. Nam eu cursus dui, ac fermentum eros. Interdum et malesuada fames ac ante ipsum primis in faucibus. Fusce elementum sapien et augue fringilla aliquam. Ut a viverra libero, eget commodo nisi. Maecenas ultrices facilisis dignissim.
<style>
#linktarget {display: none;}
#linktarget:target {display: block;}
</style>
<a href="#linktarget">Link with target</a>
<div id="linktarget">
Lorem ipsum dolor sit amet, consectetur adipiscing elit. Nam eu cursus dui, ac fermentum eros. Interdum et malesuada fames ac ante ipsum primis in faucibus. Fusce elementum sapien et augue fringilla aliquam. Ut a viverra libero, eget commodo nisi. Maecenas ultrices facilisis dignissim.
</div>
Another option is to use the :focus selector which will make the hidden content to expand on mouse click.
The advantage of this selector is that the page stays still, however, we have to click anywhere "outside" to close the expanded content and besides this, the hidden content should be immediately after, with no intermediate tags:

Demo with focus
Lorem ipsum dolor sit amet, consectetur adipiscing elit. Nam eu cursus dui, ac fermentum eros. Interdum et malesuada fames ac ante ipsum primis in faucibus. Fusce elementum sapien et augue fringilla aliquam. Ut a viverra libero, eget commodo nisi. Maecenas ultrices facilisis dignissim.
<style>
.focuselector {display: none;}
span:focus ~ .focuselector {display: block;}
</style>
<span tabindex="0">Link with focus</span>
<div class="focuselector">
Lorem ipsum dolor sit amet, consectetur adipiscing elit. Nam eu cursus dui, ac fermentum eros. Interdum et malesuada fames ac ante ipsum primis in faucibus. Fusce elementum sapien et augue fringilla aliquam. Ut a viverra libero, eget commodo nisi. Maecenas ultrices facilisis dignissim.
</div>
The last method is more fancy even though it requires more tags but it works the best since it allows us to create a toggle effect, i.e., expand on click and then collapse when clicking again. In this case, we'll use the :checked selector:


Lorem ipsum dolor sit amet, consectetur adipiscing elit. Nam eu cursus dui, ac fermentum eros. Interdum et malesuada fames ac ante ipsum primis in faucibus. Fusce elementum sapien et augue fringilla aliquam. Ut a viverra libero, eget commodo nisi. Maecenas ultrices facilisis dignissim.
<style>
.checked-selector {display: none;}
:checked ~ .checked-selector {display: block;}
input.hidden[type=checkbox] {position: absolute;left: -999em;}
</style>

<label for="toggle-hidden">Demo with checked</label>
<input type="checkbox" id="toggle-hidden" class="hidden" />
<div class="checked-selector">
Lorem ipsum dolor sit amet, consectetur adipiscing elit. Nam eu cursus dui, ac fermentum eros. Interdum et malesuada fames ac ante ipsum primis in faucibus. Fusce elementum sapien et augue fringilla aliquam. Ut a viverra libero, eget commodo nisi. Maecenas ultrices facilisis dignissim.
</div>
To apply these effects on the links and content that you want to hide and expand only on mouse click is very easy: when you create a post, paste one of the codes above inside the HTML box and replace the text in blue with the name of your link and add your text instead of the green one.
[Read more]

How to Use Character Entities in CSS, HTML and JavaScript

Posted On // Leave a Comment
Sometimes, when using scripts, we must write special characters like accents by using a special set of codes called character entities, however these don't always look good or we get a question mark or other strange symbols. Usually, this is solved if the character encoding is done right but the logic may not always work.

In Blogger, special characters most of the time appear correctly, but when it is about other services, like external files, things can get complicated.

For example, this usually looks good and when you click on this link, you should see the letters in the right way:
alert(" á é í ó ú  ☺ ✛ ❤ ");
If we are trying to use other method and we want to use this type of characters, sometimes we need to write them in a special format called escape sequence which is nothing but a backslash followed by a letter and a number in hexadecimal format. In the case of common characters or accents, it would be \x followed by two hex digits:
\xe1 is the letter á
\xe9 is the letter é
\xed is the letter í
\xf3 is the letter ó
\xfa is the letter ú
Other combinations generate special characters:
\n is a line break
\t is the tab character
\' is single quote
\" is double quote
\\ is a back slash
Or we can use \u followed by the Unicode character code expressed as four hexadecimal digits:
\u00e1 is the letter á
\u00e9 is the letter é
\u00ed is the letter í
\u00f3 is the letter ó
\u00fa is the letter ú
this will allow us to see correctly what we couldn't before if we were using some other services:
alert(" \u263a \u2764 \u271b ");
On this page you can find a comprehensive list of all the characters, both symbols and different alphabets.
Although rare characters are not often used in the CSS, there is a case when they are necessary as well, like when using the content property with the :after and :before pseudo-elements.

The same criteria applies there, but we only need to add a backslash followed by the four-digit hexadecimal code. For example:
content: ":\24d1\24d4\24d5\24de\24e1\24d4";

content: ":after  \263a  \2724  \2602";
:ⓑⓔⓕⓞⓡⓔ
:after ☺ ✤ ☂

Remember that IE doesn't understand the :before pseudoclass with content, and you would have to set the list-style-type property as none, or you would get 2 bullets in CSS compliant browsers.
[Read more]

How to Create a Sitemap or Table of Contents in Blogger

Posted On // Leave a Comment
One of the limitations of a blog is that it doesn't have an index or sitemap of the site that could make it easier for readers to find content that they are searching for.
While the blog archive and labels have all the information about the published post, these do not appear on a single page completely, so searching for more posts is not always easy.

Luckily, this gadget will help you to add a table of contents or sitemap on Blogger showing the index of all posts separated by categories that have been published. It will also show the latest posts with a text saying New!

table of contents, sitemap, blogger

Demo: You can see it working by clicking here.

How To Add a Sitemap with a List of Posts to Blogger


To implement it on your blog, follow the steps below:

Step 1. Login to your Blogger Dashboard and select your blog
Step 2. Go to Pages > click the New Page button and select Blank page


Step 3.  Click on the HTML tab and paste the following code inside the empty box:
<style>
p.labels a{color: #242424; text-transform: uppercase;font-size: 15px;}
a.post-titles {color: #0000FF;}
ol li{list-style-type:decimal;line-height:25px;}
</style>
<script>
//<![CDATA[
var postTitle=new Array();var postUrl=new Array();var postPublished=new Array();var postDate=new Array();var postLabels=new Array();var postRecent=new Array();var sortBy="titleasc";var tocLoaded=false;var numChars=250;var postFilter="";var numberfeed=0;function bloggersitemap(a){function b(){if("entry" in a.feed){var d=a.feed.entry.length;numberfeed=d;ii=0;for(var h=0;h<d;h++){var n=a.feed.entry[h];var e=n.title.$t;var m=n.published.$t.substring(0,10);var j;for(var g=0;g<n.link.length;g++){if(n.link[g].rel=="alternate"){j=n.link[g].href;break}}var o="";for(var g=0;g<n.link.length;g++){if(n.link[g].rel=="enclosure"){o=n.link[g].href;break}}var c="";if("category" in n){for(var g=0;g<n.category.length;g++){c=n.category[g].term;var f=c.lastIndexOf(";");if(f!=-1){c=c.substring(0,f)}postLabels[ii]=c;postTitle[ii]=e;postDate[ii]=m;postUrl[ii]=j;postPublished[ii]=o;if(h<10){postRecent[ii]=true}else{postRecent[ii]=false}ii=ii+1}}}}}b();sortBy="titleasc";sortPosts(sortBy);sortlabel();tocLoaded=true;displayToc2();document.write('</br><div class="sitemap-link"><a href="http://helplogger.blogspot.com/2013/12/add-sitemap-table-of-contents-to-blogger.html" style="font-size: 10px; text-decoration:none; color: #5146CD;">Get This Widget</a></div>')}function filterPosts(a){scroll(0,0);postFilter=a;displayToc(postFilter)}function allPosts(){sortlabel();postFilter="";displayToc(postFilter)}function sortPosts(d){function c(e,g){var f=postTitle[e];postTitle[e]=postTitle[g];postTitle[g]=f;var f=postDate[e];postDate[e]=postDate[g];postDate[g]=f;var f=postUrl[e];postUrl[e]=postUrl[g];postUrl[g]=f;var f=postLabels[e];postLabels[e]=postLabels[g];postLabels[g]=f;var f=postPublished[e];postPublished[e]=postPublished[g];postPublished[g]=f;var f=postRecent[e];postRecent[e]=postRecent[g];postRecent[g]=f}for(var b=0;b<postTitle.length-1;b++){for(var a=b+1;a<postTitle.length;a++){if(d=="titleasc"){if(postTitle[b]>postTitle[a]){c(b,a)}}if(d=="titledesc"){if(postTitle[b]<postTitle[a]){c(b,a)}}if(d=="dateoldest"){if(postDate[b]>postDate[a]){c(b,a)}}if(d=="datenewest"){if(postDate[b]<postDate[a]){c(b,a)}}if(d=="orderlabel"){if(postLabels[b]>postLabels[a]){c(b,a)}}}}}function sortlabel(){sortBy="orderlabel";sortPosts(sortBy);var a=0;var b=0;while(b<postTitle.length){temp1=postLabels[b];firsti=a;do{a=a+1}while(postLabels[a]==temp1);b=a;sortPosts2(firsti,a);if(b>postTitle.length){break}}}function sortPosts2(d,c){function e(f,h){var g=postTitle[f];postTitle[f]=postTitle[h];postTitle[h]=g;var g=postDate[f];postDate[f]=postDate[h];postDate[h]=g;var g=postUrl[f];postUrl[f]=postUrl[h];postUrl[h]=g;var g=postLabels[f];postLabels[f]=postLabels[h];postLabels[h]=g;var g=postPublished[f];postPublished[f]=postPublished[h];postPublished[h]=g;var g=postRecent[f];postRecent[f]=postRecent[h];postRecent[h]=g}for(var b=d;b<c-1;b++){for(var a=b+1;a<c;a++){if(postTitle[b]>postTitle[a]){e(b,a)}}}}function displayToc(a){var l=0;var h="";var e="Post Title";var m="Click to sort by title";var d="Date";var k="Click to sort by date";var c="Category";var j="";if(sortBy=="titleasc"){m+=" (descending)";k+=" (newest first)"}if(sortBy=="titledesc"){m+=" (ascending)";k+=" (newest first)"}if(sortBy=="dateoldest"){m+=" (ascending)";k+=" (newest first)"}if(sortBy=="datenewest"){m+=" (ascending)";k+=" (oldest first)"}if(postFilter!=""){j="Click to view all"}h+="<table>";h+="<tr>";h+='<td class="header1">';h+='<a href="javascript:toggleTitleSort();" title="'+m+'">'+e+"</a>";h+="</td>";h+='<td class="header2">';h+='<a href="javascript:toggleDateSort();" title="'+k+'">'+d+"</a>";h+="</td>";h+='<td class="header3">';h+='<a href="javascript:allPosts();" title="'+j+'">'+c+"</a>";h+="</td>";h+='<td class="header4">';h+="Read all";h+="</td>";h+="</tr>";for(var g=0;g<postTitle.length;g++){if(a==""){h+='<tr><td class="entry1"><a href="'+postUrl[g]+'">'+postTitle[g]+'</a></td><td class="entry2">'+postDate[g]+'</td><td class="entry3">'+postLabels[g]+'</td><td class="entry4"><a href="'+postPublished[g]+'">Read</a></td></tr>';l++}else{z=postLabels[g].lastIndexOf(a);if(z!=-1){h+='<tr><td class="entry1"><a href="'+postUrl[g]+'">'+postTitle[g]+'</a></td><td class="entry2">'+postDate[g]+'</td><td class="entry3">'+postLabels[g]+'</td><td class="entry4"><a href="'+postPublished[g]+'">Read</a></td></tr>';l++}}}h+="</table>";if(l==postTitle.length){var f='<span class="toc-note">Show All '+postTitle.length+" Posts<br/></span>"}else{var f='<span class="toc-note">Show '+l+" posts by category '";f+=postFilter+"' the "+postTitle.length+" Total Posts<br/></span>"}var b=document.getElementById("toc");b.innerHTML=f+h}function displayToc2(){var a=0;var b=0;while(b<postTitle.length){temp1=postLabels[b];document.write("<p/>");document.write('<p class="labels"><a href="/search/label/'+temp1+'">'+temp1+"</a></p><ol>");firsti=a;do{document.write("<li>");document.write('<a class="post-titles" href="'+postUrl[a]+'">'+postTitle[a]+"</a>");if(postRecent[a]==true){document.write(' - <strong><span style="color: rgb(255, 0, 0);">New!</span></strong>')}document.write("</li>");a=a+1}while(postLabels[a]==temp1);b=a;document.write("</ol>");sortPosts2(firsti,a);if(b>postTitle.length){break}}}function toggleTitleSort(){if(sortBy=="titleasc"){sortBy="titledesc"}else{sortBy="titleasc"}sortPosts(sortBy);displayToc(postFilter)}function toggleDateSort(){if(sortBy=="datenewest"){sortBy="dateoldest"}else{sortBy="datenewest"}sortPosts(sortBy);displayToc(postFilter)}function showToc(){if(tocLoaded){displayToc(postFilter);var a=document.getElementById("toclink")}else{alert("Just wait... TOC is loading")}}function hideToc(){var a=document.getElementById("toc");a.innerHTML="";var b=document.getElementById("toclink");b.innerHTML='<a href="#" onclick="scroll(0,0); showToc(); Effect.toggle(\'toc-result\',\'blind\');">?? Display Table of Contents</a> <img src="https://blogger.googleusercontent.com/img/b/R29vZ2xl/AVvXsEjiPMzy5uVllfCd5AAfqDhh4l3G_Yf3q8SdOgH4N0CzuOhiswmtsD64Xp2qgosgfoZ0a2cTEvP8sW_LiWiileXIG91UzkgMDlBvNnloi-gZl8xQKFg8-_ikptOXZTdX2ZFh3eyGK6nDFE01/s1600/new_icon.gif"/>'}function looptemp2(){for(var a=0;a<numberfeed;a++){document.write("<br>");document.write('Post Link : <a href="'+postUrl[a]+'">'+postTitle[a]+"</a><br>");document.write('Read all : <a href="'+postPublished[a]+'">'+postTitle[a]+"</a><br>");document.write("<br>")}};
//]]>
</script>
<script src="http://helplogger.blogspot.com/feeds/posts/default?max-results=9999&amp;alt=json-in-script&amp;callback=bloggersitemap"></script>
After adding the above code, replace http://helplogger.blogspot.com with the address of your blog.

Customization:

- to change the color and font size of categories title, replace the values in red
- to change the color of the links, replace the value in green

Step 4. Click Options on the right side and select Don't allow (hide existing) for the reader's comments

Step 5. Finally, click the Publish button and View the page.

That's all!
The index of the posts is sorted alphabetically and is updated automatically each time a new post is published.
[Read more]

Using JQuery + EasyDrag to Move Elements or Images by Clicking on Them

Posted On // Leave a Comment
This is one way to make your site more interactive so that readers can "play" with certain elements of the page being able to drag from one side to another within the container in which they are, i.e. can drag the images with a script that will allow them to move from one place to another within the blog.
Demo

You can see an example in this test blog

To create this effect on images


Login to your Blogger account, go to Template and click the Edit HTML button:


Click anywhere inside the template's code and press the CTRL + F keys to search for this tag:
</head>
Just before </head> paste the following scripts:
<script src='http://code.jquery.com/jquery-latest.js' type='text/javascript'/>
<script src='http://helplogger.googlecode.com/svn/trunk/jquery.easydrag.js' type='text/javascript'/>
Note: If you already have jquery, please remove the code in red.

Now when you want to drag an image, use this code inside the HTML of your post or of your page:
<img id="easydrag1" src="image-URL" style="border: 0px none; cursor: move;" />
<script type="text/javascript">
$(function(){ $("#easydrag1").easydrag();});
</script>
Change the URL of the image where is indicated, and furthermore, it is important that each image has a unique ID, in this example the ID is called easeydrag1, that ID must be twice.

If you have another picture with this effect, then you should put a different image with other ID, for example easydrag2, otherwise it will not work:
<img id="easydrag1" src="image-URL" style="border: 0px none; cursor: move;" />
<script type="text/javascript">
<img id="easydrag2" src="image-URL" style="border: 0px none; cursor: move;" />
<script type="text/javascript">
$(function(){ $("#easydrag1").easydrag();});
$(function(){ $("#easydrag2").easydrag();});
</script>
And how do you do if you want to put a link to the image?

We will set one Javascript function, so that when we will double click on it to open the page we want.

In this case, the code you would use, would be this:
<img id="easydrag1" style="cursor:move; border:0px;" ondblClick="javascript:window.open('link-URL')" src="image-URL" /><script type="text/javascript">
$(function(){ $("#easydrag1").easydrag();});
</script>
With this the picture can be without any problems dragged around and can be activated by double clicking on its link.
[Read more]

Filter out your visits to your blog from Google Analytics traffic statistics

Posted On // Leave a Comment
The results of daily visits in the web hit counters always have a margin of error. In most of them, this margin is very high, therefore the statistics shown are not even a bit closer to the actual visits we have. Google Analytics has a very short margin of error, which makes it more reliable, so that we have a better idea of how many people visit us.

However, if you visit your own website, either to check if everything works well, to review comments, to answer them, to see if anyone is online, or just because you need to enter, then your visit will also be registered in the counter. This implies that the margin of error is larger again, because those visits are not our actual visits and we are not interested in knowing how many times we are coming back to our site, but how many people from elsewhere are visiting.
Therefore what we can do is to filter our IP so that we won't be registered in the statistics and thus to get "cleaner" results on the total number of visits and page views.
  1. The first thing is to find out what is your IP address. Just type "what is my ip address" on google and above all of the results it will say "Your public IP address is..." or you can use an online service that shows your IP. There are many of these sites, one of them being http://whatismyipaddress.com... just go to the site and it will automatically show your IP.
  2. Login to your Google Analytics account and click Admin in the orage bar on the right side. This will take you to the account administration screen 
  3. On the left is the Account section and below you'll find a tab called All Filters, just click the "+NEW FILTER" button.
  4. Give the filter any name you'd like. Filter Type is "Predefined filter", "Exclude", choose "traffic from the IP addresses" and "that are equal to" then enter your four numbered IP address you looked up in step 1.  Check whether it's IPv6 or not (if you don't know leave it unchecked).
  5. Save the changes.
Screenshot:

google analytics filters


You can add as many IP as you want, depending on how many different computers you use to access your site. And that's it. Now you can browse your site without registering a click in the Google Analytics metrics.
[Read more]

How To Add Snow In The Background of Your Blog Using CSS

Posted On // Leave a Comment
Today we’re going to go over a super simple CSS technique that you can use to make it snow on your Blogger blog. It seems particularly attractive since it doesn't require scripts, only CSS and three small images.

An advantage of this method is that by not using scripts doesn't overload the blog, the disadvantage is that users with not so modern browsers, will not be able to see it (in Internet Explorer works for version 10 and up).
The snow will fall in the background of the blog, which, in addition, prevent interfering with links or content (because the flakes are images), also prevent blocking the visibility of the content of the blog.

falling snow, snow, winter background, blogger

You can see the demo in this test blog.

How To Add Falling Snow To Blogger Blogspot


Step 1. Go to Template and click on the Edit HTML button:


Step 2. Click the small arrow on the left of <b:skin>...</b:skin> to expand the style (screenshot 1) and click anywhere inside the code area to search by using the CTRL + F keys for the ]]></b:skin> tag (screenshot 2)

Step 3. Add the following code just above it:
/* Snow falling for Blogger
----------------------------------------------- */
@keyframes snow {
0% {background-position: 0px 0px, 0px 0px, 0px 0px;}
100% {background-position: 500px 1000px, 400px 400px, 300px 300px;}
}

@-moz-keyframes snow {
0% {background-position: 0px 0px, 0px 0px, 0px 0px;}
100% {background-position: 500px 1000px, 400px 400px, 300px 300px;}
}

@-webkit-keyframes snow {
0% {background-position: 0px 0px, 0px 0px, 0px 0px;}
100% {background-position: 500px 1000px, 400px 400px, 300px 300px;}
}

@-ms-keyframes snow {
0% {background-position: 0px 0px, 0px 0px, 0px 0px;}
100% {background-position: 500px 1000px, 400px 400px, 300px 300px;}
}

#falling-snow {
background-image: url(https://blogger.googleusercontent.com/img/b/R29vZ2xl/AVvXsEjCMyxN6XB3gwlU_28KIf_7ndP6rSDeT_JnzGyX1_J6fBO05ybqNX3YrK9rhjrcN5hdilb59yB_-Ck6crauli95PpBuYYmDGYIUeNJ-h-X-PSkQwRU5lAy6WhlCsudwPF2GkDAlYlqnvoZU/s1600/snow.png), url(https://blogger.googleusercontent.com/img/b/R29vZ2xl/AVvXsEiH530znaoO91SJZc_Y7PvVDjxAdJpALNyJ5sGTy0WZEZK_rEBqiLdGLo35VGCEDuz0cXvAbpf2kNuz4WxDMow4Sv5ehOY0RaMDe_7kHJXty0PH9KdO4VHFPzjo5PnkA7mKe4srMj88YvWO/s1600/snow3.png), url(https://blogger.googleusercontent.com/img/b/R29vZ2xl/AVvXsEjSdTeB1Yv6PrZ070G3rvZjrQ0haeFv3IFwQa6ztkGPGSOCMT4RHEibgX2PoIxWOr_J0fn59vmVfMUw3efgPz5vLTosAezD0oBK6B3sR0tNfQ4p4KpwuKzM8b8bPL6dFITS5B9iKjS67aF3/s1600/snow2.png);
-webkit-animation: snow 20s linear infinite;
-moz-animation: snow 20s linear infinite;
-ms-animation: snow 20s linear infinite;
animation: snow 20s linear infinite;
}
Screenshot 1: 


Screenshot 2:


Step 3. Now, search (CTRL + F) the <body> tag or if you can't find it, search this line below:
<body expr:class='&quot;loading&quot; + data:blog.mobileClass'>
Step 4. And just below, add this:
<div id='falling-snow'>
Step 5. Finally, find the </body> tag (CTRL + F) and add the following just above it:
</div>
Step 6. Save the changes and that's it. Enjoy!!! :)

As you can see this tricks is very simple and easy to install, does not block the visibility of blog's content and most important, it has no scripts, only CSS and nothing else.
[Read more]

Redirect Blogger 404 Error (Page Not Found) To Homepage

Posted On // Leave a Comment
A 404 error page tells you and search engines that a page is not found by displaying a text similar to it "Sorry, the page you were looking for in this blog does not exist.". This may happen because you have changed your URLs over time, either removed a few pages when you overhauled your design or a visitor may have accidentally misspelled an URL inexistent in your blog, so it automatically redirects to the 404 error page (page not found).
how to redirect blogger 404 error to homepage
And probably this will not make a good impression on the greatest potential users of our blog. Before the user clicks the back button or close the window/browser's tab, thus leaving our site forever, we may want to redirect 404 error in Blogger to a page, where are chances that the visitor will continue reading our blog.
One of the most used methods is the "meta refresh" but the problem with this method is that it breaks navigation (doesn't allow to return back). In this case, the best method is by using Javascript about which I will go in detail below.

Redirect Blogger 404 Error with Javascript


Go to your Blogger dashboard, select your blog and then to Settings > Search preferences > Custom Page Not Found.

redirect 404 error page in blogger to homepage

Copy and paste the following code inside the empty box:
Sorry, the page you're looking for in this blog does not exist.
You will be redirected to homepage shortly.
<script type = "text/javascript">
BSPNF_redirect = setTimeout(function() {
location.pathname= "/"
}, 5000);
</script>
The message which is going to be displayed can be modified as you want. If you are willing to redirect your blog 404 error page to another page other than your home page, just replace pathname to href and / with the url of your page. And finally, the number 5000 which is the delay expressed in milliseconds, can be changed to other value if this is more convenient.

Next thing to do is to Save all changes made in this section and do a little test to check if the code works well. You can verify the 404 error page functionality by adding a custom text at the end of your blog address and after hitting Enter, you should see the error page followed by a redirection after 5 seconds. That's it!
[Read more]

Create a Background Slideshow for Blogger

Posted On // Leave a Comment
In the previous post we saw how to make the blog's background fill the screen regardless of the resolution of the monitor. The method that we'll use now with jQuery is a plugin called BackStretch which also has the option of creating a slideshow of pictures as a blog wallpaper without losing the property of adjusting to the width and height of the screen.

slideshow for blogger, blogger widgets

What we will do in this entry is just this, try to make the blog's background to have some images that are changing, all with fade effect between each transition.
You can see an example in this demo blog.

To put this slideshow in the blog's background, just go to Template - Edit HTML and before </head> add the following code:
<script src='http://ajax.googleapis.com/ajax/libs/jquery/1.10.2/jquery.min.js' type='text/javascript'/>
<script>
//<![CDATA[
/*
* jQuery Backstretch
* Version 1.2.8
* http://srobbin.com/jquery-plugins/jquery-backstretch/
* Add a dynamically-resized background image to the page
* Copyright (c) 2012 Scott Robbin (srobbin.com)
* Licensed under the MIT license
* https://raw.github.com/srobbin/jquery-backstretch/master/LICENSE.txt
*/
;(function(a){a.backstretch=function(p,b,l){function s(){if(p){var b;0==c.length?c=a("<div />").attr("id","backstretch").css({left:0,top:0,position:m?"fixed":"absolute",overflow:"hidden",zIndex:-999999,margin:0,padding:0,height:"100%",width:"100%"}):c.find("img").addClass("deleteable");b=a("<img />").css({position:"absolute",display:"none",margin:0,padding:0,border:"none",zIndex:-999999,maxWidth:"none"}).bind("load",function(d){var b=a(this),e;b.css({width:"auto",height:"auto"});e=this.width||a(d.target).width();d=this.height||a(d.target).height();n=e/d;q();b.fadeIn(g.speed,function(){c.find(".deleteable").remove();"function"==typeof l&&l()})}).appendTo(c);0==a("body #backstretch").length&&(0===a(window).scrollTop()&&window.scrollTo(0,0),a("body").append(c));c.data("settings",g);b.attr("src",p);a(window).unbind("resize.backstretch").bind("resize.backstretch",function(){"onorientationchange"in window&&window.pageYOffset===0&&window.scrollTo(0,1);q()})}}function q(){try{j={left:0,top:0},rootWidth=h=o.width(),rootHeight=r?window.innerHeight:o.height(),f=h/n,f>=rootHeight?(k=(f-rootHeight)/2,g.centeredY&&(j.top="-"+k+"px")):(f=rootHeight,h=f*n,k=(h-rootWidth)/2,g.centeredX&&(j.left="-"+k+"px")),c.css({width:rootWidth,height:rootHeight}).find("img:not(.deleteable)").css({width:h,height:f}).css(j)}catch(a){}}var t={centeredX:!0,centeredY:!0,speed:0},c=a("#backstretch"),g=c.data("settings")||t;c.data("settings");var o,m,r,n,h,f,k,j;b&&"object"==typeof b&&a.extend(g,b);b&&"function"==typeof b&&(l=b);a(document).ready(function(){var b=window,d=navigator.userAgent,c=navigator.platform,e=d.match(/AppleWebKit\/([0-9]+)/),e=!!e&&e[1],f=d.match(/Fennec\/([0-9]+)/),f=!!f&&f[1],g=d.match(/Opera Mobi\/([0-9]+)/),h=!!g&&g[1],i=d.match(/MSIE ([0-9]+)/),i=!!i&&i[1];o=(m=!((-1<c.indexOf("iPhone")||-1<c.indexOf("iPad")||-1<c.indexOf("iPod"))&&e&&534>e||b.operamini&&"[object OperaMini]"==={}.toString.call(b.operamini)||g&&7458>h||-1<d.indexOf("Android")&&e&&533>e||f&&6>f||"palmGetResource"in window&&e&&534>e||-1<d.indexOf("MeeGo")&&-1<d.indexOf("NokiaBrowser/8.5.0")||i&&6>=i))?a(window):a(document);r=m&&window.innerHeight;s()});return this}})(jQuery);
//]]>
</script>
<script>
//<![CDATA[
var images = [
 "Image URL",
 "Image URL",
 "Image URL",
 "Image URL",
 "Image URL",
  ];

  $(images).each(function(){
 $('<img/>')[0].src = this;
  });
  var index = 0;
$.backstretch(images[index], {speed: 1000});
  var slideshow = setInterval(function() {
  index = (index >= images.length - 1) ? 0 : index + 1;
    $.backstretch(images[index]);
  }, 5000);
//]]>
</script>
Here add the URLs of the images that will be the background of your blog.
If you would like to add more pictures, just add after the var images = [ another line like this:
 "Image URL",
The images will be changing in the order you have added them, if you want these to appear in a random order, then change the second part of the code with this:
<script>
//<![CDATA[
var images=new Array();
images[ 1 ]="Image URL";
images[ 2 ]="Image URL";
images[ 3 ]="Image URL";
images[ 4 ]="Image URL";
images[ 5 ]="Image URL";

  Array.prototype.shuffle = function() {
  var len = this.length;
  var i = len;
  while (i--) {
  var p = parseInt(Math.random()*len);
  var t = this[i];
  this[i] = this[p];
  this[p] = t;
  }
};

  images.shuffle();
  $(images).each(function(){
 $('<img/>')[0].src = this;
  });
  var index = 0;
$.backstretch(images[index], {speed: 1000});
  var slideshow = setInterval(function() {
  index = (index >= images.length - 1) ? 0 : index + 1;
    $.backstretch(images[index]);
  }, 5000);
//]]>
</script>
You can also add more pictures by adding a line like this:
images[ 6 ]="Image URL";
But you will see that in this case there are some consecutive numbers in blue, so if you add another such as 6, then the next one should be 7, etc..

In both cases you can change the duration of each image which is in the 5000 value that is at the end of the script.
The advantage of this slideshow in the blog's background is that images are automatically resized to the size of the monitor, so that, no matter of the resolution, it should look good.

It is worth remembering that if you are using Scriptaculous, you have to make some changes, and if you already use jQuery, should leave only one version.

Author page | Backstretch
[Read more]

Rounded Corners and Shadows for Images using CSS

Posted On // Leave a Comment
Here are some unique border styles that you can apply to blogger images by using the border-radius property and defining either all four corners simultaneously or applying the rounded border only to some of them.

One of the advantages of CSS3 is that we can apply rounded borders without complicating things too much and one of the options would be to use these edges or borders to images in the blog posts, to which we can also add some hover effects such as shading and rounded borders accompanied by transitions.

Note: if you need more info about how to add rounded corners on images, follow these links:
- CSS Basics. How to Apply Rounded Corners On Images #1
- CSS Basics. How to Apply Rounded Corners On Images #2

Below are a few examples of these borders and how the images behave when you hover over them.
If you want to use one of these styles, just copy the code below the image, then go to Template, click on the Edit HTML button and paste that code before ]]></b:skin> (CTRL + F to find it)
.post-body img {
border:0;
padding:0;
-moz-transition: all 1s;
-webkit-transition: all 1s;
-o-transition: all 1s;
}
.post-body img:hover {
box-shadow: 0px 0px 15px #000; /* Shadow */
border-radius: 50%; /* Rounded border */
-moz-transition: all 1s;
-webkit-transition: all 1s;
-o-transition: all 1s;
cursor:pointer;
}
.post-body img {
background:#FFF; /* background color around the image */
padding:15px; /* space between border and image */
-moz-transition: all 1s;
-webkit-transition: all 1s;
-o-transition: all 1s;
}
.post-body img:hover {
box-shadow: 0px 0px 15px #000; /* Shadow */
border-radius: 0% 50%; /* Rounded border */
-moz-transition: all 1s;
-webkit-transition: all 1s;
-o-transition: all 1s;
cursor:pointer;
}
.post-body img {
background:#FFF; /* the background color around the image */
padding:15px; /* The Space Between Border and Image */
border-radius: 50% 0; /* Rounded border */
box-shadow: 0px 0px 15px #000; /* Shadow */
-moz-transition: all 1s;
-webkit-transition: all 1s;
-o-transition: all 1s;
}
.post-body img:hover {
border-radius:0; /* This removes the border roundness (value 0) */
-moz-transition: all 1s;
-webkit-transition: all 1s;
-o-transition: all 1s;
cursor:pointer;
}
.post-body img {
box-shadow: 0px 0px 15px #000; /* Shadow */
border-radius: 50%; /* Rounded border */
border:0;
padding:0;
-moz-transition: all 1s;
-webkit-transition: all 1s;
-o-transition: all 1s;
}
.post-body img:hover {
box-shadow: 0; /* With this we remove the shadow (value 0) */
border-radius: 0; /* This removes the border roundness (value 0) */
-moz-transition: all 1s;
-webkit-transition: all 1s;
-o-transition: all 1s;
cursor:pointer;
}
.post-body img {
border-radius: 45% / 20%; /* Rounded border */
box-shadow: 0px 0px 15px #000; /* Shadow */
padding:0;
-moz-transition: all 1s;
-webkit-transition: all 1s;
-o-transition: all 1s;
}
.post-body img:hover {
border-radius: 0; /* This removes the roundness of border (value 0) */
-moz-transition: all 1s;
-webkit-transition: all 1s;
-o-transition: all 1s;
cursor:pointer;
}
So these effects will apply to all images uploaded to your Blogger posts. But if you want to apply them only on certain pictures then change .post-body img with .rounded  and .post-body img:hover with .rounded:hoverThen add the rounded class selector in the image's code:
<img class="rounded" src="Image URL"/>
These are just some examples, however, you can modify them anytime by adding or deleting more CSS styles, it depends on everybody's tastes or needs. But as you have seen, we can make the images look way more attractive and this has been done only with CSS ;)
[Read more]

How to make the background image of the blog fill the entire screen

Posted On // Leave a Comment
A constant question is how to make the background image of the blog always fill the entire screen regardless of the resolution of the monitor. And that is when we put a background image as measured by our monitor forgetting that there are actually monitors of all resolutions, very small and very large. So if we put an image according to our screen, there will be someone with a bigger monitor that surely will not see the whole picture or it will be repeated, and in this case, using very small monitors, the image will be seen incomplete.

blogger tricks, blogger tutorials, blogger blogspot

Here I will talk about two solutions for this, one is using CSS3, and another is using jQuery. With either of these two, we'll make the background image of the page to fill the entire screen regardless of the resolution of it.

CSS3


The first option is using CSS3, the advantage with this method is that we do not overload the blog with scripts, we use only the background-size property that is responsible for doing what we want.
The disadvantage is that this property is supported only by modern browsers, so in the case of Internet Explorer, it will only be seen for version 9 and above, in other browsers there shouldn't be any problem.
The method is very simple, just go to Template - Edit HTML, locate the background that is within body { and replace it with this:
background: url(Image URL) no-repeat center center fixed;
background-size: cover;
Note: to find the body { tag, click anywhere inside the code area then press the CTRL + F keys and paste it inside the search box. If you can't find it, remove the space between "body" and "{" then search again.

It would look something like this:
body {
background: url(URL of the image) no-repeat center center fixed;
background-size: cover;
margin:0;
}
Just put the URL of the image and that's it.

jQuery


With this method we will use jQuery with BackStretch plugin, the advantage is that it works in all browsers, including IE7 and above. And if you already use jQuery, you don't have to worry about the loading time of your blog, because the plugin is actually small.

To use this method in your blog, go to Template - Edit HTML and before </head> paste this script:
<script src='http://ajax.googleapis.com/ajax/libs/jquery/1.10.2/jquery.min.js' type='text/javascript'/>
<script type='text/javascript'>
//<![CDATA[
/*
* jQuery Backstretch
* Version 1.2.8
* http://srobbin.com/jquery-plugins/jquery-backstretch/
* Add a dynamically-resized background image to the page
* Copyright (c) 2012 Scott Robbin (srobbin.com)
* Licensed under the MIT license
* https://raw.github.com/srobbin/jquery-backstretch/master/LICENSE.txt
*/
;(function(a){a.backstretch=function(p,b,l){function s(){if(p){var b;0==c.length?c=a("<div />").attr("id","backstretch").css({left:0,top:0,position:m?"fixed":"absolute",overflow:"hidden",zIndex:-999999,margin:0,padding:0,height:"100%",width:"100%"}):c.find("img").addClass("deleteable");b=a("<img />").css({position:"absolute",display:"none",margin:0,padding:0,border:"none",zIndex:-999999,maxWidth:"none"}).bind("load",function(d){var b=a(this),e;b.css({width:"auto",height:"auto"});e=this.width||a(d.target).width();d=this.height||a(d.target).height();n=e/d;q();b.fadeIn(g.speed,function(){c.find(".deleteable").remove();"function"==typeof l&&l()})}).appendTo(c);0==a("body #backstretch").length&&(0===a(window).scrollTop()&&window.scrollTo(0,0),a("body").append(c));c.data("settings",g);b.attr("src",p);a(window).unbind("resize.backstretch").bind("resize.backstretch",function(){"onorientationchange"in window&&window.pageYOffset===0&&window.scrollTo(0,1);q()})}}function q(){try{j={left:0,top:0},rootWidth=h=o.width(),rootHeight=r?window.innerHeight:o.height(),f=h/n,f>=rootHeight?(k=(f-rootHeight)/2,g.centeredY&&(j.top="-"+k+"px")):(f=rootHeight,h=f*n,k=(h-rootWidth)/2,g.centeredX&&(j.left="-"+k+"px")),c.css({width:rootWidth,height:rootHeight}).find("img:not(.deleteable)").css({width:h,height:f}).css(j)}catch(a){}}var t={centeredX:!0,centeredY:!0,speed:0},c=a("#backstretch"),g=c.data("settings")||t;c.data("settings");var o,m,r,n,h,f,k,j;b&&"object"==typeof b&&a.extend(g,b);b&&"function"==typeof b&&(l=b);a(document).ready(function(){var b=window,d=navigator.userAgent,c=navigator.platform,e=d.match(/AppleWebKit\/([0-9]+)/),e=!!e&&e[1],f=d.match(/Fennec\/([0-9]+)/),f=!!f&&f[1],g=d.match(/Opera Mobi\/([0-9]+)/),h=!!g&&g[1],i=d.match(/MSIE ([0-9]+)/),i=!!i&&i[1];o=(m=!((-1<c.indexOf("iPhone")||-1<c.indexOf("iPad")||-1<c.indexOf("iPod"))&&e&&534>e||b.operamini&&"[object OperaMini]"==={}.toString.call(b.operamini)||g&&7458>h||-1<d.indexOf("Android")&&e&&533>e||f&&6>f||"palmGetResource"in window&&e&&534>e||-1<d.indexOf("MeeGo")&&-1<d.indexOf("NokiaBrowser/8.5.0")||i&&6>=i))?a(window):a(document);r=m&&window.innerHeight;s()});return this}})(jQuery);
//]]>
</script>
<script>
$.backstretch("URL of the image");
</script>

Put the URL of the image where indicated and ready.

As you can see both options are easy to apply, each with its pros and cons, but the result is the same, stretching the background image to fit the screen of any monitor regardless of the resolution of it.

Remember that in the case of jQuery method, you should verify that you are not using Mootools or Scriptaculous, and if you already have it, you will have to implement some changes in the script to make it compatible. And if you already use jQuery remember having only one version - the last one.
[Read more]

Making a gadget visible only to the blog administrator

Posted On // Leave a Comment
And the post title says it all. There are gadgets that sometimes we want to be visible only to us and not to our blog readers, perhaps a Survey already ended that we want to keep, a counter, or any gadget that while we customize, we don't want anyone else to see until the final result is ready.
blogger widgets, blogger tutorials
 The procedure is simple, we just have to add two lines to our gadget that we want to hide.

First thing to do is to go to Template > Edit HTML and then search for the gadget's code we want to hide. It will be easier using the CTRL + F keys and locating the name of the gadget/widget.

For example, in a HTML/Javascript gadget, we will see a code like this:
<b:widget id='HTML1' locked='false' title='' type='HTML'>
<b:includable id='main'>
<span class='item-control blog-admin'>
<!-- only display title if it's non-empty -->
<b:if cond='data:title != &quot;&quot;'>
<h2 class='title'><data:title/></h2>
</b:if>
<div class='widget-content'>
<data:content/>
</div>

<b:include name='quickedit'/>
</span>
</b:includable>
</b:widget>
All you have to do is add the parts in red and ready. If you close the session go to your blog you'll not be able to view the gadget that you have hidden, but as soon as you sign in you will see that it is visible to you.
Not all gadgets have the same structure like in my example, but it will be easier to guide you, just place the first code in red just after <b:includable id='main'>

And the second red code just before </b:includable>
Note: to look inside the widget's code, click on the sideways arrow next to the widget's id.

And with that the gadget will be hidden for readers except you.
[Read more]

Upload images and get the URL of the image

Posted On // Leave a Comment
As each day there are lots of new users joining the world of blogging, is necessary to discuss about some basic topics that bring up some recurring questions such as how we could get the URL of an image?

On the Internet there are many both free as well as paid web hosting where we can host images, but since we use Blogger then there is nothing better than using the same hosting service that Google gives us and that is Picasa.

The fastest way to upload an image is by going to the Blogger post editor. From your Blogger Dashboard, go to your blog, then click on the New post button. And preferably from the Edit HTML tab, click on the image icon.

A pop-up window will open, then click on the Choose files button, browse for your image(s), double click or click on Open and then hit Add selected.

When you have uploaded you will see that in the post editor shows the code of the image.


That code is the URL of the image. You'll see two URLs (Web addresses):
<a href="https://blogger.googleusercontent.com/img/b/R29vZ2xl/AVvXsEhOhHeILzsxQULOICjw2E5zK66deJufd8zBKtruB_5Gjrk4sOF7vPDxL3yX7IdYtj-cNEaOOikDNvQF8Q3f6PbuwAvFiUrLTPPqo4aNa4hUkUSG1Ma70vSX_Hn4IBdAfWd2JibY9dV7I5mx/s1600/Bliss-Windows-XP.png" imageanchor="1"><img border="0" src="https://blogger.googleusercontent.com/img/b/R29vZ2xl/AVvXsEhOhHeILzsxQULOICjw2E5zK66deJufd8zBKtruB_5Gjrk4sOF7vPDxL3yX7IdYtj-cNEaOOikDNvQF8Q3f6PbuwAvFiUrLTPPqo4aNa4hUkUSG1Ma70vSX_Hn4IBdAfWd2JibY9dV7I5mx/s320/Bliss-Windows-XP.png" /></a>

The first is the URL of the image that you need to take. It is not necessary to publish this entry where you uploaded the picture, you could as well not publish it, leave it as a draft or delete it, the image will be saved anyway on PicasaWeb (unless when you removed the draft, you have also selected the image to remove). You could also upload image directly from Picasa. Just login to PicasaWeb, select the album where you want to host the image, and click on Add photos.


Select the image from your computer and upload it.


After we have uploaded, click on OK.

There you will see the thumbnail, along with other photos, if there are more.

If you want to get the URL of the image from Picasa then click on the image to open in full size.
With the right mouse button click on the picture and select option depending on the browser you use...

If using Google Chrome, then select Copy Image URL:


If you are using Mozilla Firefox select Copy Image Location:


If you are using Opera select Copy Image URL:


If you are using Safari select Copy Image Address:


If you are using Internet Explorer (I hope not), first select Properties, a window will open, there you will find the Address section from where you can select the URL of the image and copy it:


Having selected any of these options you'll have in the clipboard the URL of the image. Simple isn't it?
Remember that all images you upload on Blogger are stored in your Picasa account, so if you find an image previously uploaded to your blog, go to your Picasa account, select the album containing the name of your blog and there find the picture you need. The procedure to obtain the URL of the image is the same as explained above.
[Read more]

Fade In/Out Page Loading Effect On Blogger Posts

Posted On // Leave a Comment
A very common effect in jQuery is the fade effect that hides or shows an element by fading it, and we can use it in many ways as for example in the blog's navigation. The following script does just that, by loading the page with a fading effect when we browse on internal links that are in the blog, such as post titles, labels links, archive, navigation links, etc..
jQuery effect, fade in effect, blogger jQuery
You can see an example in this demo blog, click on the title of any post and see the fading effect when the page is loading.

How To Implement the Fade In Loading Effect

1) To put this fading effect on your blog, go to your Template > Edit HTML :

fading effect, blogger blogspot, blogger tricks

2) Click anywhere inside the code area and search for the </head> tag using CTRL + F keys:


3) Then, just above </head> add the following code:
<script src='http://ajax.googleapis.com/ajax/libs/jquery/1.8.2/jquery.min.js' type='text/javascript'/>
<script type='text/javascript'>
//<![CDATA[
$(document).ready(function() {
$("body").css("z-index", "-10");
$("body").fadeIn(0);

$("a").click(function(event){
event.preventDefault();
linkLocation = this.href;
$("body").fadeOut(500, redirectPage); });
function redirectPage() {
window.location = linkLocation;
}
});
//]]>
</script>
<style>
html {
background-color: #F2F2F2; /* Color fading */
}
</style>
4) Save the changes and that's it. In green you can see where to change the color that fades on a loading page.

The original script hides the body of the page while loading, I prefer to change that property with a negative z-index to avoid problems with the search engine robots that may effect the positioning.

Problems?

Consider that such effects could increase the blog loading time, so I recommend using it only when your blog loads fast and does not have too many scripts.

If you already use another version of jQuery remove the other, leaving only this which will be readed first.

If you are using Mootools or Scriptaculous, then you have to make some modifications to the code in order to be compatible.
If you have another script with a fade effect, then it could interfere with this and you might not see anything on the page except the color fading, in such cases it is better without this script.

You can also use this effect only on some links, for example, if you want to appear only when you click on the post titles in the navigation links (older posts and newer posts), and on the top tabs, then replace this line:
$("a").click(function(event){
With this:
$(".post-title a, .blog-pager-older-link, .blog-pager-newer-link, .tabs").click(function(event){
In some cases, the page can load for a second and then load with the fade effect, this may be "normal" because the browser is slow to read the script on page load.

Apart from these drawbacks, I think it's a very elegant way to load blog pages while browsing them, don't you think?
[Read more]

Using the :before and :after Pseudo Elements on Sidebar Titles

Posted On // Leave a Comment
This is another method of using the :after and :before properties and it will work without too many problems in any browser, including IE8. What this trick will do is to divide the header bar into left and right sections, where the left will contain an explanatory title and the right, a related link.

The idea of generating Adobe-like Arrow Headers was actually discussed by css-tricks and adapted to Blogger.

How to Add Adobe-like Headers to Blogger

blogger gadgets, blogger tricks, blogger blogspot

Step 1. Log in to your Blogger dashboard > go to Template > Edit HTML, then click anywhere inside the code area to search - using the CTRL + F keys - for the following tag:
</head>
Step 2. Just above it, copy and paste this code:
 <style>
.module h2 {
  background-color: #D5D5D5;
  border-radius: 20px 0 0 20px;
  color: #FFFFFF;
  font-family: Verdana;
  font-size: 14px;
  line-height: 32px;
  margin: 0;
  padding: 0 0 0 20px;
  text-shadow: 2px 1px 1px #222;
}

.module h2 a {
    border-left: 5px solid #ffffff;
    color: #101921;
    float: right;
    font-size: 14px;
    text-decoration: none;
    text-shadow: none;
    padding: 0 10px;
    position: relative;
   -moz-transition: padding 0.1s linear;
   -webkit-transition: padding 0.1s linear;
   -ms-transition: padding 0.1s linear;
   -o-transition: padding 0.1s linear;
}
.module h2 a:hover {
  padding: 0 32px;
}

.module h2 a:before, .module h2 a:after {
    content: &quot;&quot;;
    height: 0;
    position: absolute;
    top: 50%;
    width: 0;
}
.module h2 a:before {
    border-bottom: 8px solid transparent;
    border-right: 8px solid #ffffff;
    border-top: 8px solid transparent;
    left: -12px;
    margin-top: -8px;
}
.module h2 a:after {
    border-bottom: 6px solid transparent;
    border-top: 6px solid transparent;
    left: -6px;
    margin-top: -6px;
}

.module.blue h2 a {background-color: #A2D5EC;}
.module.blue h2 a:hover {background-color: #C5F0FF;}
.module.blue h2 a:after {border-right: 6px solid #A2D5EC;}
.module.blue h2 a:hover:after {border-right-color: #C5F0FF;}

.module.yellow h2 a {background-color: #FCE98D;}
.module.yellow h2 a:hover {background-color: #FFD700;}
.module.yellow h2 a:after {border-right: 6px solid #FCE98D;}
.module.yellow h2 a:hover:after {border-right-color: #FFD700;}

.module.green h2 a {background-color: #bada55;}
.module.green h2 a:hover {background: #C7E176;}
.module.green h2 a:after {border-right: 6px solid #bada55;}
.module.green h2 a:hover:after {border-right-color: #C7E176;}

.module.red h2 a {background-color: #F0A5B5;}
.module.red h2 a:hover {background-color: #FFC7D2;}
.module.red h2 a:after {border-right: 6px solid #F0A5B5;}
.module.red h2 a:hover:after {border-right-color: #FFC7D2;}
</style>
Step 3. Save the Template.

Screenshot:


Step 4. Now go to Layout and Add a new HTML/JavaScript Gadget with one of the codes below for each of the widget title:

Background in blue:
<div class="module blue">
<h2>Title in <a href="Link URL">Blue</a></h2>
</div>
Background in yellow:
<div class="module yellow">
<h2>Title in <a href="Link URL">Yellow</a></h2>
</div>
Background in green:
<div class="module green">
<h2>Title in <a href="Link URL">Green</a></h2>
</div>
Background in red:
<div class="module red">
<h2>Title in <a href="Link URL">Red</a></h2>
</div>

Note: Change "Title in" text with your widget's title and Blue, Yellow, Green and Red with the text on the right, then add a Link URL to it.
Step 5. After you saved the HTML/Javascript gadgets containing the codes above, drag and drop them just above the widgets you want to show... and Save the Arrangement.
blogger tricks, blogger tutorials

DEMO

You can see how the sidebar titles has been replaced with some cool header bars on this demo blog.
[Read more]
Click to go to top
