Image galleries, sliders and slideshows have become increasingly popular within web pages and more and more developers have been creating these amazing powerful, versatile and sleek galleries. In this tutorial, I will show you how to display the relevant content in an attractive and usable manner, by adding this beautiful carousel slideshow made by Brian R. Miedlar which will display a gallery of images with a cool sliding effect.


If you need to see this carousel in action, please visit this demo blog.
Step 1. Log in to your Blogger Dashboard and select your blog
Step 2. Go to Template and click the Edit HTML button:

Step 3. Click anywhere on the code area and press the CTRL + F keys, then search this tag:

Step 4. Just above the </head> tag, add this code:
Step 5. Now search for the following code (take a look at the screenshot for more details):
Step 6. Just above it, add the code below:
The width of the carousel is of 685px, so below the header might look good. If you want to change the length, then you need to change the /* width of the container */ (which is the size of the entire carousel), the /* width of the images container*/ (which is the area that shows the thumbnails) and the /* overall width of the thumbnails */ which is the actual width that all the thumbnails occupy.
Step 7. In order to save the changes, click the Save Template button
Step 8. Finally, go to Layout and click the Add a Gadget link, then choose HTML/Javascript from the pop-up box and paste the structure of the carousel inside the empty box:
If you add more images or remove some, you need also to change the width of the thumbnails, otherwise some pictures will appear behind the others.
If you want to add more pictures, just add before the </div> tag, a piece of code like this:
[Read more]
If you need to see this carousel in action, please visit this demo blog.
How to Add the Scriptaculous Image Slider on Blogger
Step 1. Log in to your Blogger Dashboard and select your blog
Step 2. Go to Template and click the Edit HTML button:
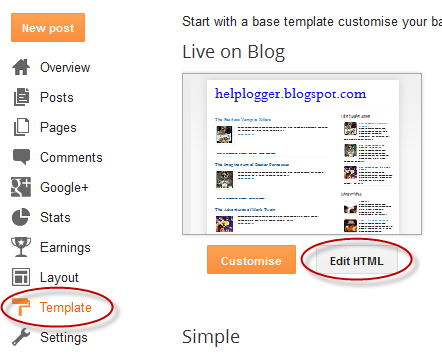
Step 3. Click anywhere on the code area and press the CTRL + F keys, then search this tag:
</head>

Step 4. Just above the </head> tag, add this code:
<script src='http://www.google.com/jsapi'></script>Note: If you already have Scriptaculous and Prototype, it's not necessary adding the code in red.
<script>
google.load("prototype","1.7.0.0");
google.load("scriptaculous", "1.9.0");
</script>
<script language='javascript' src='http://helplogger.googlecode.com/svn/trunk/Image Carousel/os.js' type='text/javascript'/>
<script language='javascript' src='http://helplogger.googlecode.com/svn/trunk/Image Carousel/carousel.js' type='text/javascript'/>
<script language='javascript' src='http://helplogger.googlecode.com/svn/trunk/Image Carousel/application.js' type='text/javascript'/>
Step 5. Now search for the following code (take a look at the screenshot for more details):
]]></b:skin>
 |
| Screenshot |
.carousel {Here, I have put some styles in green that can be customized as you want , such as the border color and the background color. The arrows are images, so if you want to change their color or use other pics, you have to change the two URLs in blue.
position:relative;
clear:both;
left:20px; /* Distance from left */
margin-top:10px;
margin-bottom:20px;
border:2px solid #000; /* Carousel border */
background-color:#333333; /* Background color */
}
.carousel .navButton { cursor:pointer; display:block;
text-indent:-9999px;
background-repeat:none;
z-index:10;
}
.carousel .container {
position:absolute;
overflow:hidden;
}
.carousel .items {
position:absolute; }
#Carousel2 {
height:88px; /* height of the container */
width:685px; /* width of the container */
}
#Carousel2 .container {
left:26px;
top:12px;
width:630px; /* width of the images container */
height:100px; /* height of the images container */
}
#Carousel2 .items { top:0; left:2px;
width:1700px; /* overall width of all the thumbnails */
}
#Carousel2 .item { height:70px; width:70px; float:left; clear:right; }
#Carousel2 .item .icon img { position:relative; left:0px; width:65px !important; height:65px; cursor:pointer;}
#Carousel2 .navButton { position:absolute; bottom:0px; width:24px; height:87px; }
#Carousel2 .navButton.previous { left:0px; background-image:url(https://blogger.googleusercontent.com/img/b/R29vZ2xl/AVvXsEjLBLVlnfADNGKHfnU0I8RUYZJ_Jaz5mZV0UAUaXiqyI2UjDOZ73FW5iiVOAjcJSzLcyWZvL9KAI1sYqVngPugsQDH1MQ8g4xlNn2wfo6xuOcNRxA3-jAB-uIALPhAOM_RvwsPx-brdsNs/s1600/button-left.png); }
#Carousel2 .navButton.next { right:2px; background-image:url(https://blogger.googleusercontent.com/img/b/R29vZ2xl/AVvXsEgowSHzMa_b_eNQpdnB2EFumFZjQHiFHSSfIeSCHlANDTFYCVkzFNu36ZAXubQW-xZXP_0JguT8-5BhFNl4LY30Pn7Jzl-anvhz_KxLmgLnMcJlhX1W5SnUE-8DvSTLOFVZUcZPvF4xcJg/s1600/button-right.png); }
#Carousel2 .item .key { display:none;}
#Carousel2 .item .picture { display:none;}
The width of the carousel is of 685px, so below the header might look good. If you want to change the length, then you need to change the /* width of the container */ (which is the size of the entire carousel), the /* width of the images container*/ (which is the area that shows the thumbnails) and the /* overall width of the thumbnails */ which is the actual width that all the thumbnails occupy.
Step 7. In order to save the changes, click the Save Template button
Step 8. Finally, go to Layout and click the Add a Gadget link, then choose HTML/Javascript from the pop-up box and paste the structure of the carousel inside the empty box:
<div id="Carousel2" class="carousel">Add the links and images addresses. The link URL is optional, so you can add the addresses only when if you want to link the images to some posts.
<div class="button navButton previous" style="display:none;">Back</div>
<div class="button navButton next" style="display:none;">Forward</div>
<div class="container">
<div class="items">
<div class="item">
<div class="key caption">Thumb</div>
<div class="icon">
<a href="link URL"><img width="65" height="65" src="image URL" /></a></div>
<div class="picture"></div>
</div>
<div class="item">
<div class="key caption">Thumb</div>
<div class="icon">
<a href="link URL"><img width="65" height="65" src="image URL" /></a></div>
<div class="picture"></div>
</div>
<div class="item">
<div class="key caption">Thumb</div>
<div class="icon">
<a href="link URL"><img width="65" height="65" src="image URL" /></a></div>
<div class="picture"></div>
</div>
<div class="item">
<div class="key caption">Thumb</div>
<div class="icon">
<a href="link URL"><img width="65" height="65" src="image URL" /></a></div>
<div class="picture"></div>
</div>
<div class="item">
<div class="key caption">Thumb</div>
<div class="icon">
<a href="link URL"><img width="65" height="65" src="image URL" /></a></div>
<div class="picture"></div>
</div>
<div class="item">
<div class="key caption">Thumb</div>
<div class="icon">
<a href="link URL"><img width="65" height="65" src="image URL" /></a></div>
<div class="picture"></div>
</div>
<div class="item">
<div class="key caption">Thumb</div>
<div class="icon">
<a href="link URL"><img width="65" height="65" src="image URL" /></a></div>
<div class="picture"></div>
</div>
<div class="item">
<div class="key caption">Thumb</div>
<div class="icon">
<a href="link URL"><img width="65" height="65" src="image URL" /></a></div>
<div class="picture"></div>
</div>
<div class="item">
<div class="key caption">Thumb</div>
<div class="icon">
<a href="link URL"><img width="65" height="65" src="image URL" /></a></div>
<div class="picture"></div>
</div>
<div class="item">
<div class="key caption">Thumb</div>
<div class="icon">
<a href="link URL"><img width="65" height="65" src="image URL" /></a></div>
<div class="picture"></div>
</div>
<div class="item">
<div class="key caption">Thumb</div>
<div class="icon">
<a href="link URL"><img width="65" height="65" src="image URL" /></a></div>
<div class="picture"></div>
</div>
<div class="item">
<div class="key caption">Thumb</div>
<div class="icon">
<a href="link URL"><img width="65" height="65" src="image URL" /></a></div>
<div class="picture"></div>
</div>
<div class="item">
<div class="key caption">Thumb</div>
<div class="icon">
<a href="link URL"><img width="65" height="65" src="image URL" /></a></div>
<div class="picture"></div>
</div>
<div class="item">
<div class="key caption">Thumb</div>
<div class="icon">
<a href="link URL"><img width="65" height="65" src="image URL" /></a></div>
<div class="picture"></div>
</div>
<div class="item">
<div class="key caption">Thumb</div>
<div class="icon">
<a href="link URL"><img width="65" height="65" src="image URL" /></a></div>
<div class="picture"></div>
</div>
<div class="item">
<div class="key caption">Thumb</div>
<div class="icon">
<a href="link URL"><img width="65" height="65" src="image URL" /></a></div>
<div class="picture"></div>
</div>
<div class="item">
<div class="key caption">Thumb</div>
<div class="icon">
<a href="link URL"><img width="65" height="65" src="image URL" /></a></div>
<div class="picture"></div>
</div>
<div class="item">
<div class="key caption">Thumb</div>
<div class="icon">
<a href="link URL"><img width="65" height="65" src="image URL" /></a></div>
<div class="picture"></div>
</div>
<div class="item">
<div class="key caption">Thumb</div>
<div class="icon">
<a href="link URL"><img width="65" height="65" src="image URL" /></a></div>
<div class="picture"></div>
</div>
</div>
</div>
</div>
If you add more images or remove some, you need also to change the width of the thumbnails, otherwise some pictures will appear behind the others.
If you want to add more pictures, just add before the </div> tag, a piece of code like this:
<div class="item">And in case you want to align the gadget, just change the part from Distance from the left to another value.
<div class="key caption">Thumb</div>
<div class="icon">
<a href="link URL"><img width="65" height="65" src="image URL" /></a></div>
<div class="picture"></div>
</div>


