Showing posts with label Widgets. Show all posts

How to customize or edit the linkwithin related post widget

Posted On // Leave a Comment
LinkWithin is a very popular widget that shows the related posts with a thumbnail and although it is not a new gadget among bloggers, many avoid using it for its lack of customization. So, in this post we will see how to add LinkWithin on a Blogger blog and how to customize it.

This is what we will do with this gadget:

- Change the location of the gadget;
- Remove the LinkWithin link;
- Change the "You might also like" title with any other text;
- Add rounded borders to images;
- Remove the border that separates posts;
- Add a background color;
- Change the background color on mouse over;
- Change the post titles color and font;

Adding the LinkWithin gadget to Blogger

First of all we need to install the LinkWithin gadget - for this, we have to go to the LinkWithin homepage and type in the required information:

linkwithin gadget, related posts widget, blogger widgets
Although it gives the option to choose Blogger as a platform, we will select Other so that we'll be able to put the code directly into our template and then modify it. Select the number of posts (stories) according to the width of posts - if the width of the posts container is small, then it is recommended to display fewer related posts.

By clicking on the "Get widget!" button, we'll be given the code that we need use it. It should look something like this:
<script>
var linkwithin_site_id = XXXXXXX;
</script>
<script src="http://www.linkwithin.com/widget.js"></script>
<a href="http://www.linkwithin.com/"><img src="http://www.linkwithin.com/pixel.png" alt="Related Posts Plugin for WordPress, Blogger..." style="border: 0" /></a>
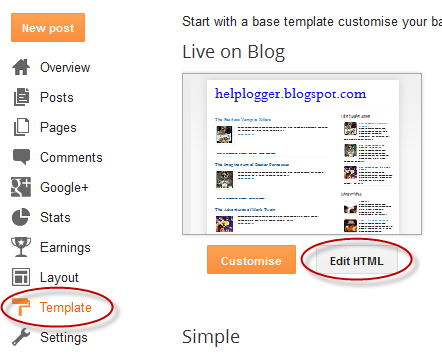
That's the basic code we need to copy. Now login into your Blogger account > select your blog to where you want to add the LinkWithin gadget and go to Template > click on the Edit HTML button:


Cick anywhere inside the code area and press the CTRL + F keys to search for the following line:
<div class='post-footer'>
Just above this line, paste the LinkWithin code.

By doing so you already have the LinkWithin gadget on your blog and the result will be like this:

linkwithin gadget, related posts widget, blogger widgets
Note: If you would like to show only in the individual post, you can enclose the code using a conditional.

Change the LinkWithin gadget location

You will notice that this widget will always appear right at the end of your posts. In the LinkWithin FAQ page we are explained how to fix this - simply add the code below where we want the widget to appear:
<div class='linkwithin_div'/>
This will make the gadget to display right where we added the code. Even if we don't want to change the gadget location, this line is required so that we can customize it later.

Replacing the "You might also like" text

By default, the LinkWithin gadget will have the title "You might also like" and we can change that text to anything we want. Just add the line below in blue within the LinkWithin code:
<div class='linkwithin_div'/>
<script>
var linkwithin_site_id = XXXXXXX;
</script>
<script>linkwithin_text='Related Posts:'</script>
<script src="http://www.linkwithin.com/widget.js"></script>
<a href="http://www.linkwithin.com/"><img src="http://www.linkwithin.com/pixel.png" alt="Related Posts Plugin for WordPress, Blogger..." style="border: 0" /></a>
Here you can change the text - in this case, it will say "Related posts" instead of "You may also like these stories".

Changing the LinkWithin background color and thumbnails style

Within the template's code, search for the ]]></b:skin> tag and just above it, add the following CSS styling:
.linkwithin_div {
background: #EEEEEE; /* Background color for the related posts container */
padding: 0 10px;
border-top: 1px solid #DBDBDB;  /* Top border for the related posts container */
border-bottom: 1px solid #DBDBDB;  /* Bottom border for the related posts container */
}
.linkwithin_text {
font-family: Cambria,Georgia,sans-serif;
font-size:18px; /* Size for the related posts title */
color:#898989; /* Color for the related posts title */
}
a#linkwithin_logolink_0, a#linkwithin_logolink_1, a#linkwithin_logolink_2, a#linkwithin_logolink_3, a#linkwithin_logolink_4, a#linkwithin_logolink_5, a#linkwithin_logolink_6, a#linkwithin_logolink_7, a#linkwithin_logolink_8, a#linkwithin_logolink_9, a#linkwithin_logolink_10, a#linkwithin_logolink_11, a#linkwithin_logolink_12, a#linkwithin_logolink_13, a#linkwithin_logolink_14, a#linkwithin_logolink_15, a#linkwithin_logolink_16, a#linkwithin_logolink_17, a#linkwithin_logolink_18, a#linkwithin_logolink_19, a#linkwithin_logolink_20 {
display:none;
}
.linkwithin_posts {
width: 500px !important; /* Width for the related posts container */
}
.linkwithin_posts a {
border: 0 !important;
padding-right: 10px !important;
}
.linkwithin_posts a:hover {
background: #F5F5F5 !important; /* Background color on mouseover */
}
.linkwithin_img_0 {
background: #F5F5F5;
border: 1px solid #C1C1C1;
padding: 2px !important;
transition:all .2s linear;
 -o-transition:all .5s linear;
-moz-transition:all .2s linear;
-webkit-transition:all .2s linear;
}
.linkwithin_img_0:hover {
background: #ffffff;
padding: 2px !important;
opacity:.6;
filter:alpha(opacity=60)

.linkwithin_img_0 div, div.linkwithin_img_0,
.linkwithin_img_1 div, div.linkwithin_img_1,
.linkwithin_img_2 div, div.linkwithin_img_2,
.linkwithin_img_3 div, div.linkwithin_img_3,
.linkwithin_img_4 div, div.linkwithin_img_4,
.linkwithin_img_5 div, div.linkwithin_img_5,
.linkwithin_img_6 div, div.linkwithin_img_6,
.linkwithin_img_7 div, div.linkwithin_img_7,
.linkwithin_img_8 div, div.linkwithin_img_8,
.linkwithin_img_9 div, div.linkwithin_img_9,
.linkwithin_img_10 div, div.linkwithin_img_10,
.linkwithin_img_11 div, div.linkwithin_img_11,
.linkwithin_img_12 div, div.linkwithin_img_12,
.linkwithin_img_13 div, div.linkwithin_img_13,
.linkwithin_img_14 div, div.linkwithin_img_14,
.linkwithin_img_15 div, div.linkwithin_img_15,
.linkwithin_img_16 div, div.linkwithin_img_16,
.linkwithin_img_17 div, div.linkwithin_img_17,
.linkwithin_img_18 div, div.linkwithin_img_18,
.linkwithin_img_19 div, div.linkwithin_img_19,
.linkwithin_img_20 div, div.linkwithin_img_20 {
-webkit-border-radius: 100px;
-moz-border-radius: 100px;
border-radius: 100px;

}
.linkwithin_title {
color: #242424 !important; /* Color for titles */
font-family: Cambria,Georgia,sans-serif;
font-size: 12px !important; /* Font size of posts titles */
line-height: 24px !important;
text-align:center;
text-decoration: none;
}
.linkwithin_title:hover {
color: #000 !important; /* Color of posts titles on mouseover */
}
After adding this CSS, the LinkWithin gadget will look like this:

linkwithin gadget, related posts widget, blogger widgets

If don't want rounded thumbnails, remove the code in red. In green you can see the parts which can be customized - there you can add more styles or change the background color, text size, etc.

After you've made the changes, click on the Save Template button and you're done. Enjoy!
[Read more]

How To Add a Floating Sticky Footer Bar in Blogger

Posted On // Leave a Comment
I have seen that many of those using toolbars such as Wibiya have had to remove it because of interfering with the performance of some scripts like Scriptaculous and Prototype, while others have chosen to remove these scripts just to continue using the toolbar.

Well, for those who prefer to have a custom toolbar that does not give them such problems and allow them to continue using other scripts, here's how to create our own floating toolbar with a close option.

The toolbar contains a search box, link for feed subscription, link to follow on Twitter and Facebook, like button to share on Twitter or Facebook and translator in five languages.


You can see it working in this demo blog.

Adding a Custom Sticky Toolbar on Blogger


Step 1. Login to your Blogger account > select your blog > click on the Template option on the left side


Step 2. Click on the Edit HTMl button on the right side > click anywhere inside the code area and press CTRL + F keys to open the Blogger search box

Step 3. Paste or type the following code inside the search box and hit Enter to find it:
]]></b:skin>
Step 4. Just above ]]></b:skin> add the following CSS style:
#custom-toolbar {
overflow: auto;
position: fixed;
background: #1B1B1B url("https://blogger.googleusercontent.com/img/b/R29vZ2xl/AVvXsEgUsPpjYbeLR2kxC90XKCVWatakOn9JaWG3axBNpfWUHKsHV-zg4lAcFC8vkbgcyc_gzXKeZwt9TX69QEIUvHTAVdbPfg-mVX5sDIuujKEa72LKjDRBt8rz3ltoI1m-m9K7vuP7sTAIn1c_/s1600/pagelist.png") repeat-x scroll 0 bottom;
font: bold 13px/17px "Helvetica Neue",Helvetica,Arial,Geneva,sans-serif;
height: 33px;
margin: 0 auto;
width: 100%;
bottom:0px;
right:0;
}
.close-toolbar {
float: right;
margin-top:6px;
padding-right: 10px;
cursor: hand;
cursor: pointer;
}
.search-text {
color: #D1D1D1;
text-align: center;
border-radius: 10px;
}

.google_translate:hover img {
filter:alpha(opacity=0.90);
-moz-opacity: 0.90;
opacity: 0.90;
border:0;
}
Step 5. Now search for this tag:
</head>
Step 6. Just above the </head> tag add this script:
<script type='text/javascript'>
// Custom Toolbar for Blogger (helplogger.blogspot.com)
//<![CDATA[
var toolbar_blogger = new Array();
var toolbar_clear = new Array();
function toolbarFloat(toolb) {
toolbar_blogger[toolbar_blogger.length] = this;
var ftrpointer = eval(toolbar_blogger.length-1);
this.pagetop = 0;
this.cmode = (document.compatMode && document.compatMode!="BackCompat") ? document.documentElement : document.body;
this.toolbsrc = document.all? document.all[toolb] : document.getElementById(toolb);
this.toolbsrc.height = this.toolbsrc.offsetHeight;
this.toolbheight = this.cmode.clientHeight;
this.toolboffset = toolbGetOffsetY(toolbar_blogger[toolbpointer]);
var toolbbar = 'toolbar_clear['+toolbpointer+'] = setInterval("toolbarFloatInit(toolbar_blogger['+toolbpointer+'])",1);';
toolbbar = toolbbar;
eval(toolbbar);
}

function toolbGetOffsetY(toolb) {
var toolbTotOffset = parseInt(toolb.mtasrc.offsetTop);
var parentOffset = toolb.toolbsrc.offsetParent;
while ( parentOffset != null ) {
toolbTotOffset += parentOffset.offsetTop;
parentOffset = parentOffset.offsetParent;
}
return toolbTotOffset;
}
function toolbarFloatInit(toolb) {
toolb.pagetop = toolb.cmode.scrollTop;
toolb.toolbsrc.style.top = toolb.pagetop - toolb.mtaoffset + "px";
}
function closeTopAds() {
document.getElementById("custom-toolbar").style.visibility = "hidden";
}
//]]>
</script>
Step 7. Now search for the </body> tag and just above it, add this HTML code:
<div id='custom-toolbar'>
<img border='0' class='close-toolbar' onClick='closeTopAds();return false;' src='https://blogger.googleusercontent.com/img/b/R29vZ2xl/AVvXsEj7a2t05-Z-UfCPsLCICp978l0tu-lO5FrEFH3CMeY5fYQLNoxNFDvE5YL4hW99MRnOm-AMtk33Rb21xDx-1c6_87-z2tXfja2vL1aGqMhOdU2OtjQjBmMdryrevFXUSvnRxfTnX-bX3pv6/s1600/close_button.png' title='Close' width='17'/>

<table border='0' cellpadding='2'>
<tr>
<td style='padding-left:30px; padding-right:50px;'><form action='/search' id='search' method='get' name='searchForm' style='display:inline;'>
<input class='search-text' name='q' onblur='if (this.value == &quot;&quot;) this.value = &quot;Search here...&quot;;' onfocus='if (this.value == &quot;Search here...&quot;) this.value = &quot;&quot;;' size='28' type='text' value='Search here...'/></form></td>

<td style='padding-left:20px;'><a href='http://www.facebook.com/username' title='Follow on Facebook'><img src='https://blogger.googleusercontent.com/img/b/R29vZ2xl/AVvXsEgNLmlpSV_d0ucF0hyphenhyphenHtlhM7lzPQ0ZXlkZOVBDphOFHhLNgLgnEzsTTXTzdEsBnV_5WoO4Kr1T1TUAK-STYX3xv8qjvrkIwjAiGq0y0RNryMMqXwRuIQT4_4vSCNQsDRYfZS4q-O8rizT4w/s1600/facebook-icon.png'/></a></td>

<td><a href='http://twitter.com/username' title='Follow on Twitter'><img src='https://blogger.googleusercontent.com/img/b/R29vZ2xl/AVvXsEgPcf-VtJ0ahregqeigAHFgTOKPmymctOiFAjD0eOWgV4sHcAa3vI4OQpQng-6f1a1dlR_lzCvdDntzcPQWwd4jRaXuhqPUa_mnjHYI67dI6jIU9Uu82p2dXLpc1k96buPBnhtrHaJixaky/s1600/twitter-icon.png'/></a></td>

<td><a expr:href='data:blog.homepageUrl + &quot;feeds/posts/default&quot;' title='Subscribe to Feed'><img src='https://blogger.googleusercontent.com/img/b/R29vZ2xl/AVvXsEgbFpbQBKV2SF-hTzmrcmKs99l-w4TmeDZtEoo37bZ4JvVIQjH8Wsqm2Ueb9F3SEdSyUjzfXzIfrpl2I2fAcAtGXfP1ksFVy19BjRMdRbsk5hPeO8bwI4rN4VOGfUcHJ6SywuFRJxkSKzbi/s1600/rss-feed-icon2.png'/></a></td>

<td style='padding-left:40px; padding-top: 5px;'><a class='twitter-share-button' data-count='horizontal' data-lang='en' href='http://twitter.com/share' title='Publish on Twitter'>Tweet</a><script src='http://platform.twitter.com/widgets.js' type='text/javascript'/></td>

<td><a href='http://www.facebook.com/sharer.php' name='fb_share' title='Publish on Facebook' type='button_count'>Share</a><script src='http://static.ak.fbcdn.net/connect.php/js/FB.Share' type='text/javascript'/></td>

  <td style='padding-left:60px;'><a class="google_translate" href='Javascript:void(0)' onclick='window.open(&quot;http://www.google.com/translate?u=&quot;+encodeURIComponent(location.href)+&quot;&amp;langpair=auto%7Cen&amp;hl=en&amp;ie=UTF8&quot;); return false;' rel='nofollow' title='English'><img align='absbottom' alt='English' border='0' height='24' src='https://blogger.googleusercontent.com/img/b/R29vZ2xl/AVvXsEhtYkwctyQ4LeTy40g_HpuhZO3mlmL7FIDyhwIQfZ11WSZazXENAX8TbombRs0hx1eqaoBjOmWYRrzVil61WL18hyphenhyphenVrvdnHsbFgumS1GkxBMZlMJsqbsiG2o1cinKu1wCkSyn-5myN81FjG/s1600/United+Kingdom(Great+Britain).png' width='24'/></a></td>

<td><a class="google_translate" href='Javascript:void(0)' onclick="window.open(&quot;http://www.google.com/translate?u=&quot;+encodeURIComponent(location.href)+&quot;&amp;langpair=auto%7Cde&amp;hl=en&amp;ie=UTF8&quot;); return false;"><img alt="German" border="0" align="absbottom" title="German" height="24" src="https://blogger.googleusercontent.com/img/b/R29vZ2xl/AVvXsEik0CuWBcIWZ0_ncHidh27Z1Bq3xZYwDLgR8FqQ_-krMDJ0AYNykhQUQEvQrliC8H6jB6tmOAo5MrOKbVDpXDQB7HNLg1zfyPeN8lbn9fgNzZ5uig1yqyh5OJ80sWlg8YtgSfrukhjSlDtB/s1600/Germany.png" width="24"/></a></td>

<td><a class="google_translate" href='Javascript:void(0)' onclick='window.open(&quot;http://www.google.com/translate?u=&quot;+encodeURIComponent(location.href)+&quot;&amp;langpair=auto%7Cfr&amp;hl=en&amp;ie=UTF8&quot;); return false;' rel='nofollow' title='French'><img align='absbottom' alt='French' border='0' height='24' src='https://blogger.googleusercontent.com/img/b/R29vZ2xl/AVvXsEhyC0yvqQP3pZ43VclZ_nh0bPIqt3j660RgKdFaNro7Rqb0Hp12jRbj8Qm6ZUfNFSlsvbU7ZzAtp5JdTgQJvIO1Iw086Ukp9WwgvmV_YPTOmyEsDLLSpUTbacVCjceWam5aZQcp7Ni05Gjv/s1600/France.png' width='24'/></a></td>

<td><a class="google_translate" href='Javascript:void(0)' onclick='window.open(&quot;http://www.google.com/translate?u=&quot;+encodeURIComponent(location.href)+&quot;&amp;langpair=auto%7Car&amp;hl=en&amp;ie=UTF8&quot;); return false;' rel='nofollow' title='Arabic'><img align='absbottom' alt='Arabic' border='0' height='24' src='https://blogger.googleusercontent.com/img/b/R29vZ2xl/AVvXsEgJAJbamQEy39fjXjYw4SHq37KdnH0oqULuI-Vp7pxGVJhgDKimRzSze77ZiGchYEKr4Uatpj432pMI_ohQFd4b8FOYwVfPTCSm0ScLZAT_cTUXNeCTsHhJ7ZPwge7R0-TypHRBPQkmgvwf/s1600/Saudi+Arabia.png' width='24'/></a></td>

<td><a class="google_translate" href='Javascript:void(0)' onclick='window.open(&quot;http://www.google.com/translate?u=&quot;+encodeURIComponent(location.href)+&quot;&amp;langpair=auto%7Czh-cn&amp;hl=en&amp;ie=UTF8&quot;); return false;' rel='nofollow' title='Chinese Simplified'><img align='absbottom' alt='Chinese Simplified' border='0' height='24' src='https://blogger.googleusercontent.com/img/b/R29vZ2xl/AVvXsEituwsLgueAl6HYn_nwBewnpJ84sVTWJDxQDivvjpPd1hUBGQQbyUXnTXZs6Q_RGLQjR_9j-xRoRieToNnt4y0US9Qu4H0GtwlK0pkTvGzpN3PDtFEtO0C8GZbUsZ07jIcHtpEh-1U6rgog/s1600/China.png' width='24'/></a></td>

</tr>
</table>
</div>
Finally, change what is in blue with the URLs of your Facebook and Twitter profiles.
If you want to add more items, such as a counter, links, etc.. add a line like this just before the </tr> tag:
<td>Add here the extra content</td>
Add the content where is indicated and that's it.

As you can see, it is not necessary to depend on external sites to have a toolbar, from now on you can have a customized toolbar on your Blogger blog.
[Read more]

Advanced Random posts widget for Blogger with image thumbnails and snippets

Posted On // Leave a Comment
When your blog has too many posts, visitors don't always have the time or desire to go through all the posts written there in order to make an idea of the blog's content. Thus, a random posts widget that will allow visitors to find content more easily could be really useful. This tutorial will show you how to add a random posts widget to display a list of posts in a random order with thumbnails and excerpts.


Check out the right sidebar to see a demo.

Steps to Show Random Posts with Thumbnails and Posts Summary in Blogger


Step 1. Login to your blogger account, select your blog and go to Layout.

Step 2. Add new widget by clicking on the Add a gadget link and select Html/JavaScript from the popup window.
html javascript widget, blogger gadgets

Step 3. After adding the Html/Javascript you need to grab the following code with styles attached.
<style>
#random-posts img{border-radius: 10px;float:left;margin-right:5px;
width:75px;height:75px;background-color: #F5F5F5;padding: 3px;transition: all 0.2s linear 0s;}
#random-posts img:hover{opacity: 0.6;}
ul#random-posts {list-style-type: none;padding: 0px;}
#random-posts a {font-size: 12px;text-transform:uppercase; padding: 0px auto 5px;}
#random-posts a:hover {text-decoration: none;}
.rp-snippet {font-size: 11px;background: none; padding: 5px; margin-right: 8px;}
#random-posts span {}
#random-posts li {margin-bottom: 10px;border-bottom: 1px solid #EEEEEE; padding: 4px;}
</style>
<ul id='random-posts'>
<script type='text/javaScript'>
var rdp_numposts=5;
var rdp_snippet_length=110;
var rdp_info='yes';
var rdp_comment='Comments';
var rdp_disable='Comments Disabled';
var rdp_current=[];var rdp_total_posts=0;var rdp_current=new Array(rdp_numposts);function totalposts(json){rdp_total_posts=json.feed.openSearch$totalResults.$t}document.write('<script type=\"text/javascript\" src=\"/feeds/posts/default?alt=json-in-script&max-results=0&callback=totalposts\"><\/script>');function getvalue(){for(var i=0;i<rdp_numposts;i++){var found=false;var rndValue=get_random();for(var j=0;j<rdp_current.length;j++){if(rdp_current[j]==rndValue){found=true;break}};if(found){i--}else{rdp_current[i]=rndValue}}};function get_random(){var ranNum=1+Math.round(Math.random()*(rdp_total_posts-1));return ranNum};
</script>
<script type='text/javaScript'> 
function random_posts(json){for(var i=0;i<rdp_numposts;i++){var entry=json.feed.entry[i];var rdp_posttitle=entry.title.$t;if('content'in entry){var rdp_get_snippet=entry.content.$t}else{if('summary'in entry){var rdp_get_snippet=entry.summary.$t}else{var rdp_get_snippet="";}};rdp_get_snippet=rdp_get_snippet.replace(/<[^>]*>/g,"");if(rdp_get_snippet.length<rdp_snippet_length){var rdp_snippet=rdp_get_snippet}else{rdp_get_snippet=rdp_get_snippet.substring(0,rdp_snippet_length);var space=rdp_get_snippet.lastIndexOf(" ");rdp_snippet=rdp_get_snippet.substring(0,space)+"&#133;";};for(var j=0;j<entry.link.length;j++){if('thr$total'in entry){var rdp_commentsNum=entry.thr$total.$t+' '+rdp_comment}else{rdp_commentsNum=rdp_disable};if(entry.link[j].rel=='alternate'){var rdp_posturl=entry.link[j].href;var rdp_postdate=entry.published.$t;if('media$thumbnail'in entry){var rdp_thumb=entry.media$thumbnail.url}else{rdp_thumb="https://blogger.googleusercontent.com/img/b/R29vZ2xl/AVvXsEh3BQHAMZ1-5Mc7R2TO9zqOgv8fd9lO9XVhZ_-9UmPS4AywScswb04eGb4prdvX7CyBD9TlWibIddqolS5Yg-e4-as0b5YNj8dfRwQvolhbPB0H7AZMhucLBaGqhtwZqbbWRipRo240WeA/s1600/no_thumb.png"}}};document.write('<li>');document.write('<a href="'+rdp_posturl+'" rel="nofollow"><img alt="'+rdp_posttitle+'" src="'+rdp_thumb+'"/></a>');document.write('<div><a href="'+rdp_posturl+'" rel="nofollow" title="'+rdp_snippet+'">'+rdp_posttitle+'</a></div>');if(rdp_info=='yes'){document.write('<span><div  class="rp-info">'+rdp_postdate.substring(8,10)+'/'+rdp_postdate.substring(5,7)+'/'+rdp_postdate.substring(0,4)+' - '+rdp_commentsNum)+'</div></span>'};document.write('<br/><div class="rp-snippet">'+rdp_snippet+'</div><div style="clear:both"></div></li>')}};getvalue();for(var i=0;i<rdp_numposts;i++){document.write('<script type=\"text/javascript\" src=\"/feeds/posts/default?alt=json-in-script&start-index='+rdp_current[i]+'&max-results=1&callback=random_posts\"><\/script>')};
</script>
</ul>
Step 4. Just paste this in the widget area and give widget the title of "Random Posts".

Random Posts Options

- Thumbnail dimensions: to change the size of the thumbnails in pixels, replace the 75px value.
- Summary length: you can control the the length of the summary (in characters) by changing the 110 value from var rdp_snippet_length=110;
- Post info: if you want to hide the post date and comment count change 'yes' from var rdp_info='yes'; to 'no';
- Font Size for Posts Titles and Summary: to modify the font size for the post snippet modify the 11px value and for the posts title, the 12px value;

Step 5. Click on the Save button and you're done! Your sidebar will display a random posts widget on each of your blog pages.
[Read more]

How to Increase Thumbnail Resolution on Blogger

Posted On // Leave a Comment
When we add a widget on Blogger, the thumbnails will keep a default size of 72 x 72px which might not look good if we try to make them bigger using only CSS. However, with a bit of JavaScript we'll be able to replace the thumbnail with the same image of higher resolution and this way, larger images will no longer appear blurry.

In this tutorial we will see how we can replace the default thumbnail size of the popular posts widget but we can apply this trick on any of the blog widgets.

See a demo HERE.

Changing the Thumbnail Size for the Popular Posts Widget


Step 1. First, let's add the Popular posts gadget by going to Layout > click on the Add a gadget link and select Popular Posts from the popup window.

Step 2. Go to Template > click on the Edit HTML button > click anywhere inside the code area and press CTRL + F keys to open the Blogger search box

Step 3. Type or paste the </head> tag inside the search box then hit Enter to find it. After you found the </head> tag, add this CSS above it:
<style type='text/css'>
.PopularPosts .item-thumbnail a {
clip: auto;
display: block;
height: 130px;
margin: 0 0px 5px;
overflow: hidden;
width: 210px;
border: 2px solid #EEEEEE;
border-radius: 20px;
}
.PopularPosts .item-thumbnail img {
position: relative;
top: -30px;
transition:all .2s linear;
 -o-transition:all .5s linear;
-moz-transition:all .2s linear;
-webkit-transition:all .2s linear;
}
.PopularPosts .item-thumbnail img:hover{
opacity:.6;
filter:alpha(opacity=60)
}
.PopularPosts .widget-content ul li {
background: #F9F9F9;
border: 2px solid #EEEEEE;
border-radius: 10px;
box-shadow: 0 4px 10px #EEEEEE;
color: #555555;
padding: 10px;
margin-bottom: 5px;
}
.PopularPosts .item-title {
font: 14px Cambria,Georgia, sans-serif;
color: #2288BB;
font-weight: bold;
text-transform: uppercase;
text-align: center;
}
.PopularPosts .item-snippet {
display: none;
}
.widget .widget-item-control a img {
height: 18px;
width: 18px;
}
</style>
Step 4. Search for the </body> tag and just above it, add this script:
<script type='text/javascript'>                  
function changeThumbSize(id,size){
var blogGadget = document.getElementById(id);
var replacement = blogGadget.innerHTML;
blogGadget.innerHTML = replacement.replace(/s72-c/g,"s"+size+"-c");
var thumbnails = blogGadget.getElementsByTagName("img");
for(var i=0;i&lt;thumbnails.length;i++){
thumbnails[i].width = size;
thumbnails[i].height = size;
}
}
changeThumbSize("PopularPosts1",210);                  
</script>
What I highlighted in red is the widget ID for the Popular Posts gadget - to change the thumbnails size for any of your blog widgets, first you need to find the gadget/widge ID and then add a line below this part:
changeThumbSize("PopularPosts1",210);
changeThumbSize("widget-ID-HERE",210);
 ... and replace widget-ID-HERE text with the ID of that widget/gadget.

Note: you'll not be able to see the changes if the widget has a class selector - for this you will need to change class with id and replace the dot "." symbol with "#" within the CSS...

Step 5. Finally, Save the Template. 

If you need more help, please leave a comment below.
[Read more]

How to Add an Admin Control Panel in Blogger

Posted On // Leave a Comment
A while ago I've posted some tutorials on how you can remove the Blogger Navbar or add a Peek A Boo Effect so that it would show only when we mouse over on top of our page.

However, customizing or removing the Blogger Navbar also has its downside because the admin links for "New post", "Customize" and "Log Out" will be no longer visible and navigating through the blog functions could be really frustrating sometimes. When the navbar is visible, blog administrators can easily create a new post or customize their template with just one click; however, when the navbar is hidden, many more clicks are required to access the Blogger dashboard panel again.

So in this tutorial, we'll see how to add an "Admin Control Panel" menu with many cool additions such as:

- access to the Blogger's Homepage
- create a New Page or Post
- view all your posts
- read your comments
- access the Blog's layout to add or rearrange gadgets
- edit the HTML of your Template
- refresh current page or post
- open a new tab with your blog's homepage
- access the blog' settings
- view your stats
- ...and finally, log out

We will put all these options on the top of your page as a menu and we will make it visible only to the administrator of the blog, so our blog visitors will not be able to see it.

The result will be something like this:

admin control panel for blogger

Getting the Blog ID 

The first thing we need to do is get the ID of our blog by clicking on any option from our Blog Dashboard, for example Settings. Once we have clicked there, take a look at the address bar in your browser:

blogger id number

Within the URL you will notice a string like this:
blogID=XXXXXXXXX
Where XXXXXXXXX is the unique identifier (ID) for your blog.

Copy the ID for the blog you wish to work with so we can add this in the links for your admin control panel.

Adding the admin control panel to Blogger template


The Admin Control Panel will only be visible when the blog author is logged in. It is invisible to blog readers, similar to the Edit post/widget pencil icons which are only visible to you while you are logged in.

To add the control panel to your Blogger template, follow the steps below:

Step 1. Go to Template and click on the Edit HTML button:


Step 2. Click anywhere inside the code area and press the CTRL + F keys to open the Blogger' search box

Step 3. Paste this line inside the search box then hit Enter to find it:
<body expr:class='&quot;loading&quot; + data:blog.mobileClass'>
Note: if you can't find this line, try to find the <body> tag.

Step 4. Just below this line, add the following code:
<span class='item-control blog-admin'>
<style>
.control-panel ul{z-index: 20; position: absolute; margin: 0px auto; background-color: #F6F6F6; width: 100%; }
.control-panel ul li{display: inline-block; float: left; padding: 7px 0px;}
.control-panel ul li a {color:#686868;padding: 7px 15px;border-right: 1px solid #E3E3E3;font-weight: bold;font-size: 13px;}
.control-panel a:hover {text-decoration:none; color:#FC8F44;}
</style>
<div class='control-panel'>
<ul>
<li><a href='http://www.blogger.com/home'>My Blogs</a></li>
<li><a href='http://www.blogger.com/blogger.g?blogID=XXXXXXXXXXXXX#editor/src=sidebar'>New Post</a></li>
<li><a href='http://www.blogger.com/blogger.g?blogID=XXXXXXXXXXXXX#editor/target=page'>New Page</a></li>
<li><a href='http://www.blogger.com/blogger.g?blogID=XXXXXXXXXXXXX#posts'>All Posts</a></li>
<li><a href='http://www.blogger.com/blogger.g?blogID=XXXXXXXXXXXXX#comments'>Comments</a></li>
<li><a href='http://www.blogger.com/blogger.g?blogID=XXXXXXXXXXXXX#pageelements'>Layout</a></li>
<li><a href='http://www.blogger.com/blogger.g?blogID=XXXXXXXXXXXXX#templatehtml'>Edit HTML</a></li>
<li><a href='#' onclick='location.reload(true); return false;'>Refresh</a></li>
<li><a href='/' target='_blank'>New Tab</a></li>
<li><a href='http://www.blogger.com/blogger.g?blogID=XXXXXXXXXXXXX#basicsettings'>Settings</a></li>
<li><a href='http://www.blogger.com/blogger.g?blogID=XXXXXXXXXXXXX#overviewstats'>Stats</a></li>
<li><a href='http://www.blogger.com/logout.g'>Logout</a></li>
</ul>
</div>
</span>
Change XXXXXXXXXXXXX with your unique Blog ID previously copied, and be careful not to delete anything, like quote or any other character.

Step 4. Click on the Save template button to save the changes.

Now take a look at your blog. While you are logged in to Blogger, you should notice your control panel appear on top of your blog. Enjoy!

With this admin control panel for Blogger you can easily access the functions of the blog and you will not have to always open your blog page and the Blogger homepage at the same time.
[Read more]

Create a CSS Image Slider with Thumbnails for Blogger

Posted On // Leave a Comment
Image galleries/sliders are particularly useful for photoblogs, but they could also serve those who occasionally need a gadget like this. As we saw in a previous tutorial, on the top of the block we had some small thumbnails which were enlarged at the bottom each time an image was selected. The difference is that there we had to click the thumbnail in order to show a larger version and that was acquired with JavaScript.

This time will use only hover and CSS.

DEMO

How to Add A CSS Image Slider with Thumbnails to Blogger


Step 1. Log in to your Blogger Dashboard and go to Template > Edit HTML


Step 2. Click anywhere inside the code area and press the CTRL + F keys to open the Blogger search box


Step 3. Paste the </head> tag inside the search box and hit Enter.

Step 4. Just above the </head> tag, add this code:
<style type='text/css'>
.image-container {
position: relative;
width: 640px;
height: 530px;
margin: 0 auto;
text-align:center;
overflow: hidden;
}
.image-container a {
display: inline;
text-decoration: none;
}
/* Mini-thumbnails style */
.mini-thumbnail {
width: 18%; /* mini-thumbnails width */
margin:1px;
opacity: 1;
-webkit-box-shadow: 0px 0px 3px rgba(0,0,0,0.5);
-moz-box-shadow: 0px 0px 3px rgba(0,0,0,0.5);
box-shadow: 0px 0px 3px rgba(0,0,0,0.5);
}
/* Style for the main thumbnail */
.large-thumbnail {
position: absolute;
width: 100%;
top: 800px;
margin:0 auto;
text-align: center;
display: block;
-webkit-transition: top 1s ease;
-moz-transition: top 1s ease;
-o-transition: top 1s ease;
-ms-transition: top 1s ease;
transition: top 1s ease;
}
.feature {
top: 110px;
width: 100%;
opacity: .3;
}
/* style for the selected mini-thumbnail */
a:hover .mini-thumbnail {
opacity: .5;
-webkit-box-shadow: 0px 0px 10px rgba(0,0,0,0.5);
-moz-box-shadow: 0px 0px 10px rgba(0,0,0,0.5);
box-shadow: 0px 0px 10px rgba(0,0,0,0.5);
}
/* transition effects for the selected image */
a:hover .large-thumbnail {
top: 110px;
width: 100%;
z-index:3;
opacity: 1;
-webkit-transition: top 1s ease;
-moz-transition: top 1s ease;
-o-transition: top 1s ease;
-ms-transition: top 1s ease;
transition: top 1s ease;
}
</style>
Here we set a specific height (530px) and width (640px) so that we can slide an image out of the bounds of the container and have it be hidden (overflow:hidden);
The absolute positioning on the larger thumbnails (.large-thumbnail) pulls them out and places them specifically in the spot that we've chosen using a value of 800px for the top property;
The mini-thumbnails which are actually a second image remain all the time above in a static position and are altered only slightly in terms of style for distinguishing the active (a:hover .mini-thumbnail) on mouse over.
Step 5. Save the changes by clicking on the Save template button.

And finally, we need to add the HTML code.

Step 6. Paste the below HTML structure to where you want to display the gallery by going either to Layout and add a new gadget (click on the Add a gadget link and choose HTML/JavaScript), or inside a post or page within the HTML section.
<div class="image-container">
<a href="javascript:void(0);">
<img class="mini-thumbnail" src="MINI-THUMB-URL1" />
<img class="large-thumbnail" src="LARGE-THUMB-URL1" />
</a>
<a href="javascript:void(0);">
<img class="mini-thumbnail" src="MINI-THUMB-URL2" />
<img class="large-thumbnail" src="LARGE-THUMB-URL2" />
</a>
<a href="javascript:void(0);">
<img class="mini-thumbnail" src="MINI-THUMB-URL3" />
<img class="large-thumbnail" src="LARGE-THUMB-URL3" />
</a>
<a href="javascript:void(0);">
<img class="mini-thumbnail" src="MINI-THUMB-URL4" />
<img class="large-thumbnail" src="LARGE-THUMB-URL4" />
</a>
<a href="javascript:void(0);">
<img class="mini-thumbnail" src="MINI-THUMB-URL5" />
<img class="large-thumbnail" src="LARGE-THUMB-URL5" />
</a>
<a href="javascript:void(0);">
<img class="large-thumbnail feature" src="LARGE-THUMB-URL1" />
</a>
</div>
In this example we left the link empty (javascript:void(0);) but you can add one if you want - just replace javascript:void(0); with the url of your page/post.
To add pics inside the image slider just replace MINI-THUMB-URL and LARGE-THUMB-URL texts with the URL of your images. Note: The last LARGE-THUMB-URL1 should be replaced with the URL of the default image that will appear on your slider. 

If you need more information on how to get the URL of images, I recommend you reading this tutorial:
How to Upload Images and Get the URL

Finally, save your widget/gadget or publish your page/post and that's it! Enjoy :)
[Read more]

How to add a thumbnail image/photo gallery in Blogger

Posted On // Leave a Comment
For those who would like to show pictures in an image gallery, here's a gallery made with JavaScript and CSS that includes some thumbnails with which you will be able to pick different images on mouse click.

With the help of CSS, we can then place the <img> element to make it appear at the same position for each thumb and we'll be able to style the thumbnails as small blocks with a defined height/width. The script will add a click-event for each <li> object that changes it's child's <img> visibility and assigns an "active" class name to the <li>.


How to Add Image Gallery with Thumbnails to Blogger


Step 1. Log in to your Blogger dashboard, go to Template > Edit HTML


Step 2. Click anywhere inside the code area and press the CTRL + F keys to open the Blogger search box

Step 3. Inside the search box type </head> and hit enter to find it.

Step 4. Now pick one of the styles below that you like the most, then copy the code associated with it:

Style 1

<style type='text/css'>
#image-gallery {display: none;}
  #jquery-gallery {padding:0;margin:0;list-style: none; width: 500px;}
  #jquery-gallery li {width:84px; height: 80px;background-size: 100%;-webkit-background-size: cover;-moz-background-size: cover; -o-background-size: cover;background-size: cover;margin-right: 10px; border: 3px solid #fff; outline: 1px solid #E3E3E3; margin-bottom: 10px;opacity: .5; filter:alpha(opacity=50); float: left; display: block; }
#jquery-gallery li img { position: absolute; top: 100px; left: 0px; display: none;}
  #jquery-gallery li.active img { display: block; border: 3px solid #fff; outline: 1px solid #E3E3E3; width:490px; max-height: 375px;}
  #jquery-gallery li.active, #jquery-gallery li:hover { outline-color: #DFDFDF; opacity: .99;filter:alpha(opacity=99);}
</style>

Style 2

<style type='text/css'>
#image-gallery { display: none; }
#jquery-gallery {padding:0;margin:0;list-style: none; width: 200px; }
#jquery-gallery li {background-size: 100%;-webkit-background-size: cover;-moz-background-size: cover; -o-background-size: cover;background-size: cover;margin-right: 10px; width: 80px; height: 80px; border: 3px solid #fff; outline: 1px solid #ddd; margin-right: 10px; margin-bottom: 10px; opacity: .5;filter:alpha(opacity=50); float: left; display: block; }
#jquery-gallery li img { position: absolute; top: 0px; left: 200px; display: none; }
#jquery-gallery li.active img { display: block; width:370px; border: 3px solid #fff; outline: 1px solid #E3E3E3; }
#jquery-gallery li.active, #jquery-gallery li:hover { outline-color: #bbb; opacity: .99;filter:alpha(opacity=99);}
</style>
Note: The display: none; of the first ID (#image-gallery) is to prevent images appear with their actual size before they go inside the gallery container, this is while loading the code. In #jquery-gallery we have the width of the container for the thumbnails (200px), so that they display in two rows and for this we need to count the width of the thumbnail (80px) plus the margins between them. The left declaration of #jquery-gallery li img is to move the larger thumbnail that shows on mouse click so that it won't overlap with the smaller thumbnails.
Step 5. Paste the code that you copied earlier just above the </head> tag.

Step 6. Just above the same </head> tag, add this script:
<script type='text/javascript'>
//<![CDATA[
var gal = {
init : function() {
if (!document.getElementById || !document.createElement || !document.appendChild) return false;
if (document.getElementById('image-gallery')) document.getElementById('image-gallery').id = 'jquery-gallery';
var li = document.getElementById('jquery-gallery').getElementsByTagName('li');
li[0].className = 'active';
for (i=0; i<li.length; i++) {
li[i].style.backgroundImage = 'url(' + li[i].getElementsByTagName('img')[0].src + ')';
li[i].title = li[i].getElementsByTagName('img')[0].alt;
gal.addEvent(li[i],'click',function() {
var im = document.getElementById('jquery-gallery').getElementsByTagName('li');
for (j=0; j<im.length; j++) {
im[j].className = '';
}
this.className = 'active';
});
}
},
addEvent : function(obj, type, fn) {
if (obj.addEventListener) {
obj.addEventListener(type, fn, false);
}
else if (obj.attachEvent) {
obj["e"+type+fn] = fn;
obj[type+fn] = function() { obj["e"+type+fn]( window.event ); }
obj.attachEvent("on"+type, obj[type+fn]);
}
}
}
gal.addEvent(window,'load', function() {
gal.init();
});
//]]>
</script>
Basically what this script does is to look if there is any ID named "image-gallery" and get the different list items that may exist within it. These elements will be displayed as thumbnails and a function will decide what to do when they are clicked. So, each time we click on a thumbnail, the "active" class will be assigned and the thumbnail should be visible in a larger container.

Step 7. Save the changes by clicking on the Save template button.

And finally, here's the HTML code. This is a normal list with the image-gallery ID, enclosed within a DIV with a relative position to avoid side effects of other pre-existing positions.

Step 8. Paste the below HTML to where you want to display the gallery by going either to Layout and adding a new gadget (click on the Add a gadget link and choose HTML/JavaScript), or inside a post or page within the HTML section.
<div style="position:relative;">
<ul id="image-gallery">
<li><img src="IMAGE-URL1" /></li>
<li><img src="IMAGE-URL2" /></li>
<li><img src="IMAGE-URL3" /></li>
<li><img src="IMAGE-URL4" /></li>
<li><img src="IMAGE-URL5" /></li>
</ul>
</div>
Note: if elements on your page overlap with this gallery, you might need to add the height declaration after the position: relative; The value of height depends on the size of your gallery.

Example:
<div style="position:relative; height: 500px;"> 
Change IMAGE-URL1 with the image URL. If you don't know how to get the address of an image, see this tutorial: How to Upload Images and Get the URL

In case you need to add links to your images, add this HTML structure instead:
<div style="position:relative;">
<ul id="image-gallery">
<li><a href="page-URL"><img src="IMAGE-URL1" /></a></li>
<li><a href="page-URL"><img src="IMAGE-URL2" /></a></li>
<li><a href="page-URL"><img src="IMAGE-URL3" /></a></li>
<li><a href="page-URL"><img src="IMAGE-URL4" /></a></li>
<li><a href="page-URL"><img src="IMAGE-URL5" /></a></li>
</ul>
</div>
Again, here you need to replace the page-URL text with the URL of your page/post.

Save your widget or page and you're done!
[Read more]

How to Create Magazine Style with Post Summaries and Thumbnails on Blogger

Posted On // Leave a Comment
The magazine or newspaper style templates are those that display the posts summaries in the homepage by stacking the columns on top of each other. This kind of templates is very popular nowadays, whether it is a news or technology blog, everyone needs a fresh magazine style layout for their blogs.

blogger tricks, blogger widgets, blogger templates
There are several ways to make posts appear this way. An option would be to use the Read more script to display a summary of the posts and add a conditional tag and a different style to the first post so that it will have a larger width than the older posts. So, in this tutorial I will show you how to create a magazine style for a Blogger Template. By following this tutorial, you can transform your boring and simple Blogger template to have an attractive and stylish magazine style layout.
To see a demo of it, please visit this blog

Adding the Magazine/Newspaper style to the Blogger Template

Step 1. Before anything please make a backup of your current template to make sure that you won't lose anything important - just log in on your Blogger Dashboard and go to Template, then click on the Backup/Restore button. After you've got a copy of the xml template, click on the Edit HTML button:

blogger edit html template

Step 2. Click anywhere inside the code area and search by using CTRL + F keys for this line:
<data:post.body/>
Note: You'll find it more than once, but stop to the second one in order to see the changes.

Step 3. Remove that line and instead it add this code:
<b:if cond='data:blog.pageType != &quot;item&quot;'>
<b:if cond='data:blog.pageType != &quot;static_page&quot;'>
 <span class='post-comment-link'><b:if cond='data:blog.pageType != &quot;item&quot;'><b:if cond='data:post.allowComments'><a class='comment-link' expr:href='data:post.addCommentUrl' expr:onclick='data:post.addCommentOnclick'><data:post.numComments/></a></b:if></b:if></span>
<div expr:id='&quot;summary&quot; + data:post.id'><data:post.body/></div>
  <script type='text/javascript'>createSummaryAndThumb(&quot;summary<data:post.id/>&quot;);</script>
<span class='readmorebutton' style='float:right'><a expr:href='data:post.url'>Read More &#187;</a></span></b:if></b:if>
<b:if cond='data:blog.pageType == &quot;item&quot;'><data:post.body/></b:if>
<b:if cond='data:blog.pageType == &quot;static_page&quot;'><data:post.body/></b:if>
Note: you can replace the Read More text, by changing the code in red

Step 4. Now find (CTRL + F) this line:
<b:include data='post' name='post'/>
Step 5. Remove this as well and instead of it add this:
<b:if cond='data:post.isFirstPost'>
<b:if cond='data:blog.homepageUrl == data:blog.url'>
<div id='first'>
<b:if cond='data:post.title'>
<h3 class='post-title entry-title'>
<b:if cond='data:post.link'>
<a expr:href='data:post.link'><data:post.title/></a>
<b:else/>
<b:if cond='data:post.url'>
<a expr:href='data:post.url'><data:post.title/></a>
<b:else/>
<data:post.title/>
</b:if>
</b:if>
</h3>
</b:if>
<div class='first-body'>

<b:if cond='data:blog.pageType != &quot;item&quot;'>
<b:if cond='data:blog.pageType != &quot;static_page&quot;'>
<div expr:id='&quot;summary1&quot; + data:post.id'><data:post.body/></div>
  <script type='text/javascript'>createSummaryAndThumb1(&quot;summary1<data:post.id/>&quot;);</script>
<span class='post-comment-link'><b:if cond='data:blog.pageType != &quot;item&quot;'><b:if cond='data:post.allowComments'><a class='comment-link' expr:href='data:post.addCommentUrl' expr:onclick='data:post.addCommentOnclick'><data:post.numComments/></a></b:if></b:if></span>
<span class='readmorebutton' style='float:right'><a expr:href='data:post.url'>Read More &#187;</a></span>
</b:if></b:if>
<b:if cond='data:blog.pageType == &quot;item&quot;'><data:post.body/></b:if>
<b:if cond='data:blog.pageType == &quot;static_page&quot;'><data:post.body/></b:if>

</div>
</div>
<b:else/>
<b:include data='post' name='post'/>
</b:if>
<b:else/>
<b:include data='post' name='post'/>
</b:if>
Note: you can change the Read More text here also, just replace the code in red with the text that you want to show.

Step 6. Now find the </head> tag and paste the following script before/above it:
<script type='text/javascript'>
posts_no_thumb_sum = 290;
posts_thumb_sum = 240;
img_thumb_height = 80;
img_thumb_width = 80;
first_no_thumb_sum = 600;
first_thumb_sum = 540;
img_thumb_height1 = 145;
img_thumb_width1 = 165;
</script>

<script type='text/javascript'>
//<![CDATA[
function removeHtmlTag(strx,chop){
if(strx.indexOf("<")!=-1)
{
var s = strx.split("<");
for(var i=0;i<s.length;i++){
if(s[i].indexOf(">")!=-1){
s[i] = s[i].substring(s[i].indexOf(">")+1,s[i].length);
}
}
strx = s.join("");
}
chop = (chop < strx.length-1) ? chop : strx.length-2;
while(strx.charAt(chop-1)!=' ' && strx.indexOf(' ',chop)!=-1) chop++;
strx = strx.substring(0,chop-1);
return strx+'...';
}

function createSummaryAndThumb(pID){
var div = document.getElementById(pID);
var imgtag = "";
var img = div.getElementsByTagName("img");
var summ = posts_no_thumb_sum;
if(img.length>=1) {
imgtag = '<span class="posts-thumb" style="float:left;"><img src="'+img[0].src+'" width="'+img_thumb_width+'px" height="'+img_thumb_height+'px"/></span>';
summ = posts_thumb_sum;
}

  var summary = imgtag + '<div>' + removeHtmlTag(div.innerHTML,summ) + '</div>';
div.innerHTML = summary;
}

function createSummaryAndThumb1(pID){
var div = document.getElementById(pID);
var imgtag = "";
var img = div.getElementsByTagName("img");
var summ = first_no_thumb_sum;
if(img.length>=1) {
imgtag = '<span class="first-post-thumb" style="float:left;"><img src="'+img[0].src+'" width="'+img_thumb_width1+'px" height="'+img_thumb_height1+'px"/></span>';
summ = first_thumb_sum;
}

var summary1 = imgtag + '<div>' + removeHtmlTag(div.innerHTML,summ) + '</div>';
div.innerHTML = summary1;
}

//]]>
</script>
Step 7. And below the script above add these CSS styles:
<b:if cond='data:blog.pageType != &quot;static_page&quot;'>
<b:if cond='data:blog.pageType != &quot;item&quot;'>
<style type='text/css'>
.first-post-thumb {
margin-right: 10px;
border: 1px solid #fff;
-webkit-box-shadow: 2px 2px 5px rgba(0,0,0,0.3);
-moz-box-shadow: 2px 2px 5px rgba(0,0,0,0.3);
box-shadow: 2px 2px 5px rgba(0,0,0,0.3);
}
.post-body img, .post-body .tr-caption-container, .Profile img, .Image img, .BlogList .item-thumbnail img {
background: none;
border: none;
box-shadow: none;
padding: 0;
}
#first { /* Styles for the First Post Container */
width: auto;
height: 250px;
float: left;
margin-bottom:10px;
background-color: #F4F4F4; /* background color for the first post */
border: 1px solid #E5E5E5; /* border for the first post */
}
.first-body { /* Style for the First Post summary */
color: #545454;
font-size: 13px;
text-align: justify;
padding: 5px 10px;
line-height:1.5em;
}
#first h3 a, #first h3 a:visited { /* Style for the First Post Title*/
border-bottom: 2px solid #DFDFDF;
color: #515151;
font-size: 20px;
display:block;
margin: 10px auto;
width: 95%;
font-size: 20px;
padding: 0px 0px 4px 0px;
font-weight: bold;
text-align:left;
line-height: 1.4em;
background: none;
}
#first h3 a:hover { /* Color on mouseover for the First Post Title */
color: #1061A1;
}
.post { /* Styles for the small posts container */
float:left;
margin-right: 10px;
width: 290px;
height: 210px;
padding: 0px 5px 5px 5px;
background: #FCFCFC; /* background color for the small posts */
border: 1px solid #E5E5E5; /* border for the small posts */
overflow: hidden;
}
.posts-thumb { /* Style for the small posts thumbnails */
margin-right: 5px;
background: #ddd;
padding: 3px 3px 0px;
border: 1px solid #C4C4C4;
border-radius: 4px;
}
h3.post-title a{ /* Style for the small posts titles */
font-size: 14px;
color: #747474;
background-color: #F4F4F4; /* Background color for the small posts titles */
width: 95%;
font-weight: bold;
font-family: 'Arial Narrow', sans-serif;
padding: 5px;
}
h3.post-title a:hover { /* Color on mouseover for the Small Posts Title */
color: #005B77;
}
h2.date-header { /* Hide the post date */
display:none;
}
.post-footer { display: none;}
h3.post-title {margin: 0px;}
.readmorebutton { margin-top: 5px;}

.readmorebutton a { /* Styles for the Read More link */
color: #767676;
border: 1px solid #E1E1E1;
background: #EAEAEA; /* Background color for the Read More link */
text-decoration:none;
padding: 3px 5px;
font-weight: bold;
font-size: 11px;
}
.post-comment-link { /* Style for the comment bubble of posts below */
float: right;
display: inline;
margin: -35px 0px;
border: 1px solid #E1E1E1; /* border for the comment bubble */
background: #EAEAEA; /* background color for the comment bubble */
font-size: 11px;
position: relative;
-webkit-border-radius: 100px;
-moz-border-radius: 100px;
border-radius: 100px;
}
#first .post-comment-link { /* Style for the comment bubble of first post */
margin: -200px 10px;
}
.post-comment-link a{ /* Link color for the comments bubble*/
padding: 10px;
color: #6A6A6A;
text-decoration:none;
font-weight: bold;
}
#blog-pager {clear:both;}
</style>
</b:if>
</b:if>
Customization:

1) At the beginning of the script from step 6, we have this section:
posts_no_thumb_sum = 290;
posts_thumb_sum = 240;
img_thumb_height = 80;
img_thumb_width = 80;
first_no_thumb_sum = 600;
first_thumb_sum = 540;
img_thumb_height1 = 145;
img_thumb_width1 = 165;
- The first number is the number of characters that will show for the small posts when there will be no image available
- The second number will be the number of characters that will show when the small posts will have an image
- The third and the forth line is for the height and width of the small posts thumbnails (images).
- The same goes for what is in blue, but this configuration affects only the first post. Since the first post is wider, it may contain a larger number of characters and we'll be able to make the thumbnail size larger.

2) And finally, we have the CSS styles. That last thing we added is a code that determines how the posts are going to look on the homepage (and archive pages as well, except for the first post).

To change the width an height, respectively the size for the first post container, look for these lines:
width: auto;
height: 250px;
Underneath the first post are the values for the other posts, just look for this part:
width: 290px;
height: 210px;
So, width is the width and height is the height of the other posts container. There you will have to experiment a bit with the sizes in order to make them appear correctly.

Finally set the number of posts to show on the homepage so that there will never be any empty space. Go to Settings >> Posts and comments >> Show at most and select the number of posts that you want to appear.
[Read more]

Popular Posts Widget for Christmas

Posted On // Leave a Comment
The Christmas countdown has begun and while homes are decorated with colorful lights and the sweet smell of pine trees and the stores are playing Jingle Bells, there's no reason why we wouldn't decorate your Blogger blog with some ringing christmas bells right next to the Blogger Popular Posts widget!
So today I was playing around a bit with CSS and I was thinking that it would be nice to add some fresh styles to the Popular Posts widget so that it would look just ready for the forthcoming Christmas holiday.

popular posts widget, blogger gadgets

Demo: Click here to see how it looks like.

How to Add the Popular Posts Widget with Ringing Christmas Bells to Blogger


Step 1. Log in to your Blogger Dashboard, go to Template and click the Edit HTML button


Step 2. Click anywhere inside the code area and press the CTRL + F keys, then search for this tag:
</head>
Step 3. Just above the </head> tag, add the following:
<style>
#PopularPosts1 .item-thumbnail:before{
display: block;
content: url('https://blogger.googleusercontent.com/img/b/R29vZ2xl/AVvXsEgcS9s4ccY8-TOg6edSK5QVugNuPycLgZXDMmU1ZJombUVqr0C5nrOy-5dTkn8_v0DZlBeXViXxWzkZgVkcvLl-8ouxFmbSOA87NLZv691XanRau_qqymIve-61LFTJWORhBC1BBXBb3KlM/s1600/bells.png');
margin-left: -15px;
margin-top: -5px;
z-index: 2;
position: absolute;
}
#PopularPosts1 .item-thumbnail img{
float:left;
margin:5px;
padding: 2px;
border: 6px solid #FED74C;
height: 72px;
width: 92px;
position: relative;
background: #F11C25;
-webkit-box-shadow: 2px 2px 5px rgba(0,0,0,0.3);
-moz-box-shadow: 2px 2px 5px rgba(0,0,0,0.3);
box-shadow: 2px 2px 5px rgba(0,0,0,0.3);
transition: opacity 1s ease;
}
#PopularPosts1 ul li:nth-child(odd){
  -ms-transform:rotate(20deg); /* IE 9 */
  -moz-transform:rotate(20deg); /* Firefox */
  -webkit-transform:rotate(20deg); /* Safari and Chrome */
  -o-transform:rotate(20deg); /* Opera */
 -webkit-transition: all 0.2s ease-in-out;
-moz-transition: all 0.2s ease-in-out;
-o-transition: all 0.2s ease-in-out;
transition: all 0.2s ease-in-out;
}
#PopularPosts1 ul li:nth-child(even){
  -ms-transform:rotate(-40deg); /* IE 9 */
  -moz-transform:rotate(-40deg); /* Firefox */
  -webkit-transform:rotate(-40deg); /* Safari and Chrome */
  -o-transform:rotate(-40deg); /* Opera */
 -webkit-transition: all 0.2s ease-in-out;
-moz-transition: all 0.2s ease-in-out;
-o-transition: all 0.2s ease-in-out;
transition: all 0.2s ease-in-out;
}
#PopularPosts1 ul li:nth-child(odd):hover{
  -ms-transform:rotate(0deg); /* IE 9 */
  -moz-transform:rotate(0deg); /* Firefox */
  -webkit-transform:rotate(0deg); /* Safari and Chrome */
  -o-transform:rotate(0deg); /* Opera */
}
#PopularPosts1 ul li:nth-child(even):hover{
  -ms-transform:rotate(0deg); /* IE 9 */
  -moz-transform:rotate(0deg); /* Firefox */
  -webkit-transform:rotate(0deg); /* Safari and Chrome */
  -o-transform:rotate(0deg); /* Opera */
}
#PopularPosts1 ul li{
display: inline-block;
float: left;}
#PopularPosts1 .item-thumbnail{
width: 70px;
}
#PopularPosts1 li{
margin-right: 15px;
}
#PopularPosts1 .item-snippet, .item-title{
display: none;
} </style>
<script src="http://helplogger.googlecode.com/svn/trunk/sounds.js"/>
Step 4. Now search for the following line (you'll find it twice but you should stop at the second one):
Note: if you don't want any ringing sound on mouseover, skip this step.
<a expr:href='data:post.href' target='_blank'>
And replace it with this:
<a onmouseover='mouseoversound.playclip()' expr:href='data:post.href' target='_blank'>
Step 5. Click on the Save Template button to save the changes.

And you're done! Enjoy :)
If you've missed it, here's a tutorial on how to add falling snowflakes in the background of a Blogger blog

Happy Holidays!
[Read more]
Click to go to top